
This Fluffy Crustless Cheesecake is simply the best, and it happens to be gluten-free! This New York-style cheesecake has fans all over the world! It's one of the most popular recipes on Cooking with Mamma C.
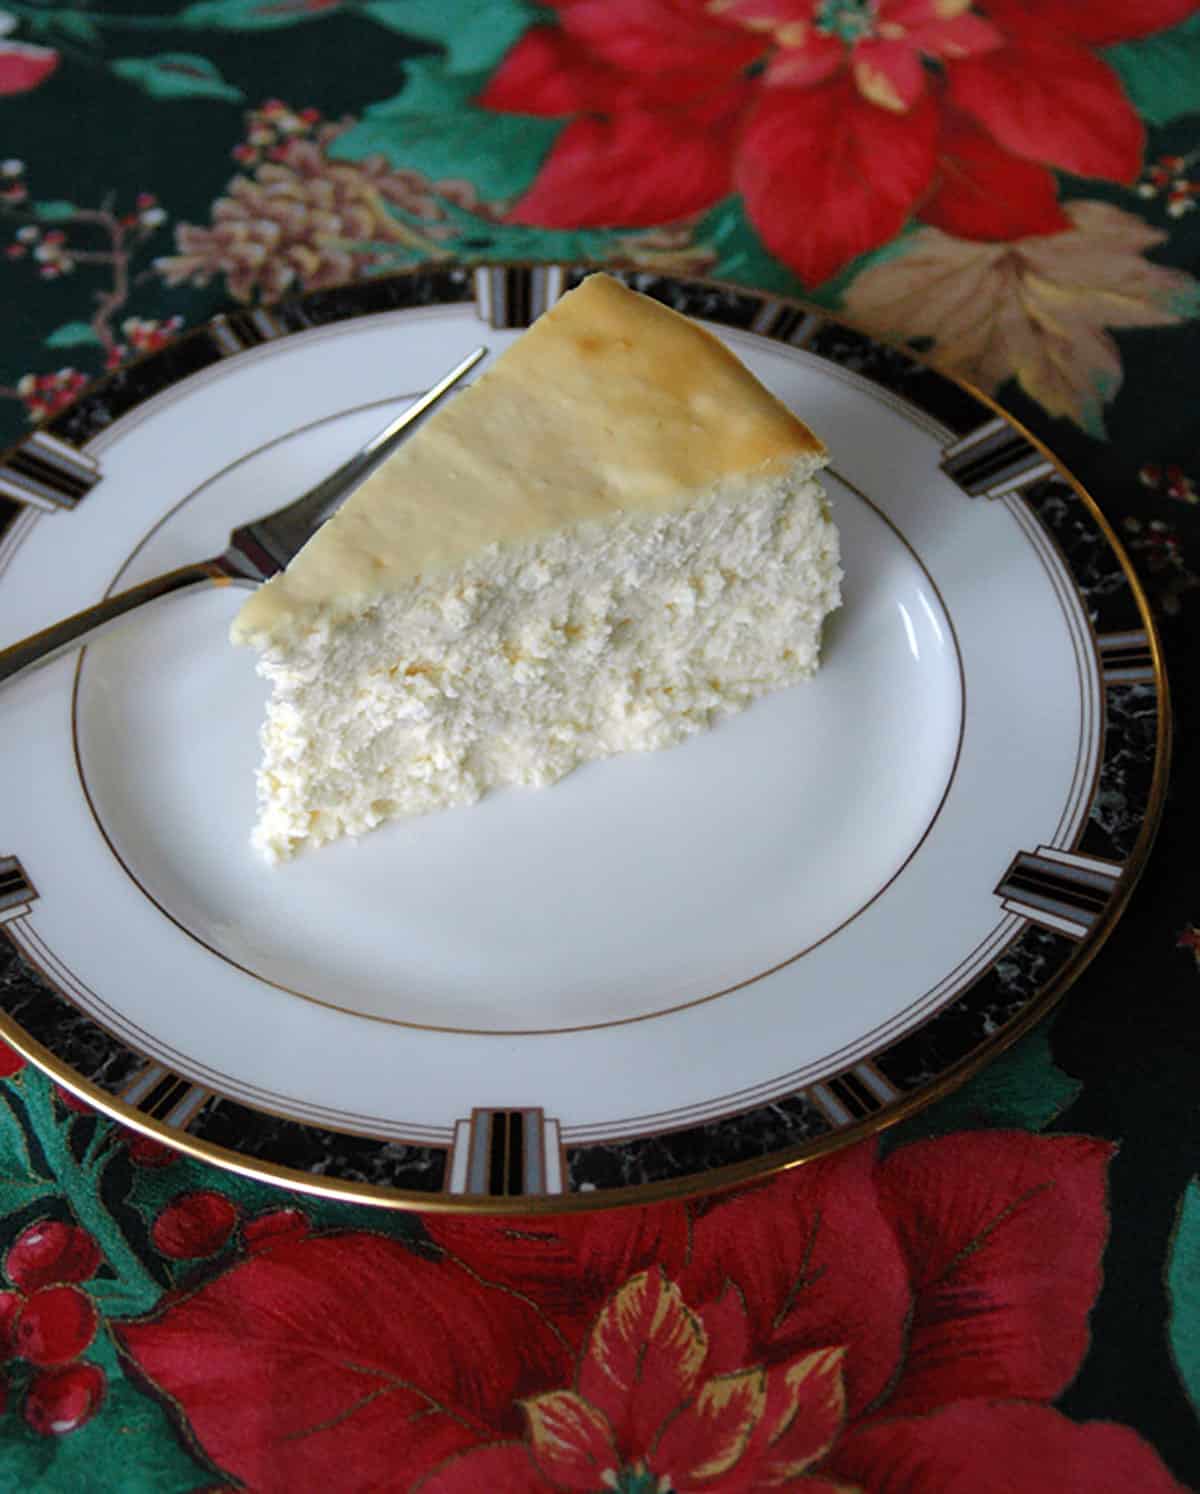
This Fluffy Crustless Cheesecake is the best cheesecake I've ever tasted! And it's become a holiday tradition for many Cooking with Mamma C visitors, ever since I posted the recipe in 2014.
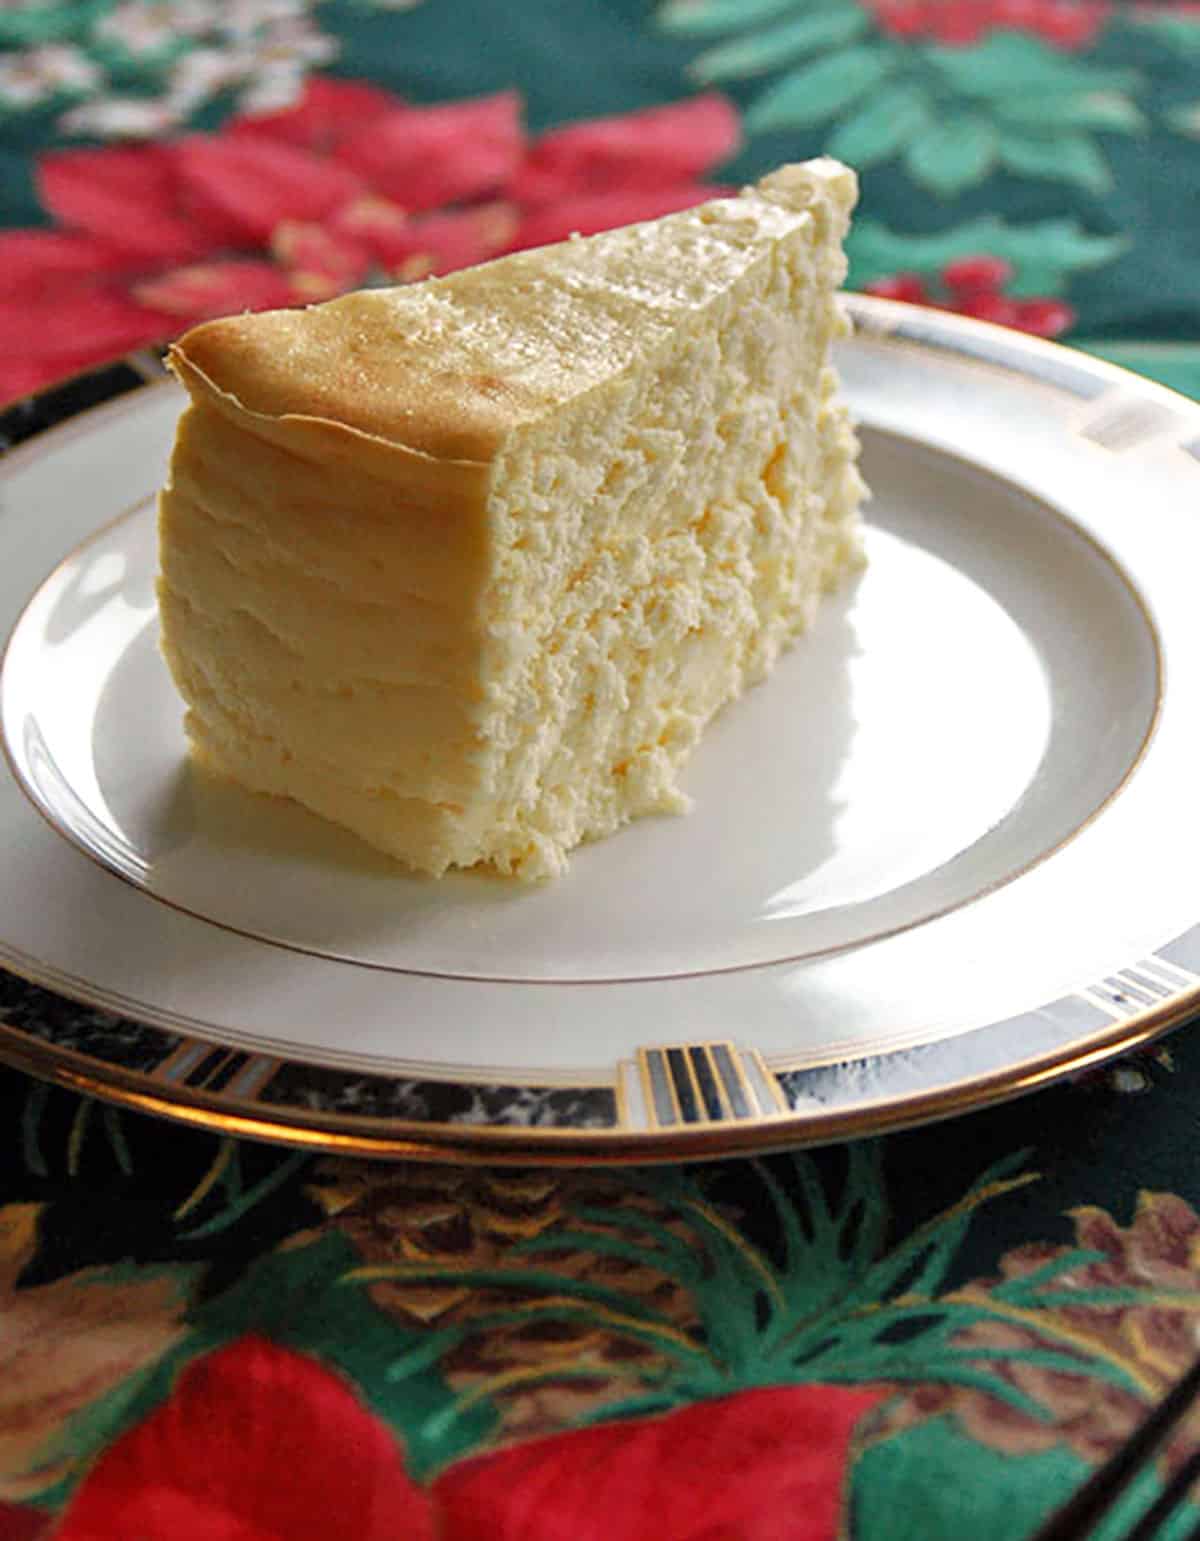
I'm almost at a loss for words in trying to describe this New York cheesecake without crust. It's fluffy, airy, luscious, creamy and so delicately soft.
It's pure decadence! And, since it's flourless, this is a gluten-free cheesecake.
Delicious on its own, it's flavored with vanilla and is just begging to be accented with your favorite cheesecake topping. I've tried it with homemade versions of chocolate liqueur, strawberry liqueur and limoncello.
I know. To die for!
But it's excellent with non-alcoholic toppings like Italian Strawberries with Sugar and Lemon, caramel sauce and raspberry coulis.
We enjoy this crustless cheesecake on our trips to Connecticut to visit my in-laws for the holidays. A dear family friend makes it, and my mother-in-law stores it in the freezer to thaw when we arrive.
I asked for the recipe several years ago, and the rest is history!
"This was the BEST cheesecake I have ever made…try it, you will love it!"
- Gloria
Recipe ingredients
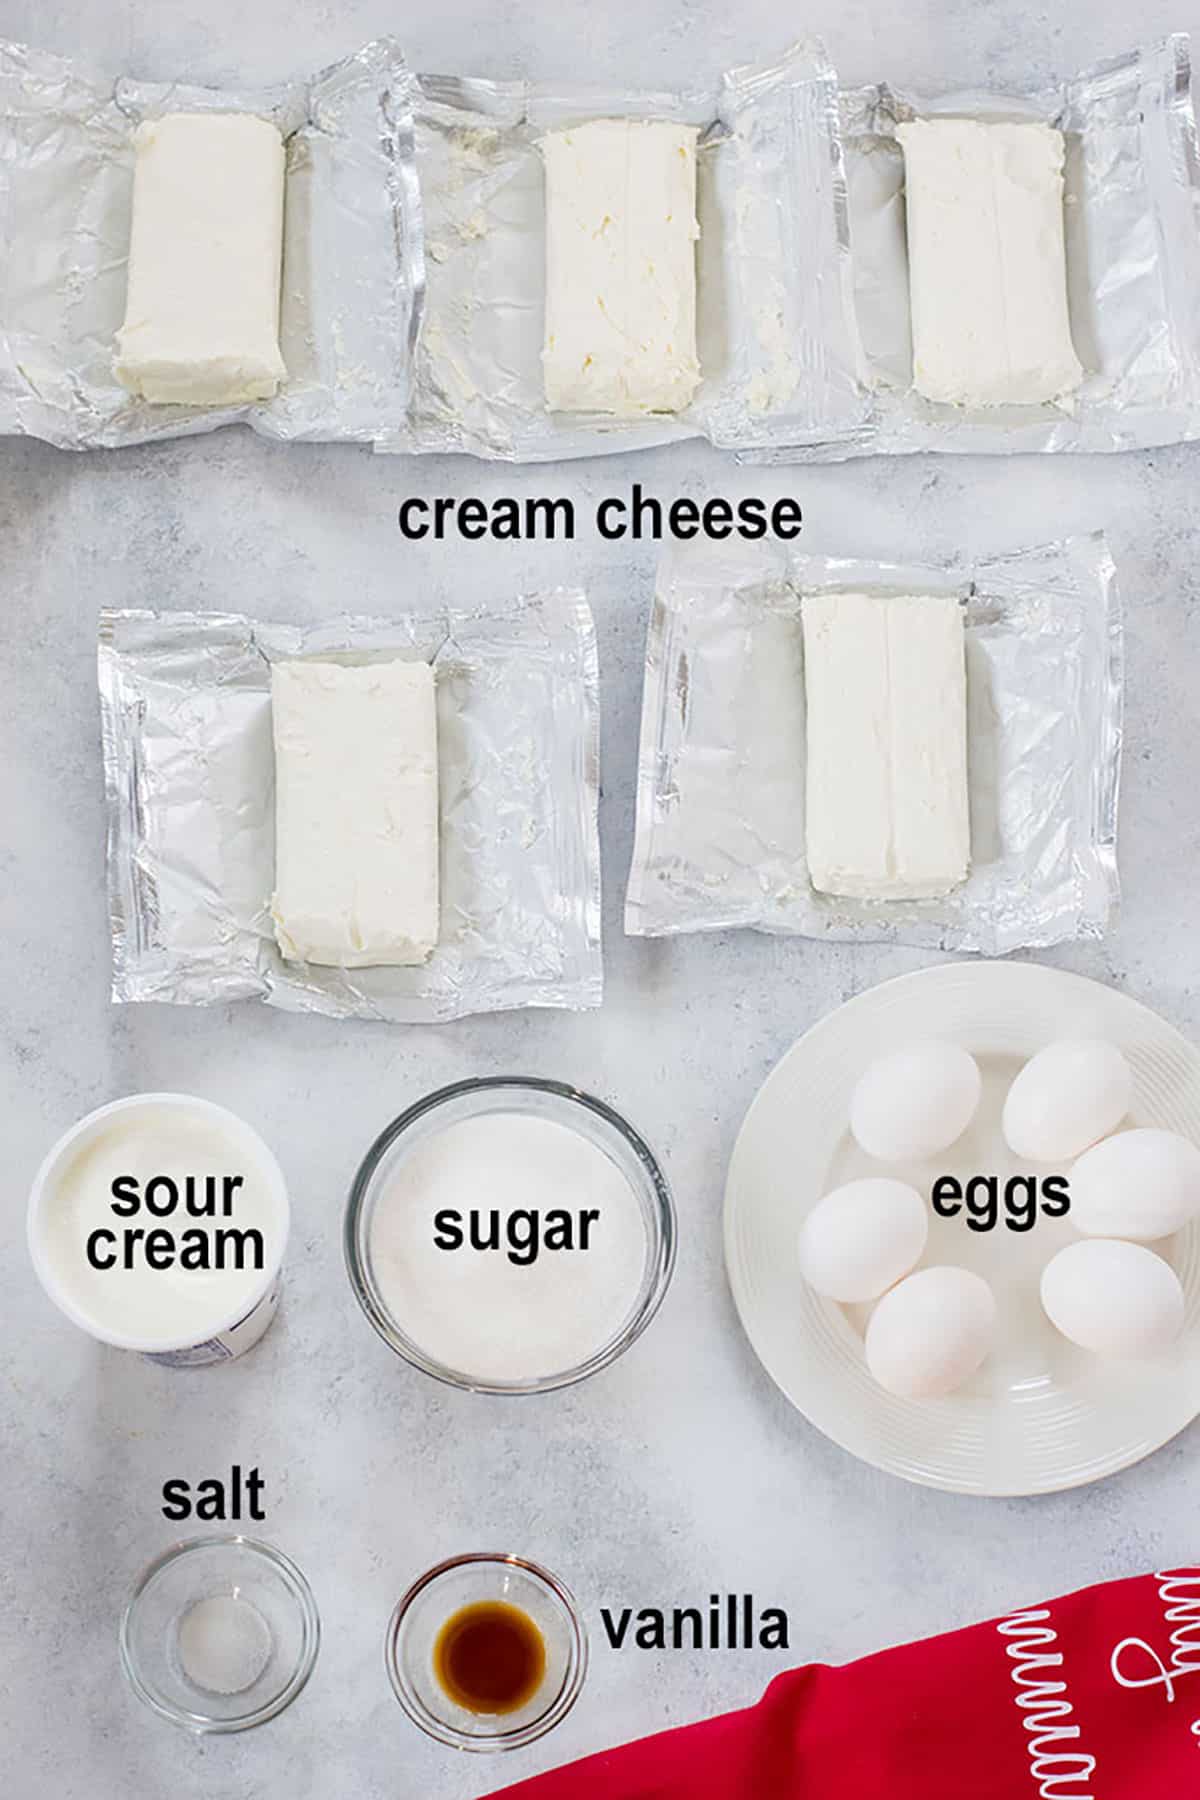
Cream Cheese - You'll need five, 8-ounce blocks for this tall cheesecake. We're not messing around!
You can use full-fat or low-fat cream cheese. Just make sure it's softened.
Sour Cream - The addition of sour cream to the batter makes this a New York-style cheesecake recipe. Use regular or low-fat sour cream.
Eggs: We're using large eggs here. I haven't tested this with other sizes.
For a keto cheesecake
You can easily make this no-crust cheesecake low carb. To make a keto crustless cheesecake, replace the sugar with a keto-friendly sweetener. Monk fruit sweetener (affiliate link) has the best taste, in my opinion.
How to make fluffy cheesecake
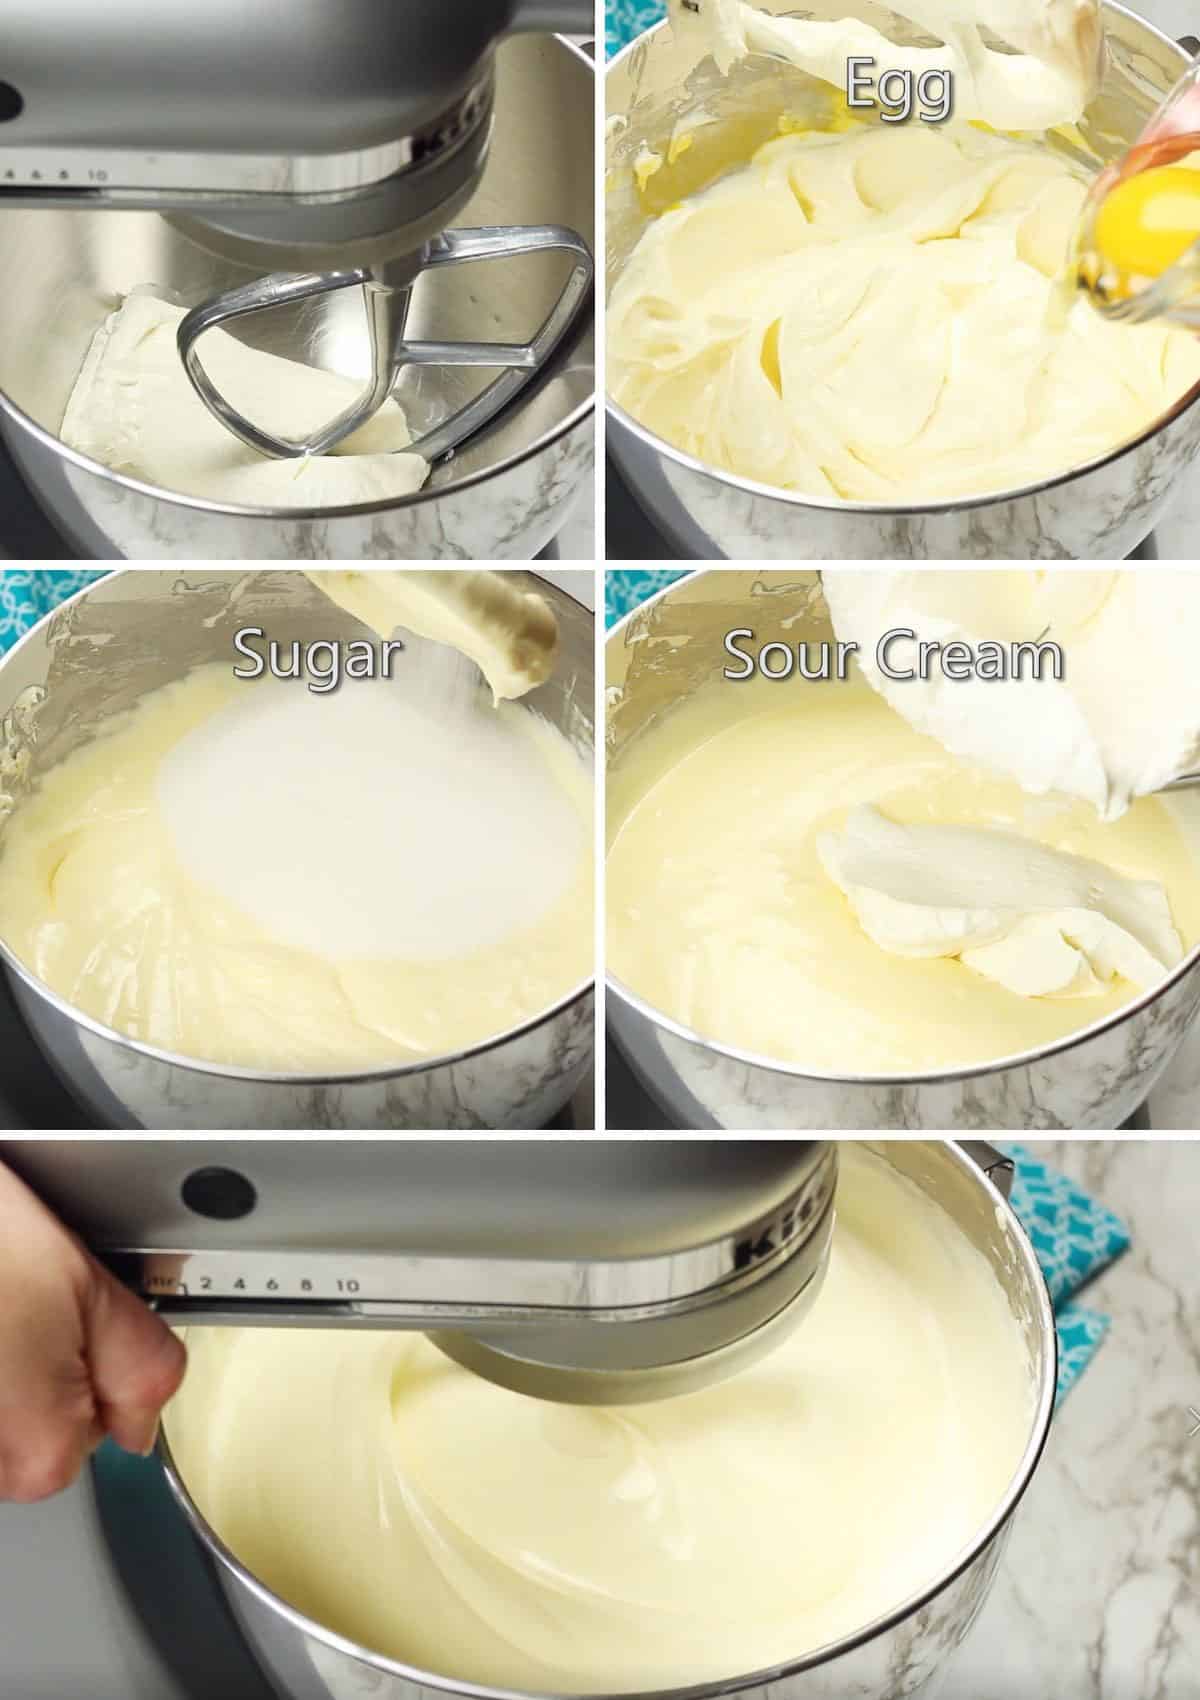
The key to this fluffy cheesecake recipe is beating in lots of air for volume! Besides beating after adding each ingredient, you'll beat the cheesecake filling for seven minutes.
See the recipe card at the end of this post for full instructions, but here's an overview.
Tips for the best crustless cheesecake:
- To prevent lumps, let the cream cheese, eggs and sour cream come to room temperature before starting. Beat each block of cream cheese one at a time, until it's smooth and creamy. Add each ingredient one at a time, beating after each addition, just until combined, then mix everything for seven minutes.
- To prevent over browning, move your top oven rack down to the second lowest position and bake your cheesecake there, with nothing above it so there's room. Also, if you have a dark springform pan, you'll need to reduce the oven temperature by 25 degrees. Note that your cheesecake will still taste good if it does get brown on top.
- To prevent cracks, bake your cheesecake in a water bath (bain marie) by filling a roasting pan ¼ full with hot water and placing your springform pan (affiliate link) with the batter in it. When done baking, leave the cheesecake in the oven with the door ajar for one hour.
- To prevent water from seeping into your springform pan, place your springform in a large pie dish first. Then set the pie plate with the springform in the water bath and proceed. If you don't have a pie dish large enough, you'll need to wrap the outside of the springform pan with heavy-duty foil (or a double layer of regular foil), covering the bottom, up the sides and inside the top of the rim.
How to tell when cheesecake is done
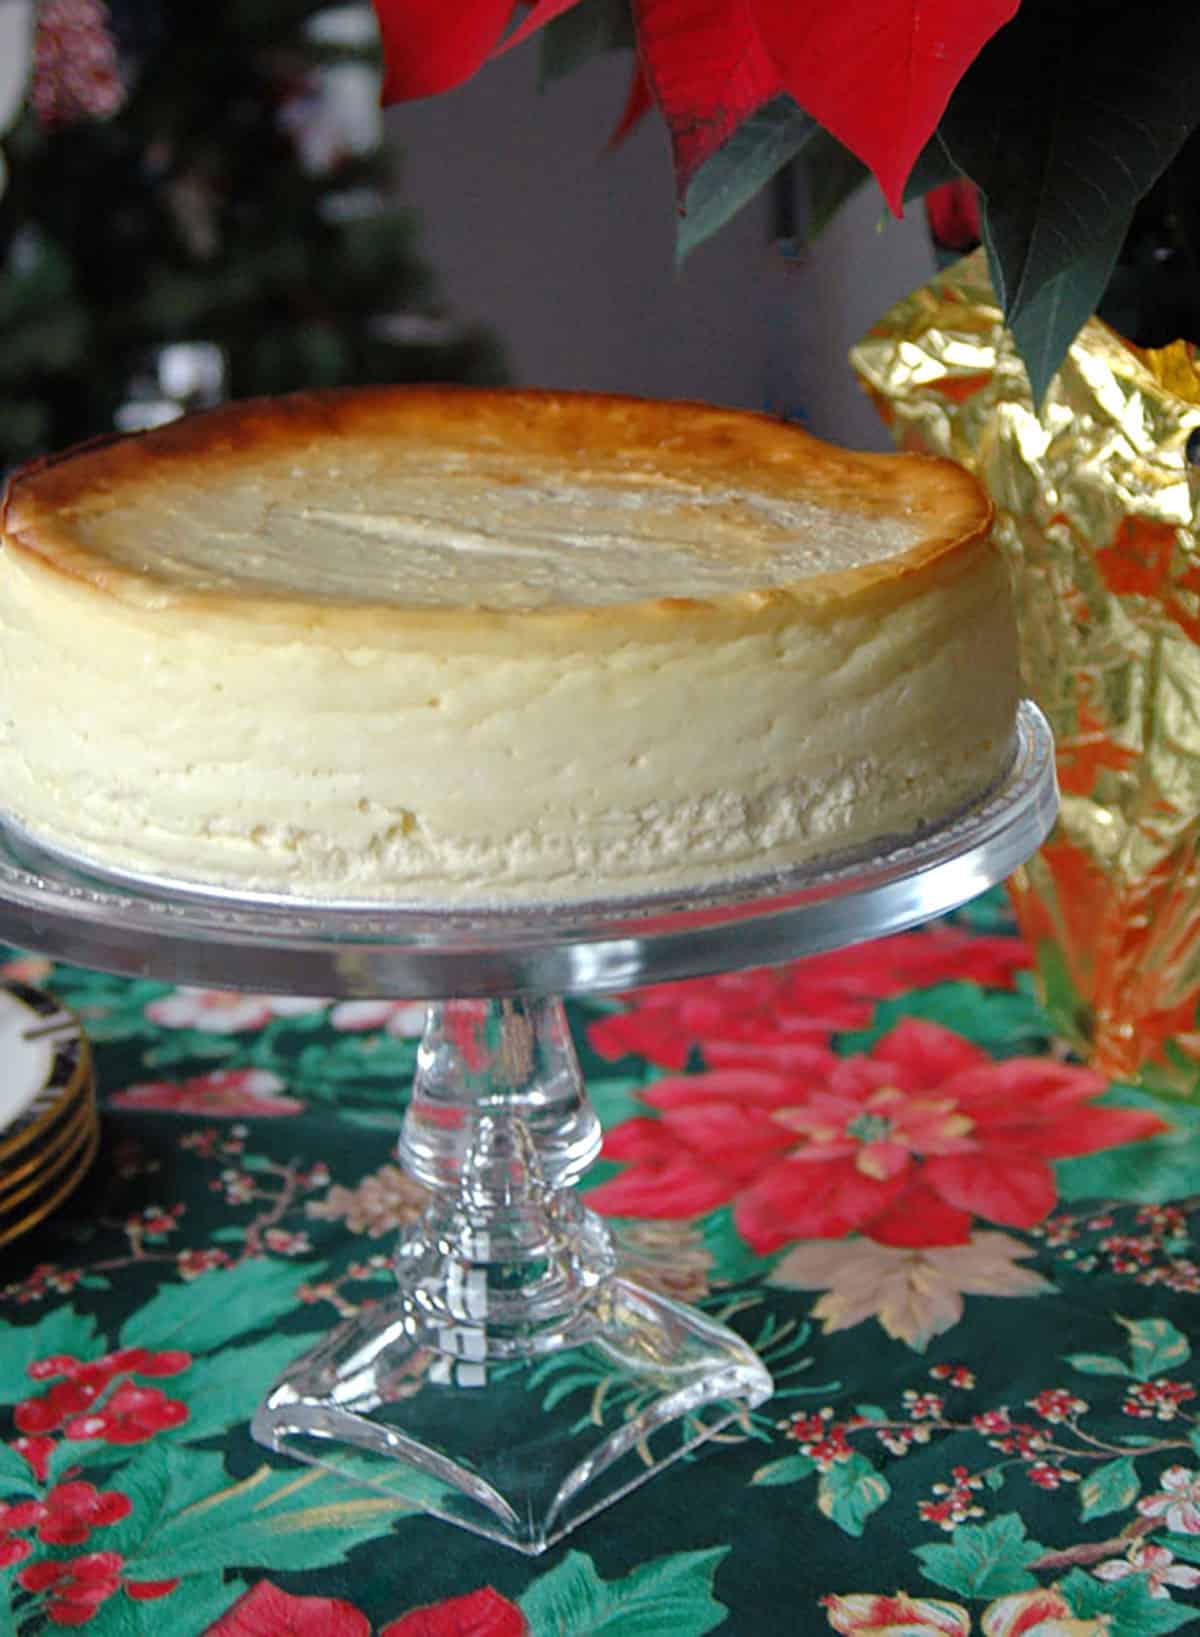
The cheesecake is done when the top is set, except for a small circle in the middle. Don't insert anything into the cheesecake to test it, or it will crack.
Turn off the heat and let the cheesecake stay in the oven with the door ajar for one hour. This allows the cheesecake to finish cooking in the center while the cake cools down gradually.
Frequently asked questions
You can freeze this cheesecake for up to three weeks with good results. The texture starts to change after that, but it can be used within two months.
Cover the cheesecake (whole, partial or sliced) with plastic wrap, then foil. You can leave the cheesecake in the springform pan and just wrap the whole thing.
Thaw the cheesecake in the refrigerator overnight or let it sit out at room temperature for 2-4 hours. You can thaw an individual slice in the microwave on the defrost setting for less than a minute.
You just need to release the buckle, then lift the sides of the pan to remove the circular frame. Keep the cheesecake on the bottom portion of the pan, however. You can even place the cheesecake with the base of the pan on a cake stand.
More dessert recipes to love
- Chocolate Cheesecake - A chocolate version of this gluten-free crustless cheesecake!
- Creamy Cheesecake with Sour Cream Topping - A family favorite for decades!
- Lemon Lush Dessert - A recipe made from scratch!
- Torta Caprese - A flourless chocolate-almond cake that's gluten free!
If you try this Fluffy Crustless Cheesecake, be sure to leave a comment and a rating!
Fluffy Crustless Cheesecake (NY Style)
Video
Ingredients
- 5 (8-ounce) blocks cream cheese (at room temperature)
- 6 eggs (large)
- 1 ⅓ cups granulated sugar
- ¼ teaspoon salt
- 1 teaspoon vanilla extract
- 1 pint sour cream (low-fat is fine)
Instructions
- Two hours ahead of time, unwrap the cream cheese blocks and set them out at room temperature to soften. Set out the eggs and sour cream also. When the cream cheese is softened, start the recipe.
- Move the top oven rack down to the second lowest position in your oven, with nothing above it (to prevent over browning the cheesecake). Preheat the oven to 400 degrees F. (If using a dark springform pan, you'll need to reduce the oven temperature by 25 degrees F for this recipe, or the cheesecake will brown too much. You'll start at 375 degrees, then lower to 350 degrees.)
- Grease a 10-inch springform pan. (See notes if you have a 9-inch springform.)
- Fill a roasting pan ¼ full with hot water. Prepare your springform pan to prevent water from seeping into it during baking. If you have a large pie dish, place the springform in it. If you don't have a pie dish large enough, you'll need to wrap the outside of the springform pan with heavy-duty foil (or a double layer of regular foil), covering the bottom, up the sides and inside the top of the rim.
- In a large mixing bowl, add one block of cream cheese and beat it until creamy. Continue adding one block of cream cheese at a time and beating well, scraping the bowl as needed. There must not be any lumps in your batter. Add the eggs one at a time, mixing after each addition on low. Add the remaining ingredients one at a time, mixing to combine after each addition. When all ingredients have been added, beat on high (or as high as you can without splashing) for seven minutes.
- Transfer the batter to the springform pan (filling it no more than ¾ of the way to the top; see notes for what to do with extra batter). Place the springform and bottom pie dish in the water bath and bake for 10 minutes at 400 degrees F. (Use 375 degrees for a dark pan.) Then lower the temperature to 375 degrees (use 350 degrees for a dark pan) and bake for 40-55 minutes, or until the top is set except for a small circle in the middle. Do not insert anything into the cheesecake to test it, or it will crack. Turn off the heat and let the cheesecake stay in the oven with the door ajar for one hour.
- Leave the cheesecake in the springform pan and let it finish cooling on a wire rack. Refrigerate it overnight before slicing it. Leave it uncovered the first night if you can, unless you have strong odors in your fridge from onions or something. (See notes.)
- To slice, remove the outer circle of the pan and dip a knife in warm water to make the cuts, wiping the knife clean after each slice. (Keep the bottom of the pan under the cheesecake. You can even place the cheesecake with the bottom portion of the pan on a cake stand.)
- Store the cheesecake covered in the refrigerator (you can keep it in the springform) for up to three days or freeze it for up to 3 weeks. Wrap it in plastic, then foil before freezing it. Thaw the cheesecake in the refrigerator overnight or let it sit out at room temperature for 2-4 hours. You can thaw an individual slice in the microwave on the defrost setting for less than a minute.
Notes
- Even if you have a 10-inch springform, just fill it ¾ full so it doesn't overflow.
- If you only have a 9-inch springform pan, fill it ¾ full with the batter. Bake the remaining batter in two ramekins or another suitable baking dish, in a water bath, ideally in a separate oven, so you can pull out them out earlier without affecting the springform cheesecake. I bake my extra batter in a separate oven for 10 minutes at 400 degrees, then 25 minutes at 375 degrees, then leave it in the oven with the door ajar for 20 minutes. If you don't have a separate oven, bake the ramekins/baking dish in the same oven with the springform cheesecake for the full amount of time (it's important not to open the oven during baking) and just know that the ramekins/baking dish will come out a bit overcooked, but tasty.
- Some readers have halved the recipe with good results.
- Whenever I cover the cheesecake with foil or wrap the first night, a few drops of moisture pool on top of the cheesecake, leaving a water stain on its surface. If you don't have strong odors in your fridge, try leaving the cheesecake uncovered for the first night.
- I have never tried making this with a crust.
- This cheesecake is barely adapted from a Williams Sonoma recipe.
Nutrition
(Recipe Source: Barely adapted from family friends Lee and Carol, who said it originally came from Williams Sonoma. Originally published on December 22, 2014 and updated now with additional photos and information.)
Julie says
This is also called a Japanese cheesecake that I make all the time. It's a great recipe even though a lot of work. Worth every minute and unlike a cheesecake you will ever have.
Mamma C says
It's interesting that you mention that, Julie, because I've always wanted to try Japanese cheesecake. The recipes I've seen for Japanese cheesecake call for separating the eggs and beating the whites into a meringue. Does your recipe call for making meringue?
Elizabeth says
Made this Wed night, served Thurs night. It was WONDERFUL! I'm not new to making cheesecakes, but wanted to make a crustless this time. Do we even need crust?? Anyway, I'd like to share how I prevent cracks without the waterbath. I put a pyrex dish on bottom rack in oven and this creates a moist oven and I never get cracks. I learned of this method from a Judy Rosenberg recipe book years ago.
Thank you Mamma for sharing!
Elizabeth says
Forgot to say ...filled Pyrex dish 1/2 way with water! 🙂
Mamma C says
I'm so glad you loved this, Elizabeth! I'm glad that it works to fill a pan with some water on the rack below the cheesecake. I was just mentioning to another reader that she could try that, since she didn't have a roasting pan. -Andrea
Rebecca says
Is the water bath a must? I don't have a roasting pan!!
Mamma C says
The water bath helps prevent cracks. You could place a smaller pan of hot water on the rack below the rack with the cheesecake and see if that works. Some people make their cheesecakes that way. If you end up with cracks, you can conceal them with whipped cream and fruit.
Alycia says
Hello,
I would like to know your recommendations if I wanted to make these into minis(like in cupcake tins) how many would it make? And how would I adjust the baking times if they need be? I am making these for a potluck and could not see myself making 4 of these just to make sure every got a slice.
Thanks In Advance
Mamma C says
That's an interesting idea, Alycia. I've never tried making them into cupcakes, but I do bake a couple ramekins with the extra batter when I use my 9-inch springform. I researched pan conversions, and it looks like you should get at least 24 cupcakes out of the batter. You would have to experiment to see what works. You'd probably have to grease the cupcake liners well to prevent sticking. Use a water bath. Keep the temperatures the same, but keep an eye on them to figure out the time (don't open the oven door to check, or they'll crack.) Maybe do the initial 10 minutes at the higher temp, reduce the temp, then try for 20-30 minutes? When I bake them in ramekins, I do bake them for the full time, since they're in the oven with the full cheesecake, and I don't want to open the door in the middle of it. The ramekins turn out just a little more cooked. Please let me know if you try it!
Alycia says
Thank you for such a fast response! So I will not have to half the recipe to get 24 cupcakes? I will be making this next week Tuesday night for the potluck Wednesday. Can I submit pictures here?
Mamma C says
The conversion chart I found on Allrecipes shows there are 12 cups of batter in a 10-inch springform pan. You should get 24 cupcakes from that, but I've never tried it. (The chart shows that a 9-inch springform recipe will yield 18-24 cupcakes, and this cheesecake recipe is for a 10-inch springform.) I hope this works out for you, Alycia. You can send me photos, and I can share them on social media.
Riviera Dresden says
Hi! This is gorgeous; thank you for posting. I'm dying to make this as soon as I can, but I don't have sour cream. Could I use greek yogurt as a substitute?
Mamma C says
Riviera, I've never tried it with Greek yogurt. I read that some people do substitute it for sour cream in cheesecake, but it's important that the yogurt is full fat, or at least 2%, since I've used low-fat sour cream here. Also, I read that the less yogurt you have to use in the recipe, the better. However, a pint of sour cream is required here, and that's a significant amount of yogurt as a replacement. I'm guessing that the cheesecake would taste more tangy than the sour cream version. I'd prefer the sour cream here, but if you decide to try the Greek yogurt, let me know how it comes out.
Riviera Dresden says
Thank you for telling me so all that info! I probably won't risk using greek yogurt and will make this when I have sour cream. I hope you have a good week!
Mamma C says
You're welcome, Riviera. Enjoy!
Nonny says
I've made a cheesecake every Christmas Eve for over 30 years, and this year I needed a gluten free recipe for members of our family who are gluten intolerant. I discovered your website and made your cheesecake recipe today. It was by far the best cheesecake I have ever made or eaten. It is divine. Fluffy, perfect texture, creamy, light flavor. Absolute perfection. A few notes: 1) to avoid leakage in a spring form set in a water bath, I wrap an aluminum foil seal around the outside of the pan before setting it in the water bath. 2) I made the the cheesecake in the morning, baked it, cooled it and placed the cheesecake in the fridge at 11AM. It was set up and easy to serve at 7:30 PM the same night. 3) I put 3/4 of the pint of organic sour cream in the cheesecake batter. I saved the remaining quarter cup of sour cream to whip until runny and pour in thin layer on top of the cooled cheesecake. Very pretty. 4) I put out bowls of thawed frozen raspberries for people to spoon over top, and a bowl each of whipped cream and greek yogurt.
Delicious - Best - Cheesecake - Ever. Thank you!
Mamma C says
Nonny, I'm thrilled to hear that you loved the cheesecake! I really appreciate you letting me know all of your tips and serving suggestions. You've been so helpful. I'm glad you found my blog, and I hope you will visit often! Merry Christmas!
Angela L. says
This is the best cheesecake ever! I made it for Thanksgiving and it was all gone! Now, I'm making it for an Art exhibition for tomorrow 🙂 Thank you so much for sharing this. I prefer crustless cheesecake but never saw a recipe for it.
Mamma C says
I think so too! 🙂 I'm glad you enjoyed it, Angela, and I love that you're bringing it to the exhibition. Thank you for letting me know!
Yergy says
Hi! I just made this delicious looking cheesecake (I know it's delicious though cause I tasted the batter haha) but mine cracked at the edges 🙁 Maybe my water bath wasn't high enough? I can't wait to try it though! Have you ever topped with homemade whipped cream? I'm thinking to do that to cover up the cracks lol! Thanks so much for the recipe 😀
Mamma C says
Yergy, that's a bummer that it cracked at the edges. Usually that's from a draft, like if the oven door was opened to check on the cheesecake. Also, I'm wondering about whether your oven runs extra hot. At the end of baking, there should have been a small circle in the middle that was not set. If, for example, it was set all the way in the middle, it could mean your oven overbaked it. As for the water level, I know some people bake cheesecake with only an inch of water, so it probably wasn't that. At any rate, it would look pretty with whipped cream piped around the edges, if you have a pastry bag.
Katie says
This looks great as cheesecake is my favorite dessert and I need a crustless recipe since I'm gluten-free.
I'd like to make this as the base for pumpkin cheesecake for thanksgiving. Do you have any recommendations? Thanks!
Mamma C says
Katie, I've never tried a pumpkin version, so I can't vouch for the results. But I'm thinking you could bump up the sugar to 1 1/2 cups total, add a 15-ounce can of pure pumpkin before the eggs, and try 1 teaspoon of cinnamon and 3/4 teaspoon allspice. If it were me, I'd taste the batter to see if the spice level was to my liking, and make any adjustments from there. I'd fill my springform almost to the top with batter, and then bake any leftover batter in ramekins in a water bath. I'd probably use caramel sauce as a topping. Please let me know if you try it!
Sharee @ Savory Spicerack says
this sounds great! pinning for later!
Mamma C says
Thanks, Sharee! It's definitely a keeper.