

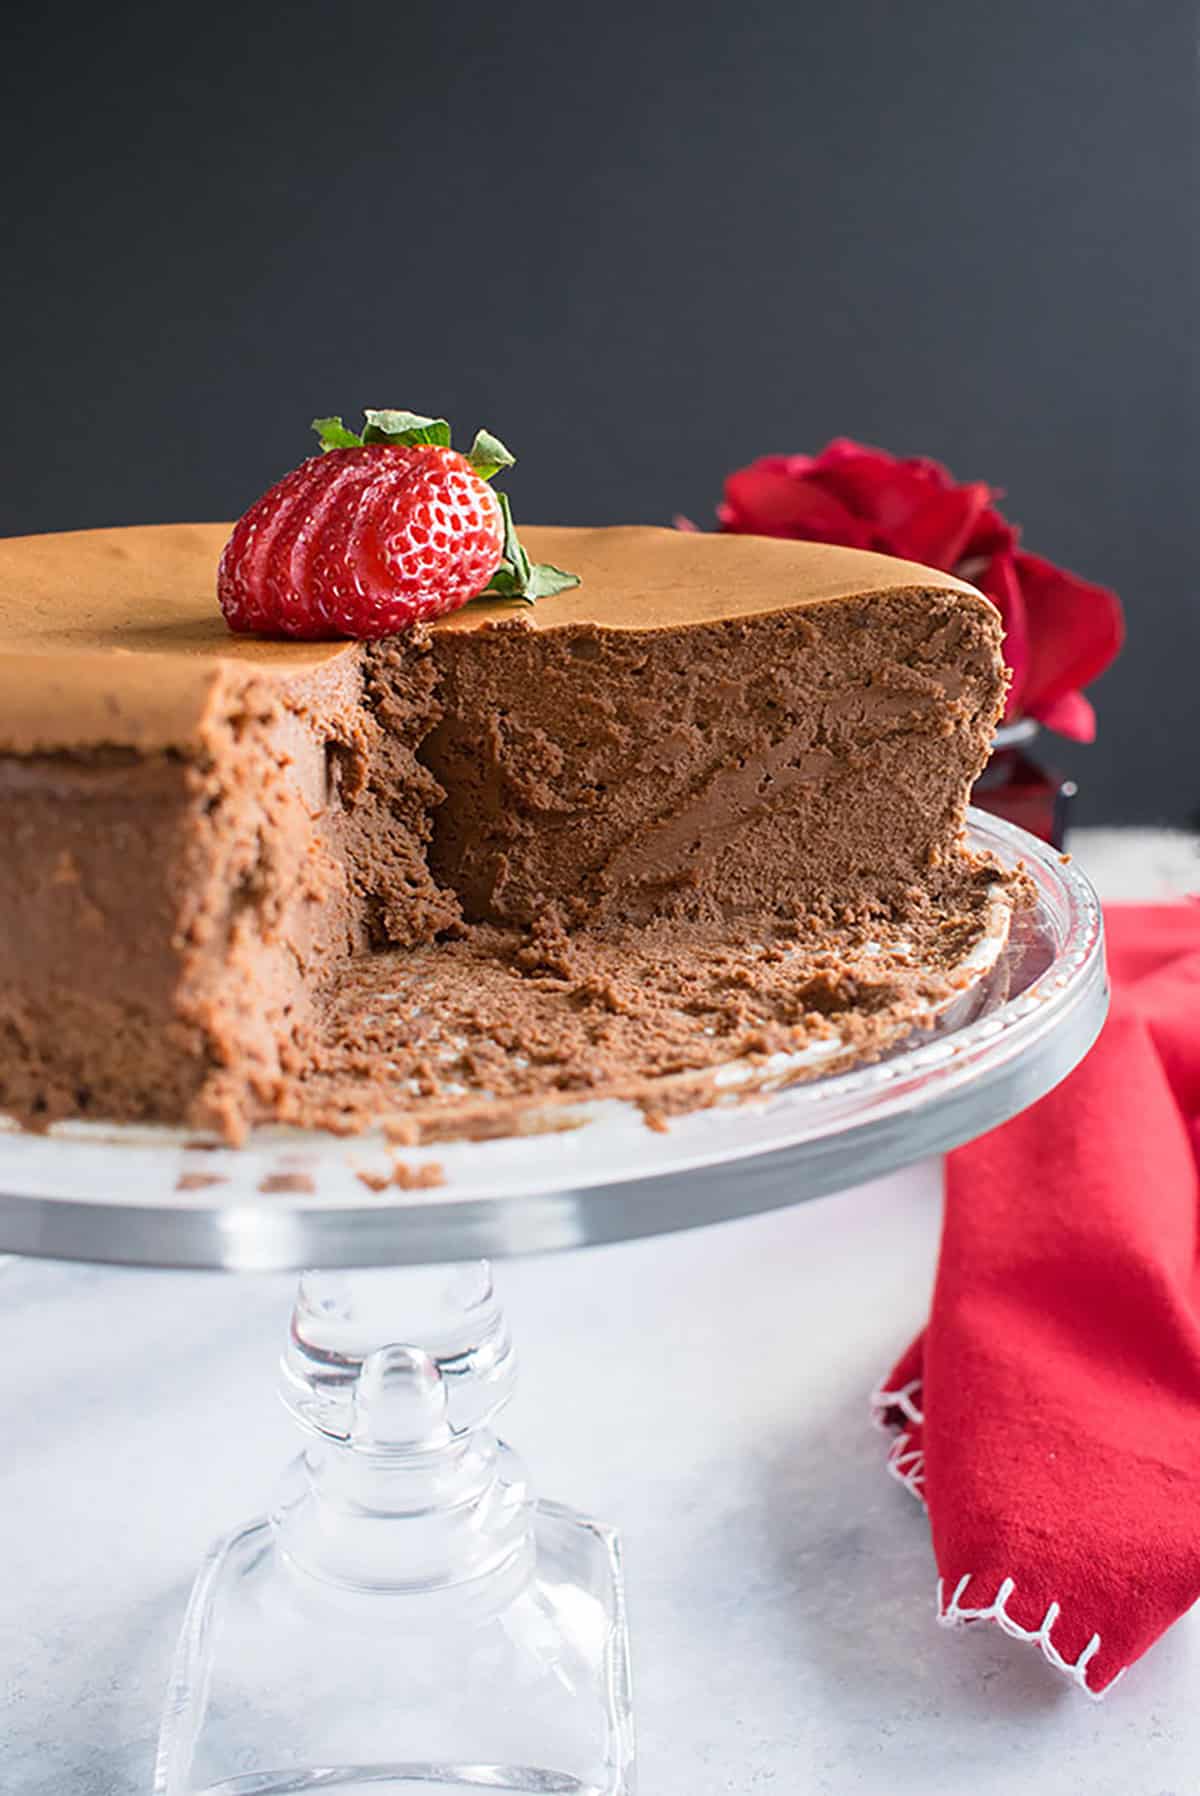
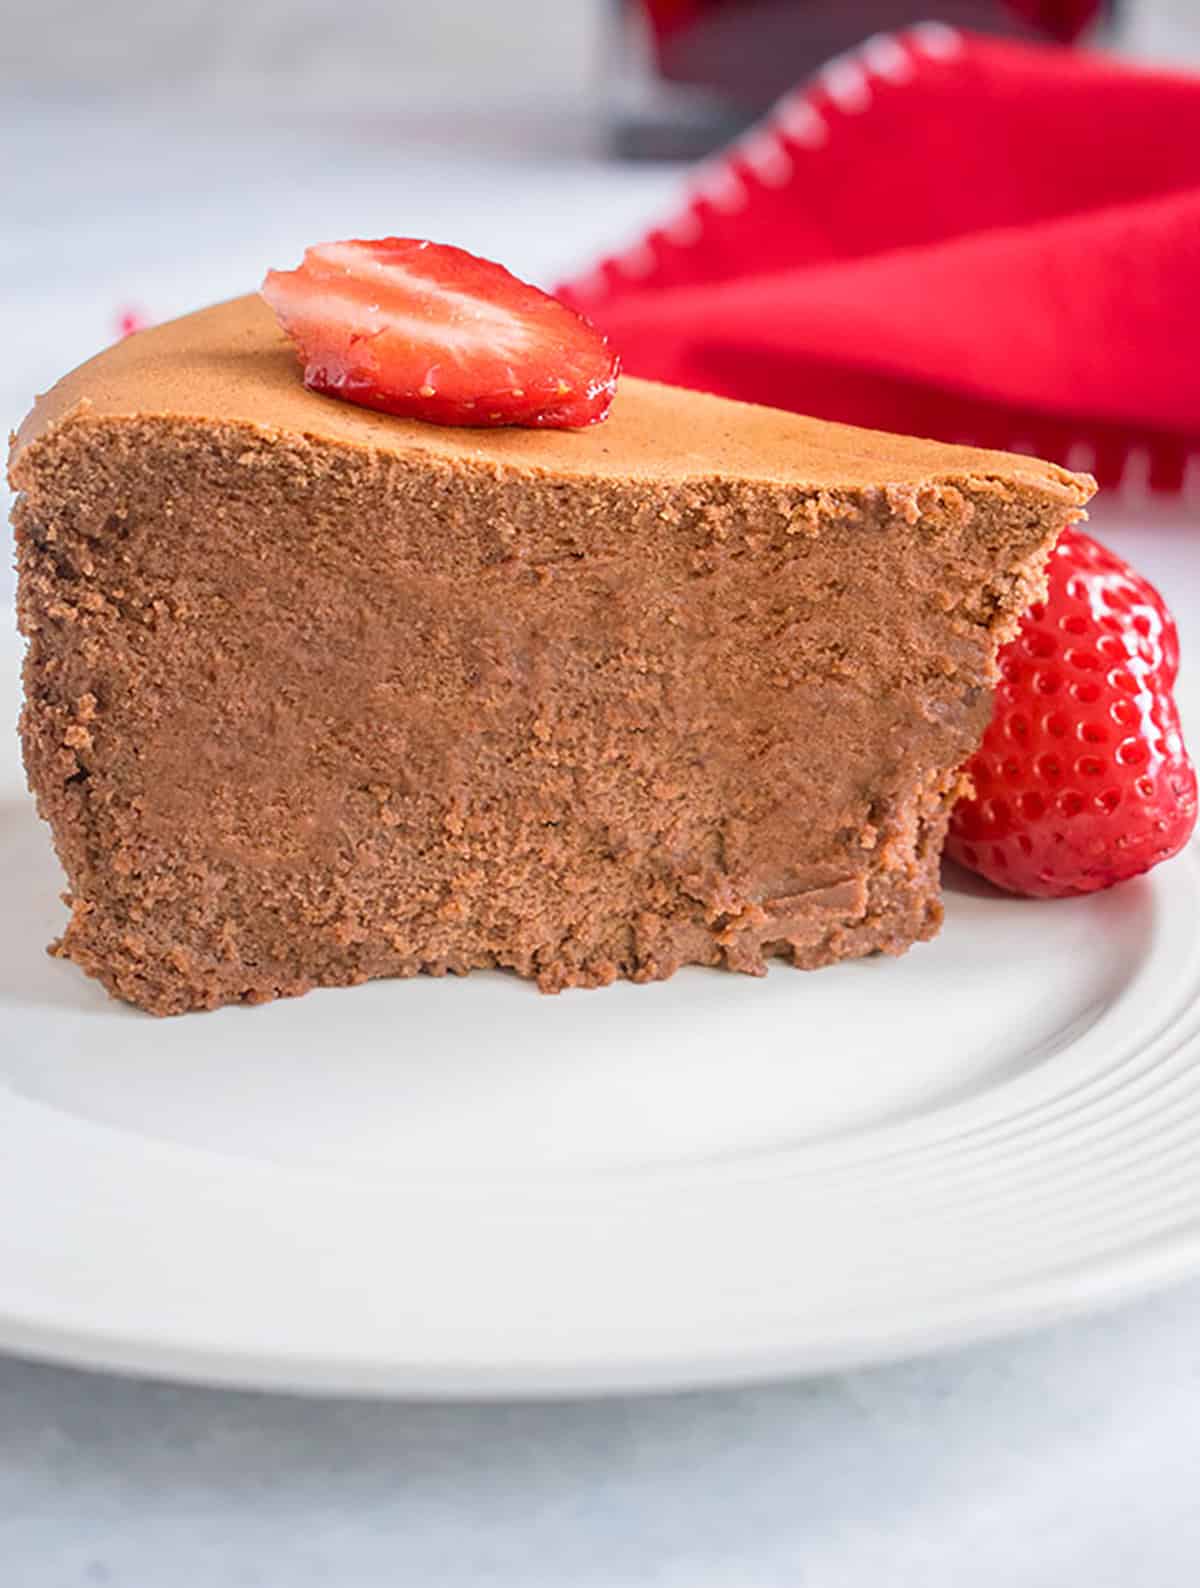
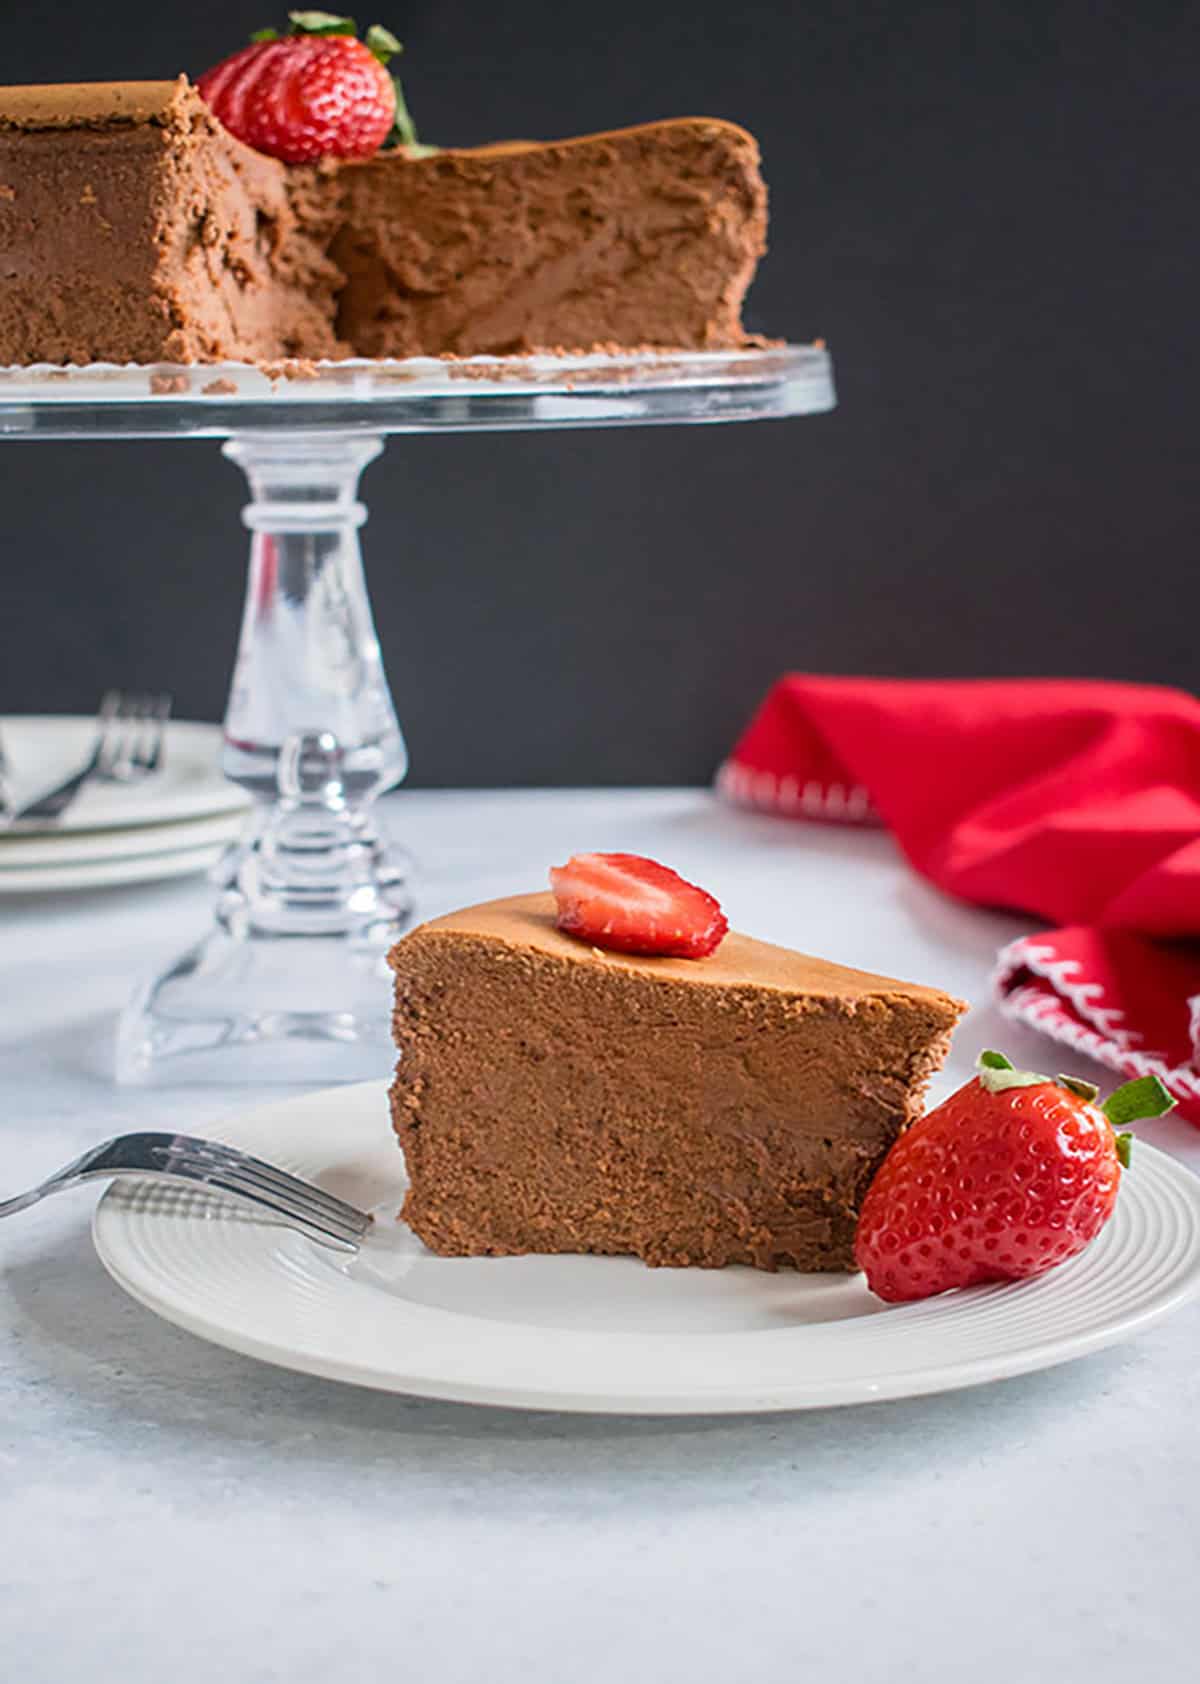
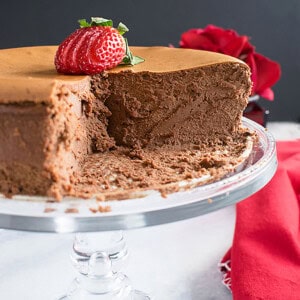
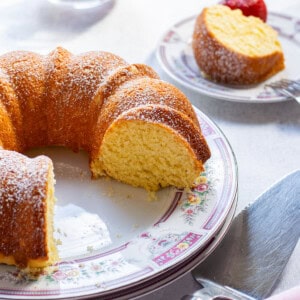
This Gluten-Free Chocolate Cheesecake is fabulous! Made without a crust, it's fluffy and creamy, similar to chocolate mousse. Our newly scaled-down recipe fits perfectly in a 9-inch springform pan.
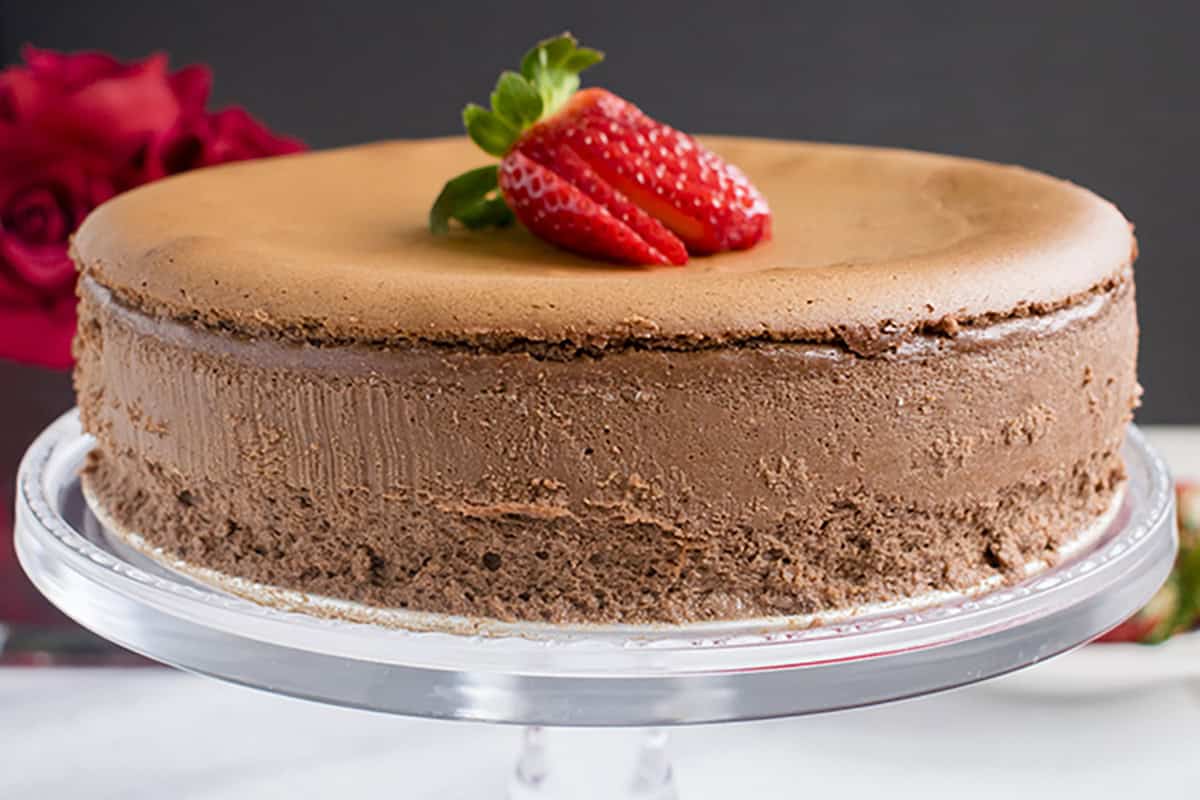
This showstopping chocolate cheesecake is a keeper, folks. It's based on this wildly popular Fluffy Crustless Cheesecake. Like that recipe, it happens to be gluten-free because it doesn't contain flour and doesn't have a crust.
It's the best chocolate cheesecake we've ever had!
"I have made this, and it IS amazing!!! I don't like to bake…but this is one recipe I would absolutely make again!!!"
Christine
Recipe ingredients
In December 2025, we scaled down our original recipe for this flourless chocolate cheesecake by 25%. It now works well in a 9-inch or 10-inch springform pan, without extra batter. It's still a decent size, yielding at least 12 servings.
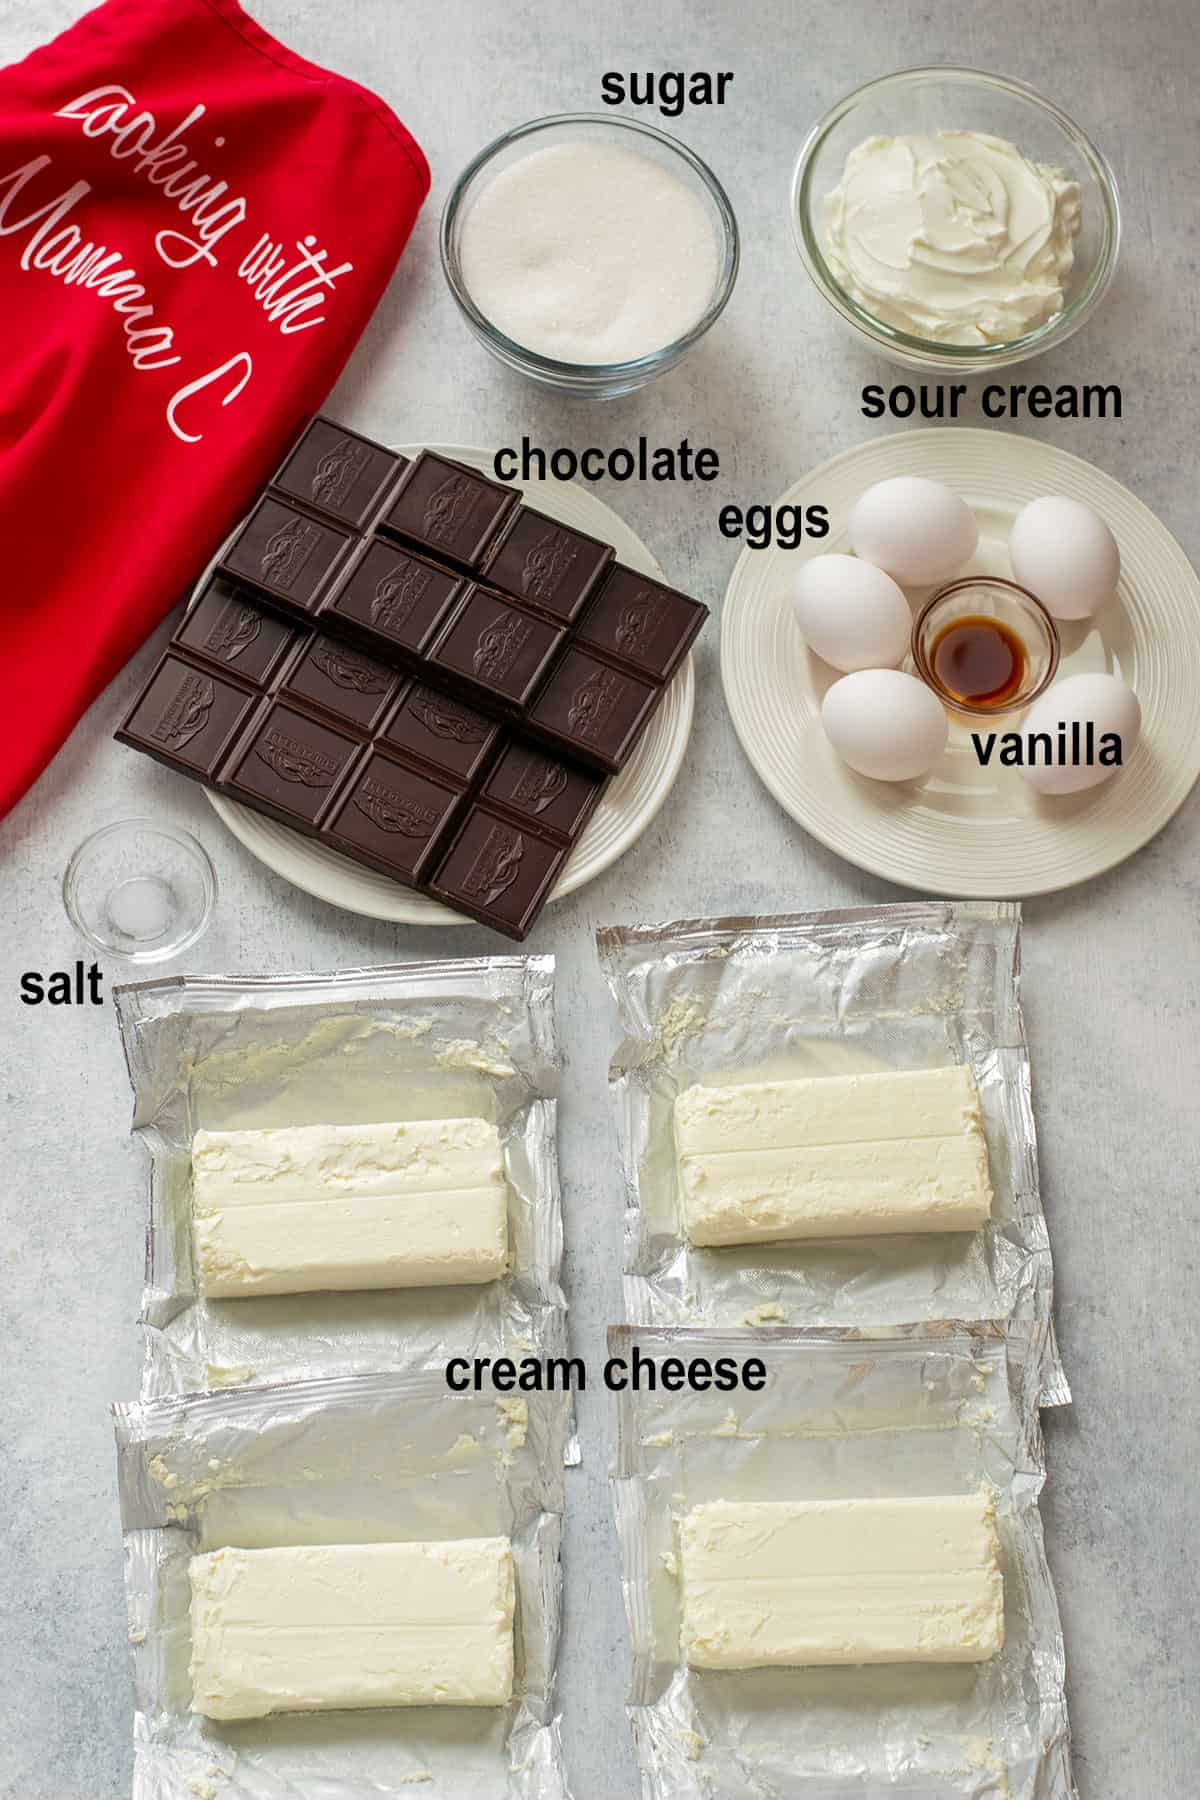
Chocolate: A combination of semisweet and bittersweet chocolate provides a wonderful, rich chocolate flavor, similar to the taste of chocolate ice cream. I prefer to use Ghirardelli chocolate.
Cream Cheese: Use full-fat cream cheese for best results. Leave it out for two hours before starting the recipe so it's soft enough to mix well.
Sour Cream: Feel free to use regular or light sour cream. Let it come to room temperature first.
Eggs: Use large eggs at room temperature for the best results.
How to make gluten-free chocolate cheesecake
See the card at the end of this post for the full recipe, but here's an overview.
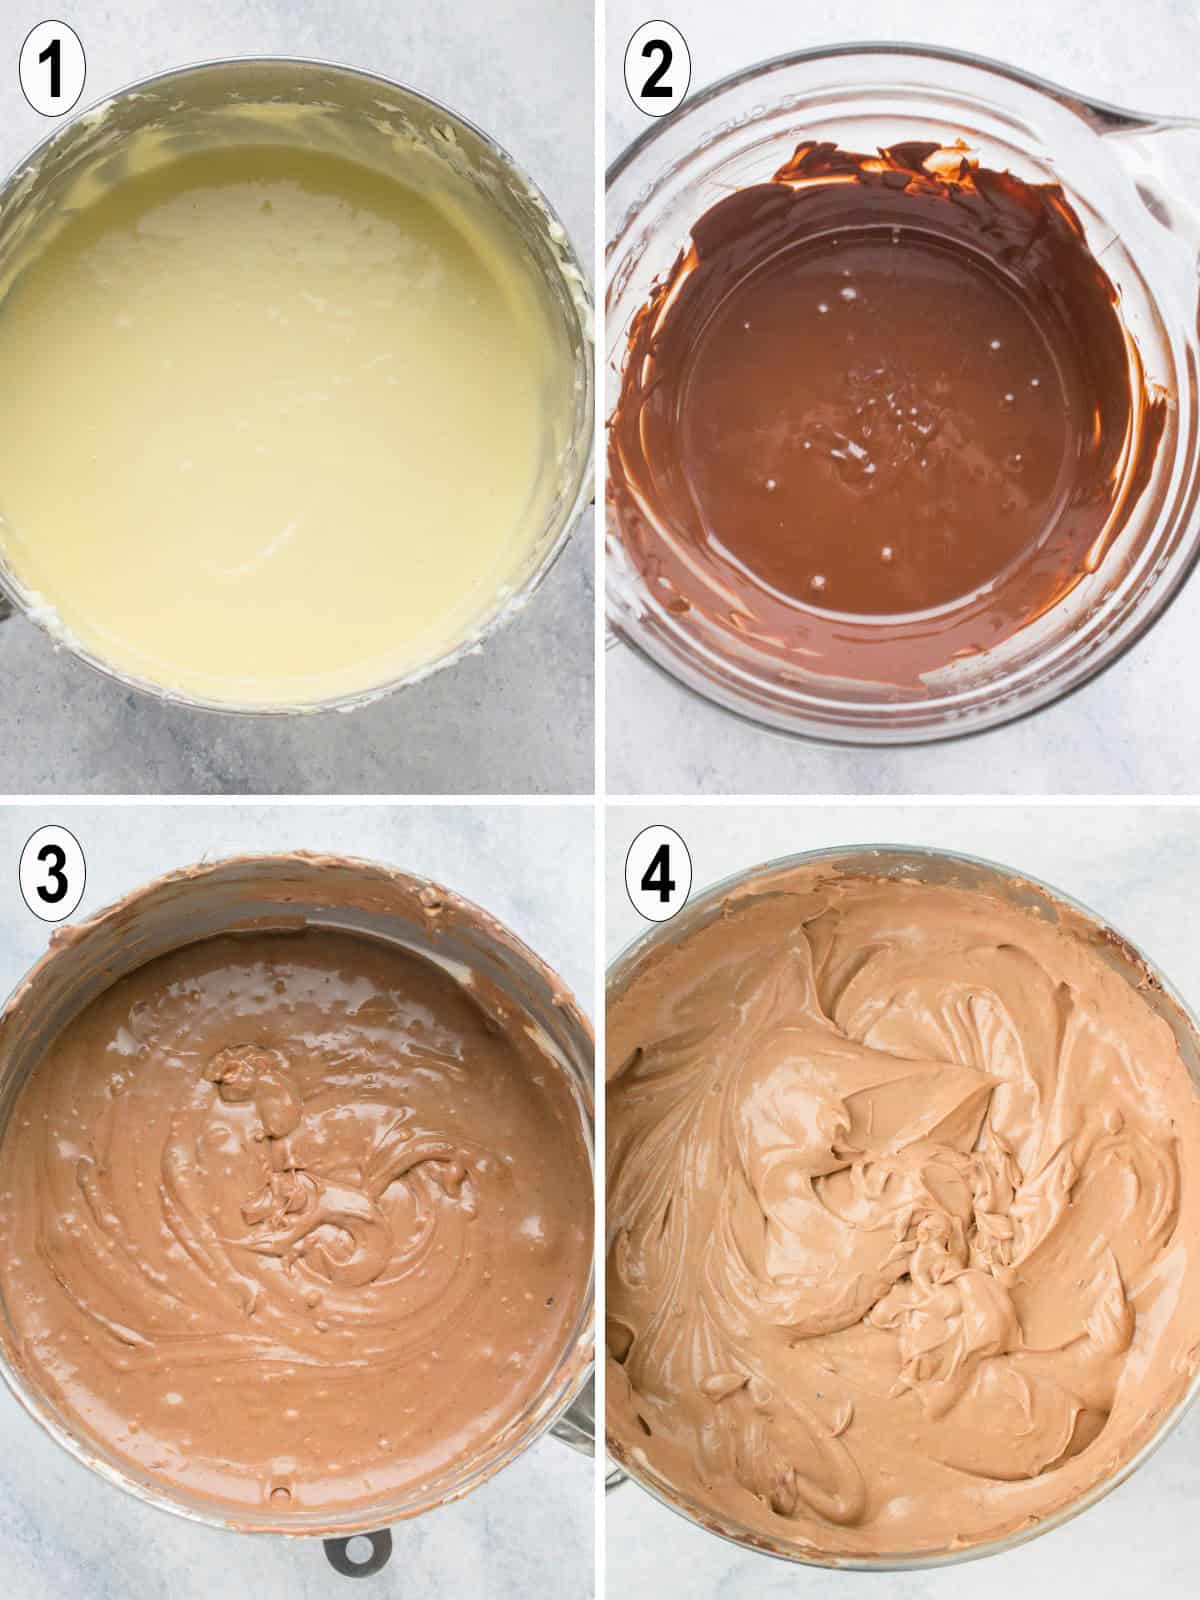
- Beat the cream cheese in a stand mixer one block at a time. Then, beat in each egg one at a time, mixing after each addition.
- Melt the chocolate.
- Beat in the sugar, salt, vanilla and sour cream. After the melted chocolate has cooled, mix it into the batter.
- Beat on high for seven minutes to incorporate air into the batter.
- Transfer the batter into a springform pan and bake in a water bath according to the instructions in the recipe card at the end of this post.
Recipe tips
- To prevent lumps, let your cream cheese come to room temperature before starting. Beat each block one at a time, until it's smooth and creamy. The batter must be smooth before baking.
- To prevent over browning, move your top oven rack down to the second lowest position and bake your cheesecake there, with nothing above it so there's room.
- To prevent cracks, bake your cheesecake in a water bath (bain marie) by filling a roasting pan ¼ full with hot water and letting your springform pan (affiliate link) with the batter rest in it. When done baking, leave the cheesecake in the oven with the door ajar for one hour.
- To prevent water from seeping into your springform pan, place your springform in a large pie dish first. Then set the pie plate with the springform in the water bath and proceed. If you don't have a pie dish large enough, you'll need to wrap the outside of the springform pan with heavy-duty foil (or a double layer of regular foil), covering the bottom, up the sides and inside the top of the rim.
What to serve with it
It's delicious plain, but I highly recommend serving this New York chocolate cheesecake with whipped cream and strawberries. You also could try drizzling on homemade chocolate liqueur or any of these toppings for cheesecake.
Frequently asked questions
You can freeze this chocolate cheesecake for up to three weeks with good results. The texture starts to change after that, but it can be used within two months.
Cover the cheesecake (whole, partial or sliced) with plastic wrap, then foil. You can leave the cheesecake in the springform pan and just wrap the whole thing.
Thaw the cheesecake in the refrigerator overnight or let it sit out at room temperature for 2-4 hours. You can thaw an individual slice in the microwave on the defrost setting for less than a minute.
Slice the cheesecake when it's cold and firm, right out of the refrigerator. It will soften as it sits out and it'll be more difficult to get clean slices.
Use a knife dipped in warm water and cut straight down without sawing. Wipe the knife clean after each cut.
You also could use unflavored dental floss instead of a knife. Or, try slicing it when it's partially frozen.
You would have to use sugar-free chocolate and a sweetener such as monk fruit to make this into a keto-friendly recipe. We haven't tested a keto version.
More recipes to try
If you love cheesecake with a graham cracker crust, you have to try Mom's Cheesecake with Sour Cream Topping. And you'll love these Take 5 Cheesecake Bars with a pretzel crust.
If chocolate's your thing, don't miss this gluten-free Torta Caprese recipe, Homemade Chocolate Pudding Pie with Brownie Crust or The Best Brownies with Frosting! And use this Chocolate Frosting for Brownies or small cakes!
Enjoy!
If you try this Gluten-Free Chocolate Cheesecake recipe, please leave a comment and a rating!
Gluten-Free Chocolate Cheesecake
Video
Equipment
Ingredients
- 4 (8-ounce) blocks cream cheese (at room temperature)
- 5 large eggs (room temperature)
- 6 ounces semisweet chocolate bars
- 6 ounces bittersweet chocolate bars
- 1 ½ cups granulated sugar
- 1 pinch salt
- 1 ½ teaspoons vanilla extract
- 12 ounces sour cream (Light is fine. Room temperature.)
- strawberries for serving (optional)
Instructions
- Two hours ahead of time, unwrap the cream cheese blocks and set them out at room temperature to soften. Also set out the eggs and sour cream. When the cream cheese is softened, start the recipe.
- Move the top oven rack down to the second lowest position in your oven (to prevent over browning the cheesecake), with nothing above it. Preheat the oven to 400 degrees F. Grease a 9-inch springform pan, making sure to coat the sides well. (If using a dark springform pan, you'll need to reduce the oven temperature by 25 degrees F for this recipe, or the cheesecake will brown too much. You'll start at 375 degrees, then lower to 350 degrees.)
- Fill a roasting pan ¼ full with hot water. Prepare your springform pan to prevent water from seeping into it during baking. If you have a large pie dish, place the springform in it. If you don't have a pie dish large enough, you'll need to wrap the outside of the springform pan with heavy-duty foil (or a double layer of regular foil), covering the bottom, up the sides and inside the top of the rim.
- In a large mixing bowl, add one block of cream cheese and beat it until creamy. Continue adding one block of cream cheese at a time and beating well, scraping the beaters and bowl as needed. There must not be any lumps in your batter.
- Add the eggs one at a time, mixing after each addition on low.
- Break up all of the chocolate bars into pieces and add them to a microwaveable bowl. Cover loosely and heat on high in the microwave for a minute, then stir. Heat for another 50-60 seconds and stir. Heat for another 30 seconds or more as needed, stirring afterward until the chocolate is fully melted. Set aside to cool. You will need to wait until all of the other ingredients have been added before you mix in the chocolate.
- Add the sugar, salt and vanilla and mix to combine. Then add the sour cream and mix to combine, scraping the beaters and bowl as needed.
- Touch the melted chocolate to make sure it's not hot and has almost reached room temperature. Add the melted chocolate to the batter and mix until combined, scraping the batter and bowl as needed. Then beat on high (or as high as you can without splashing) for seven minutes.
- Transfer the batter to the springform pan. Place the springform and bottom pie dish in the water bath and bake for 10 minutes at 400 degrees F. (Use 375 degrees F for a dark pan.) Then lower the temperature to 375 degrees F (use 350 degrees F for a dark pan) and bake for 25-35 minutes. The top should be set, except for a small circle in the middle. Do not insert anything into the cheesecake to test it, or it will crack. Turn off the heat and let the cheesecake stay in the oven with the door ajar for one hour.
- Leave the cheesecake in the springform pan and let it finish cooling on a wire rack. Refrigerate the cheesecake in the pan overnight before cutting into it. Refrigerate it uncovered if you can, unless you have strong odors in your fridge from onions or something. (See notes.)
- Slice the cheesecake when it's cold and firm, right out of the refrigerator. To slice, remove the outer circle of the pan. Use a knife dipped in warm water and cut straight down without sawing. Wipe the knife clean after each cut. (Keep the bottom of the pan under the cheesecake. You can even place the cheesecake with the bottom portion of the pan on a cake stand.)
- Serve the cheesecake plain or with strawberries, if desired. It's also great with whipped cream. Store it in the refrigerator in the springform pan for up to three days or cover the pan of cheesecake with plastic and foil and freeze it for up to 3 weeks.
Notes
- Whenever I cover the cheesecake with foil or wrap the first night, a few drops of moisture pool on top of the cheesecake, leaving a water stain on its surface. If you don't have strong odors in your fridge, try leaving the cheesecake uncovered.
- We haven't tried making this with a crust.
Nutrition
(Recipe Source: Cooking with Mamma C. Originally published on January 28, 2019 and updated now with additional information and a scaled-down recipe.)
Missy says
Can you make this using cocoa powder?
Mamma C says
Hi Missy - I have not tested it with cocoa powder and have no idea how it would come out.
Greg G. Graf says
I would like more Gluten Free, Vegan, Keto or Paleo cheesecake recipes, should you have any more. Thank you.
Mamma C says
Hi Greg - This Fluffy Crustless Cheesecake is gluten free and can be made keto friendly by using monk fruit sweetener in place of the sugar. Right now, this and the chocolate cheesecake are my only gluten-free cheesecake recipes. Enjoy!
Debbi Plitnick says
Hi this chocolate rustless GF cheesecake looks amazing but 16 servings is way too much. is there a way to make a smaller cake say for 10 people max? I tried to change the number of servings but then the quantities of the ingredients are way off. lmk if there is a way to make a smaller cake
Mamma C says
Hi Debbi - Our scaled-down version as of December 2025 serves 12. That is the current recipe shown.
Chichi says
I have been on a cheese cake baking spree lately. Looks like I found the next one to bake. Yum!
Mamma C says
Hi Chichi - Oh, you have to make this!
Juli says
Gluten free and chocolate = HEAVEN! Love the process shots! This recipe sounds delicious!
Mamma C says
Hi Juli - I'm so glad you love the process shots!
Noelle says
I love this recipe!! will be making again.
Mamma C says
Hi Noelle - Enjoy!
Tara says
The texture on this cheesecake looks perfect! I love the tips you included and that it is gluten free.
Mamma C says
Hi Tara - Thank you! Even people who don't eat gluten free love this cheesecake.
Morgan Eisenberg says
If you wanted to test a third cheesecake justtt to be sure, I would be happy to lend my services. Looks so light and fluffy!
Mamma C says
Haha! It truly is light and fluffy!