

Everyone loves these Italian Rainbow Cookies! They feature almond sponge cake layers filled with apricot preserves, topped with melted chocolate and accented with amaretto. Serve them for holidays, weddings and more!
These Italian Rainbow Cookies are legendary in my family! We've been making them for a decade, thanks to my son. They're better than any we've tried from a bakery!
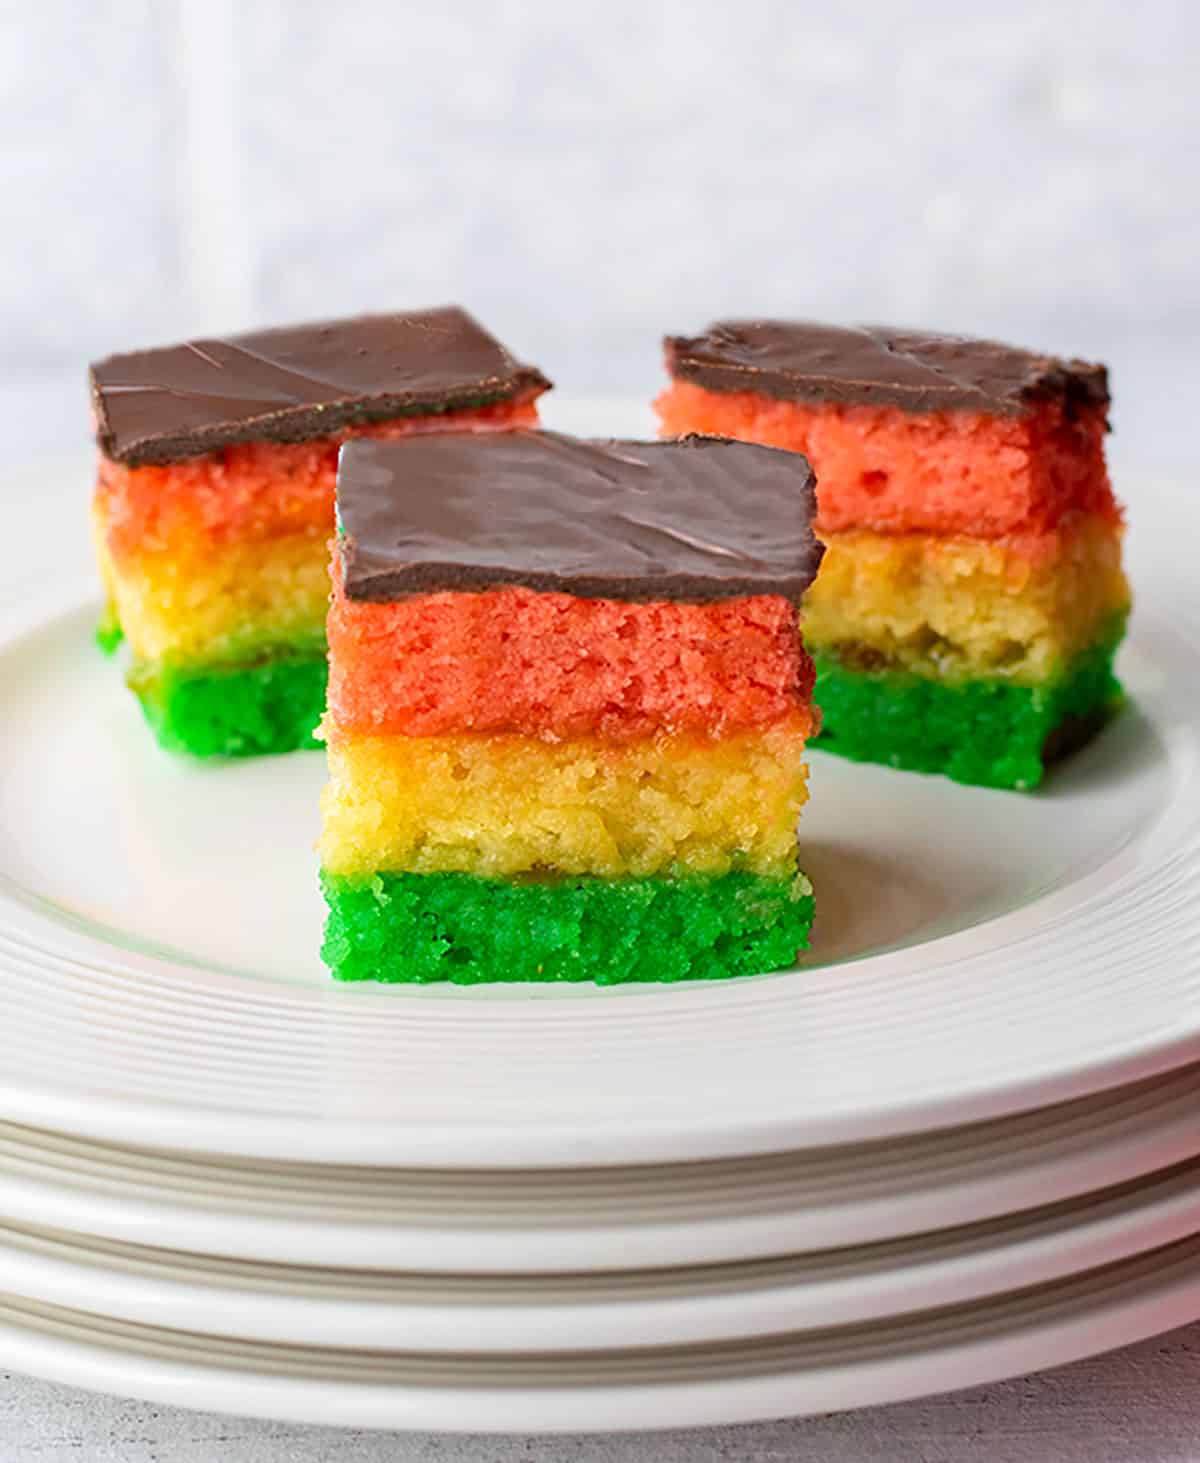
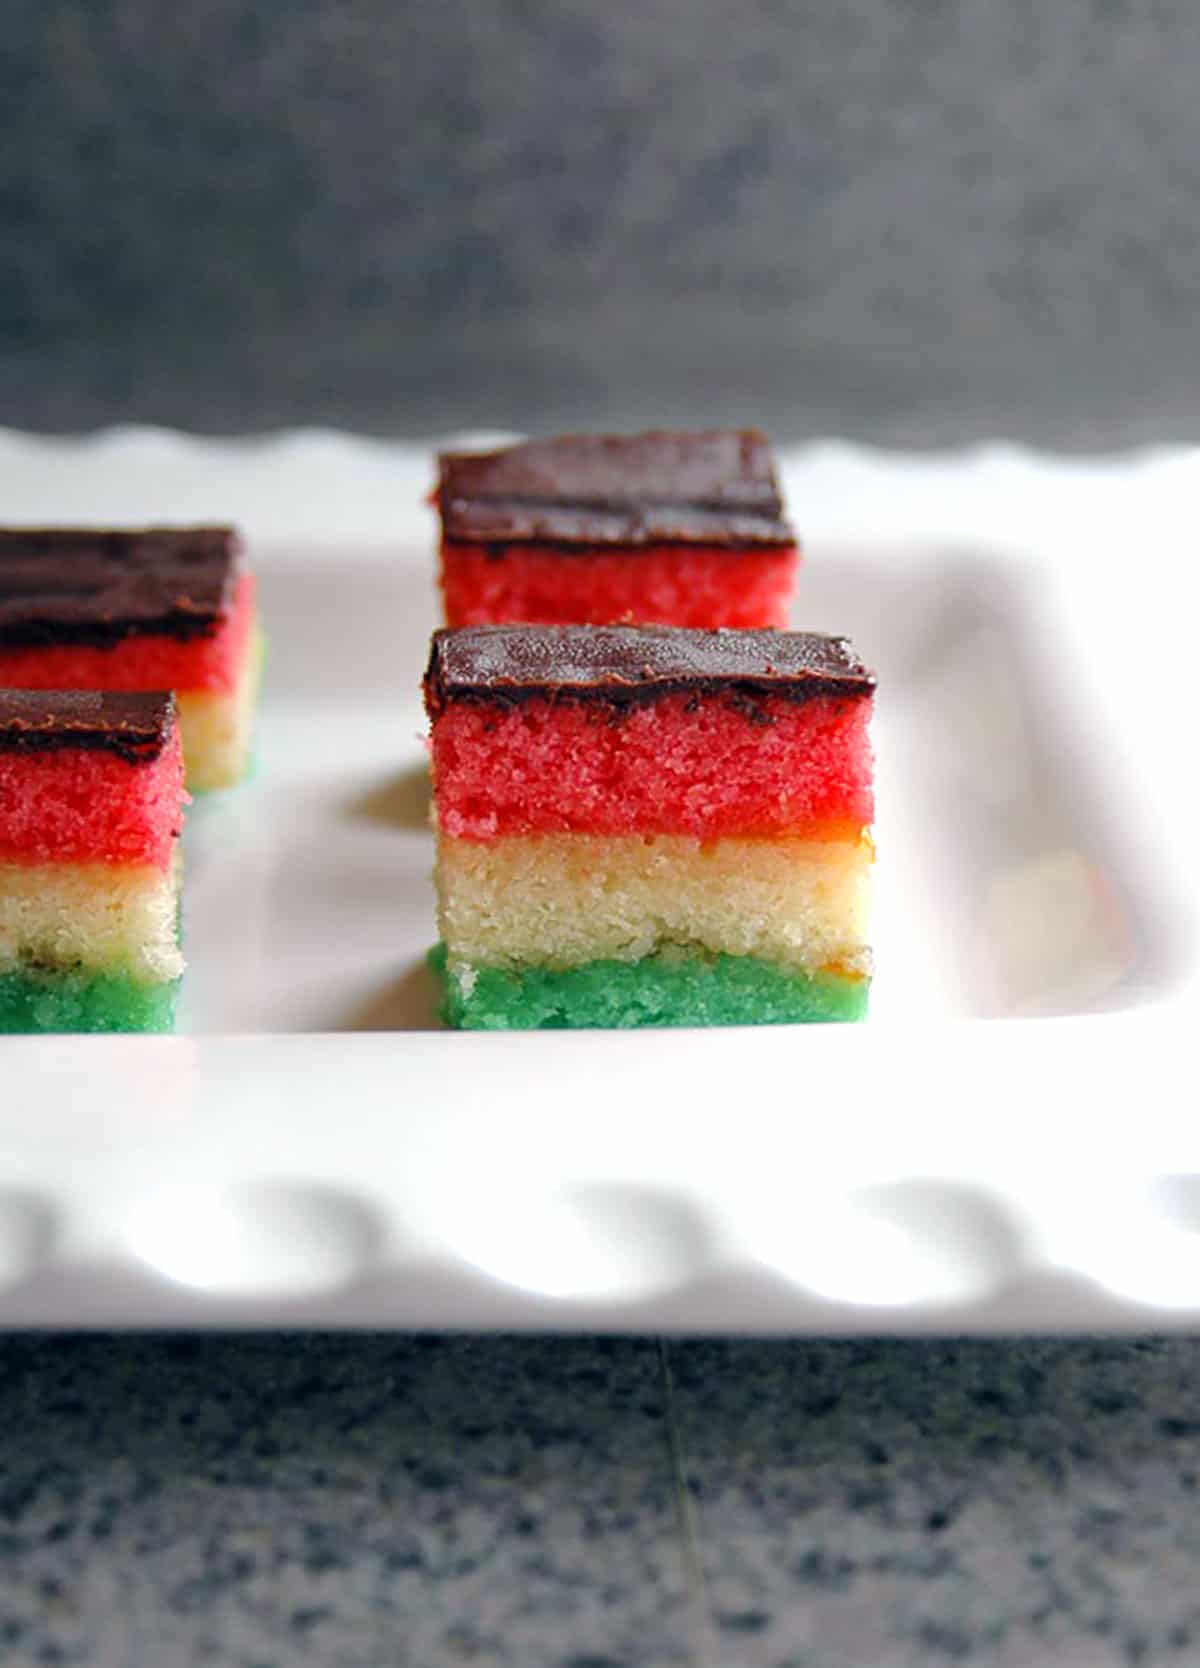
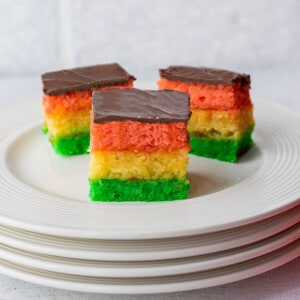
Made to resemble the Italian flag with its green, white and red stripes, these tri-color "cookies" consist of colorful sponge cake layers filled with apricot preserves and topped with glossy, semisweet chocolate.
But the predominant flavor here is almond, from almond paste in the cake batter. And...we up the ante by soaking each layer of cake with amaretto!
Oh, yes, my friends.
Read on to learn how to make these Italian flag cookies. The holidays wouldn't be the same without them, but you can serve these all year long! And don't miss these Italian Christmas cookies or our Chocolate Pizzelle Recipe!
Recipe ingredients
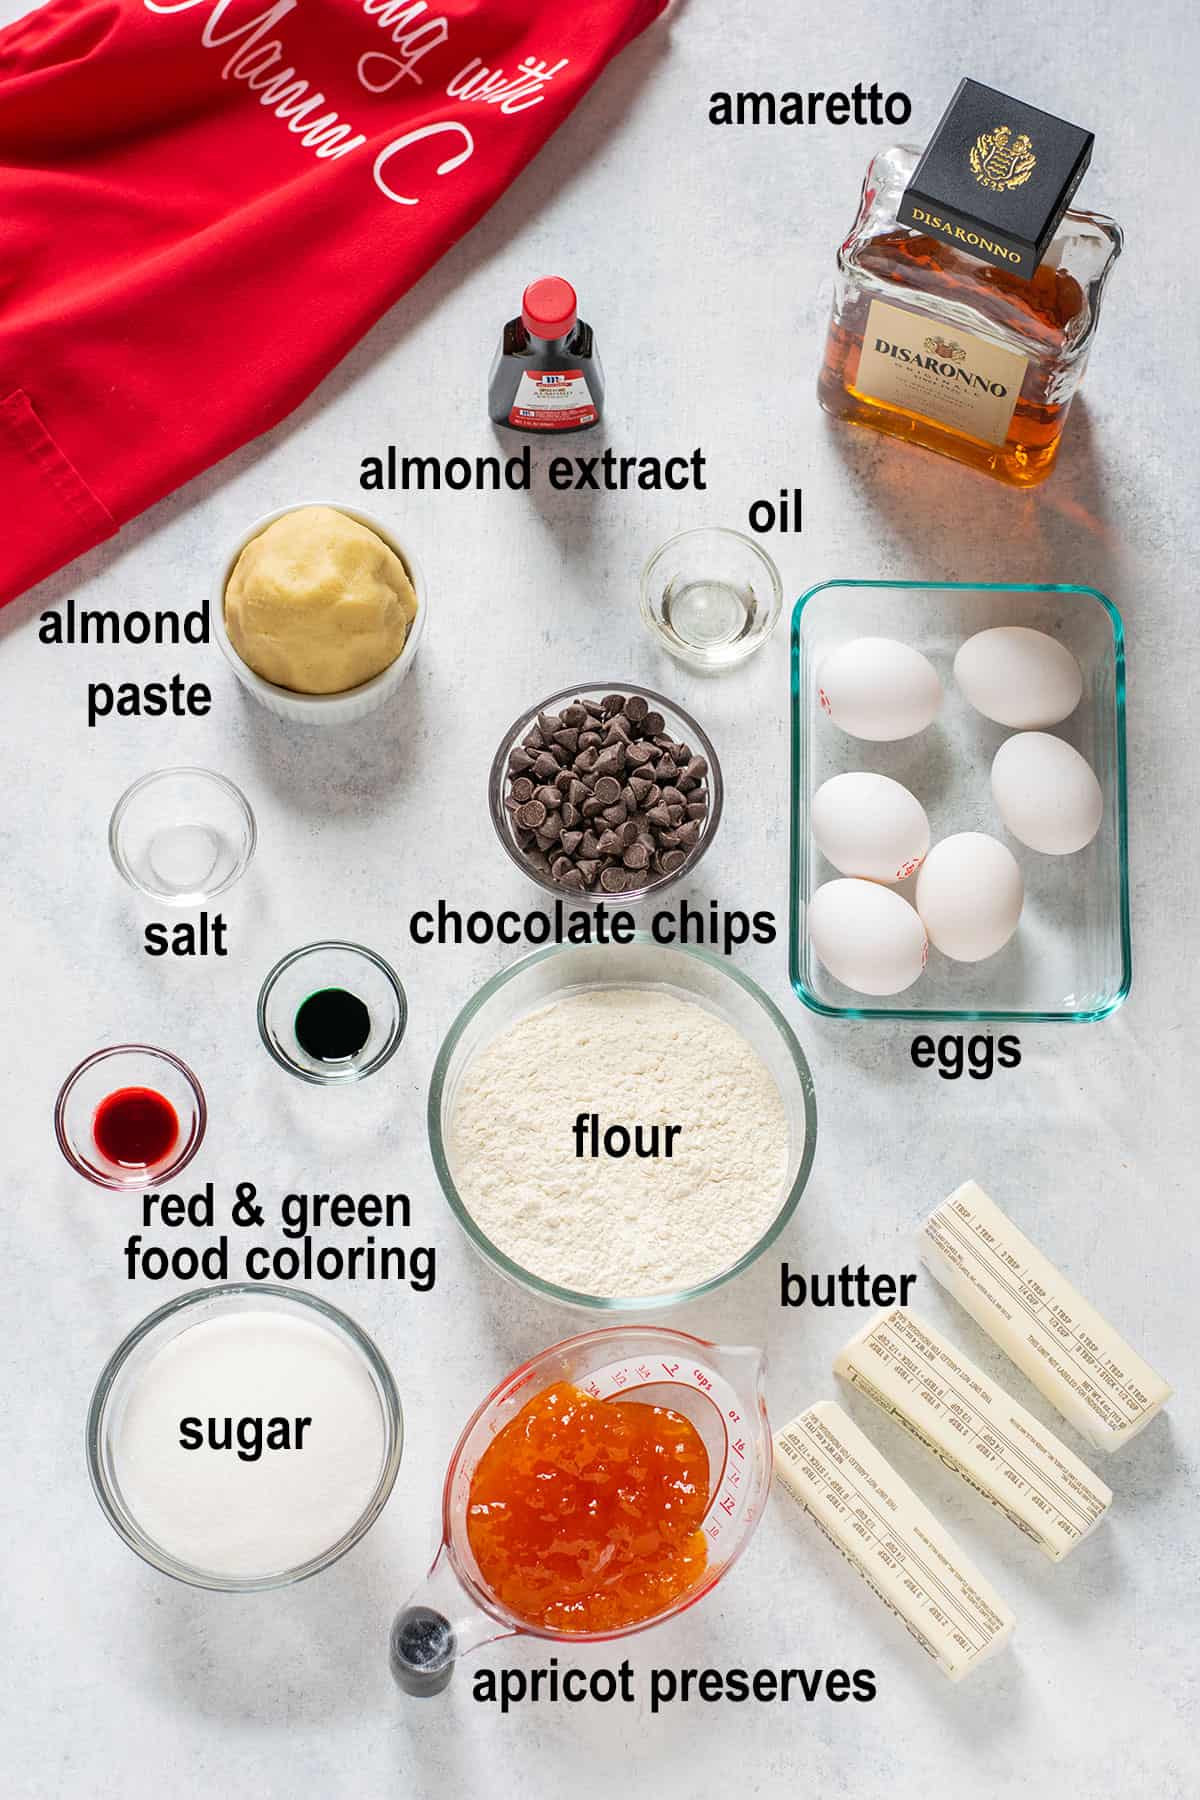
Almond Paste: This is the signature ingredient in these Italian layered cookies. You can make this almond paste recipe in five minutes, and it will provide your cookies with fresh almond flavor and a wonderful texture.
It contains almond flour, powdered sugar, an egg white, almond extract and salt. We also use the almond paste in these Italian Pignoli Cookies, and Amaretti Cookies contain similar ingredients.
I've included the instructions to make the almond paste in the recipe card below. Of course, you can buy the paste, (affiliate link), but it'll be sweeter and won't taste as fresh.
Amaretto: We love our rainbow cookies with a little boozy kick from almond-flavored liqueur! It also brings moisture to our sponge cake layers. But, feel free to omit it if needed.
We sometimes make an alcohol-free version for kids and a regular one for adults. We designate them by having one rainbow cookie cake with green on the bottom and one with pink on the bottom.
Apricot Preserves: These bring delicious flavor and moisture to our rainbow layers. You could substitute raspberry preserves if needed.
Food Coloring: I never use food coloring for anything but these cookies! You just need a few drops of red and few drops of green to help make the colorful cake layers resemble the Italian flag.
But, I have a friend who makes hers without food coloring so each cake layer is yellow, and the preserves in between provide some color.
Semisweet Chocolate Chips: I love the convenience of melting chocolate chips in the microwave to make the chocolate layer. You also could use squares of semisweet chocolate.
Oil: You just need two teaspoons of canola oil, vegetable oil or coconut oil to bring a beautiful sheen to the melted chocolate. Don't substitute corn syrup, because it doesn't work as well.
How to make Italian rainbow cookies
See the card at the end of this post for the full recipe, but here's an overview.
Make the batter
- Add sliced, room-temperature almond paste, sugar and almond extract to the mixing bowl.
- Beat until crumbly, then add three sticks of butter.
- Beat until it forms a dough. Add the eggs.
- Beat until the batter is creamy.
- Add the flour and salt and beat until the batter is creamy with no lumps.
Make the tri-color cake layers
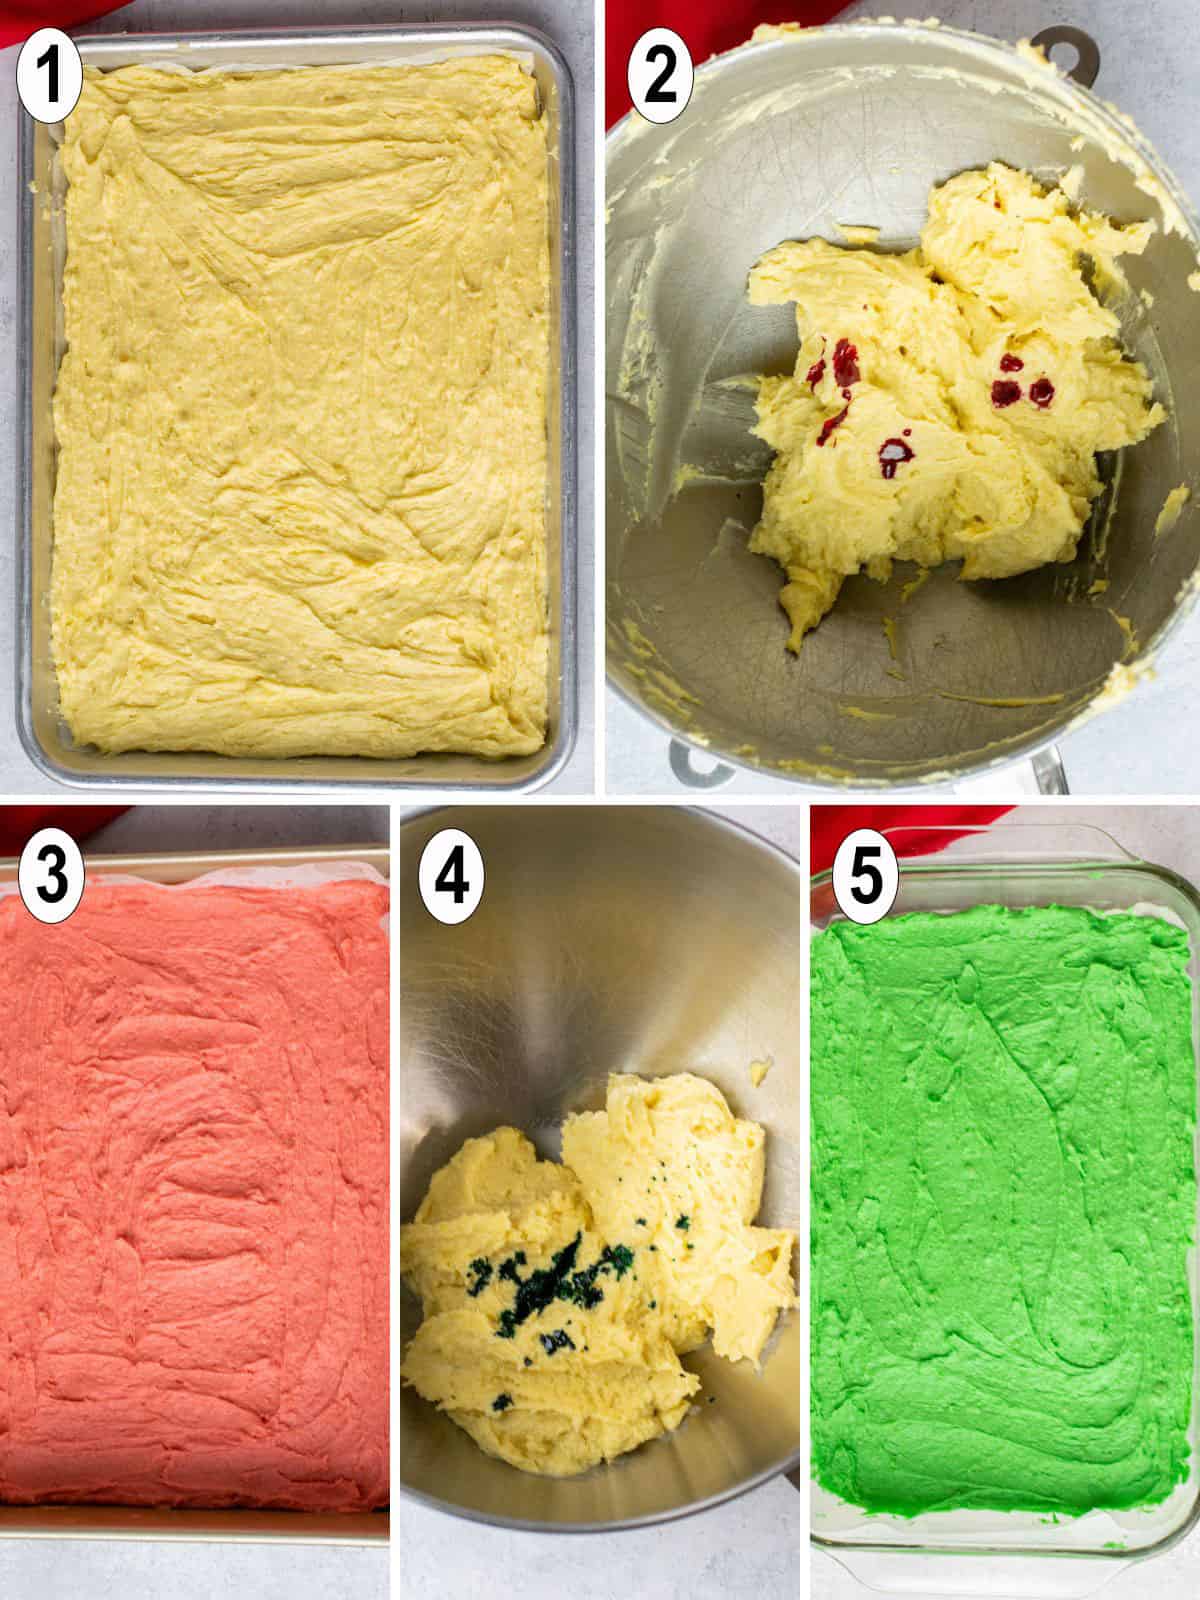
- Evenly divide the batter into three bowls. Spread the plain batter into a prepared 9x13 pan and bake it.
- Add red food coloring to the next portion of batter and stir to combine.
- Spread the pink batter into a prepared 9x13 pan and bake it.
- Add green food coloring to the last portion of batter and stir to combine.
- Spread the green batter evenly into a prepared 9x13 pan and bake it.
Assemble with amaretto + apricot jam
As long as you use the yellow cake layer in the middle, you can decide whether to use the green layer on the bottom or top.
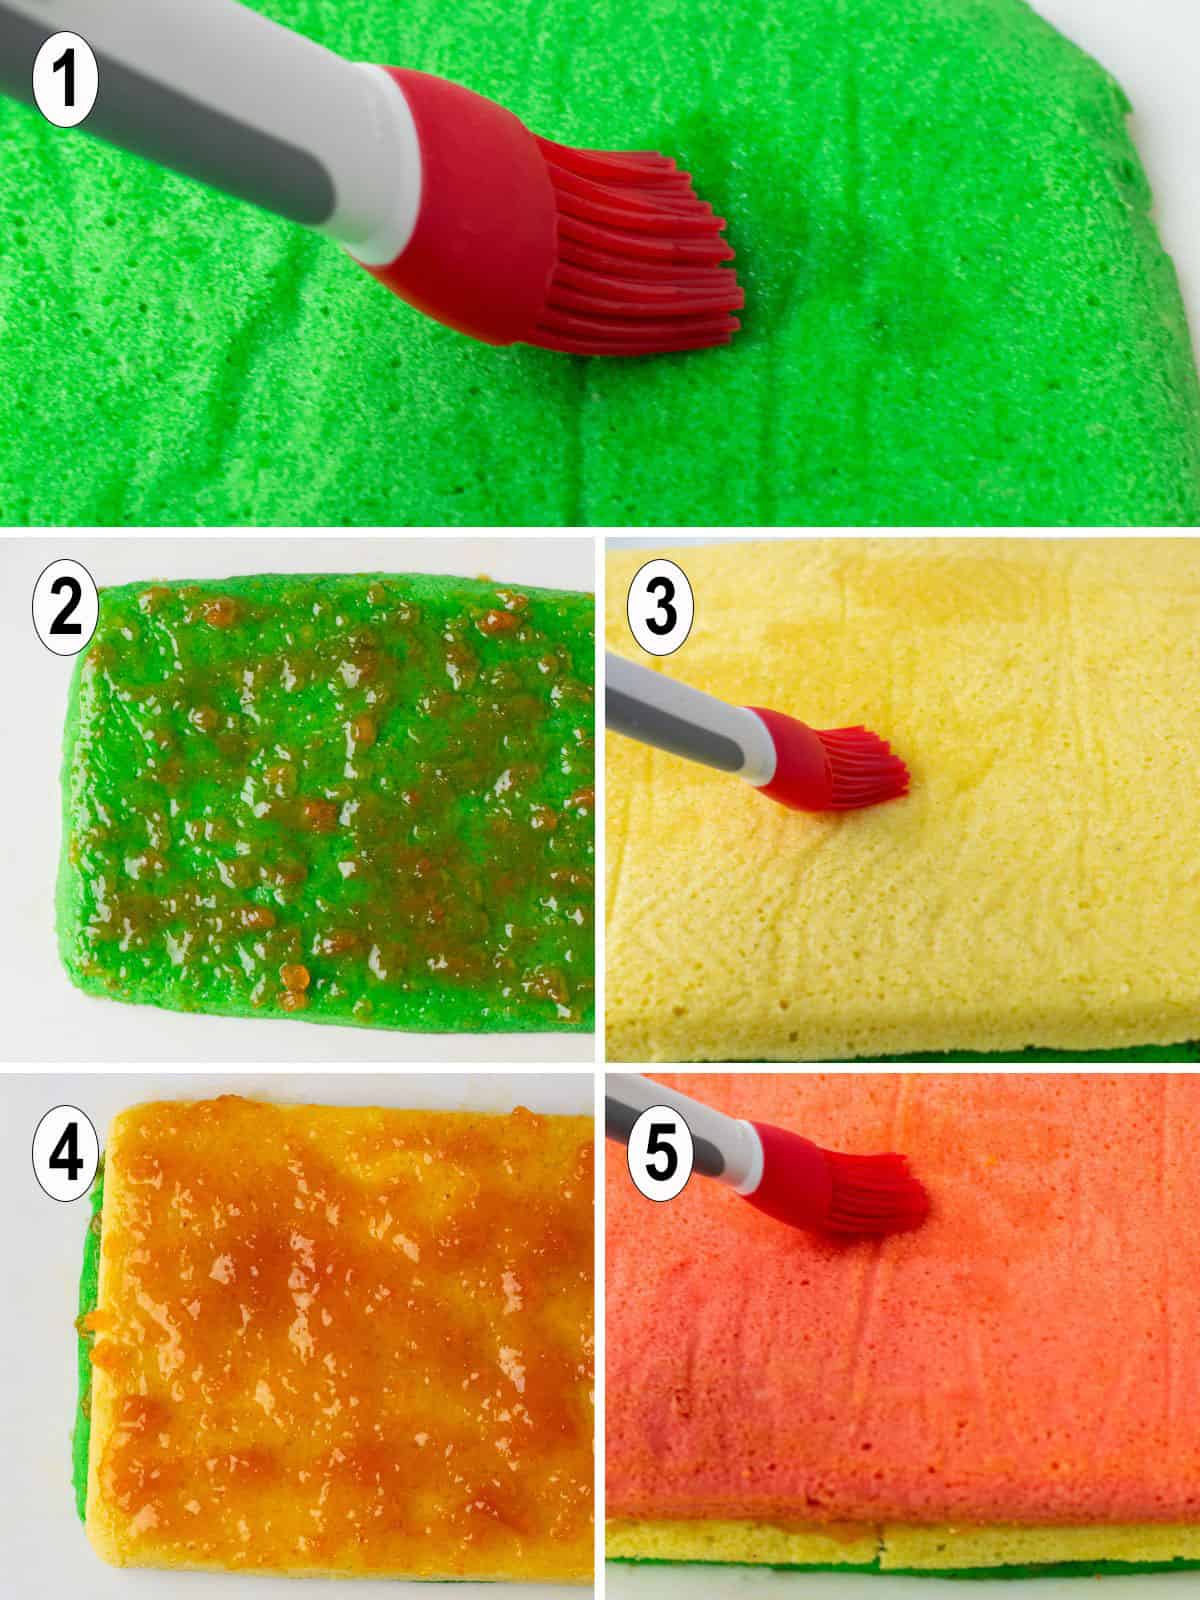
- Brush Amaretto onto the cooled green cake layer.
- Spread on apricot preserves with the back of a spoon.
- Place the yellow cake layer on top of the green layer. Brush on Amaretto.
- Spread on the apricot preserves.
- Top with the pink cake layer and brush on Amaretto. Don't use preserves for the top layer.
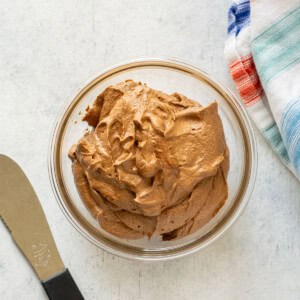
Make the chocolate topping
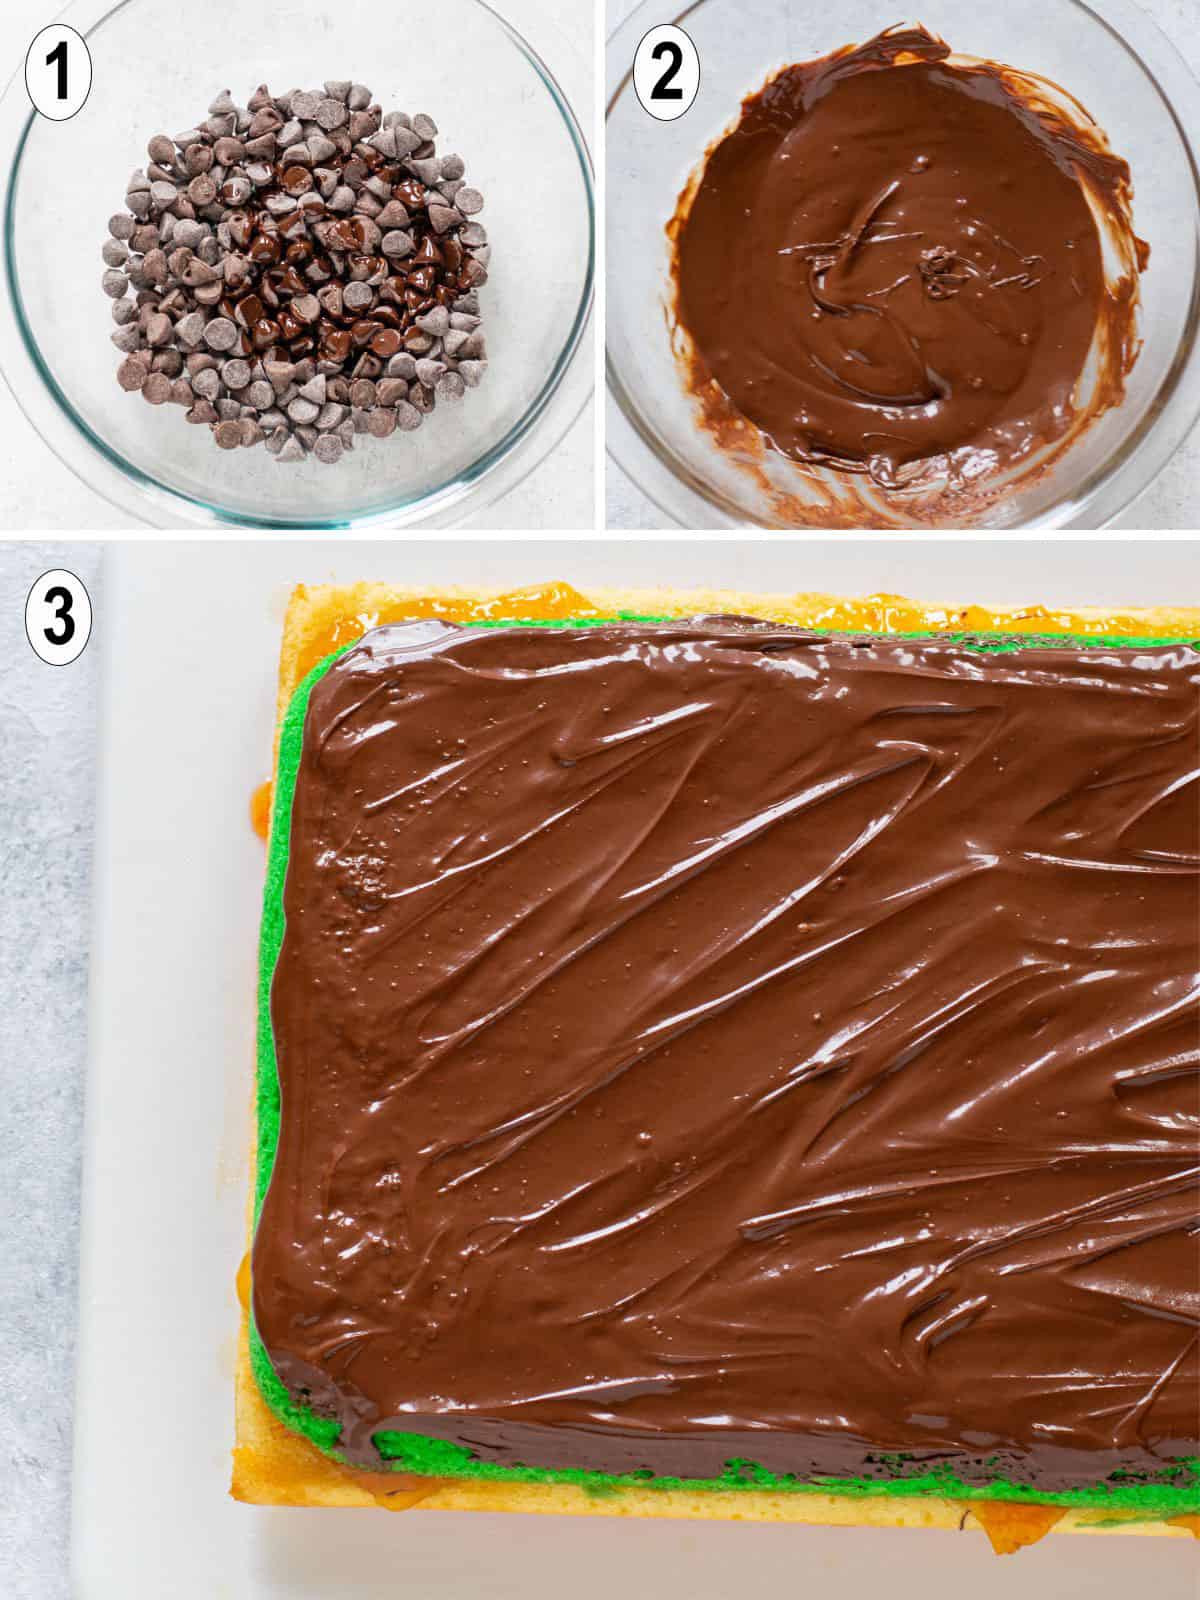
- Place semisweet chocolate chips and canola oil in a microwave-safe bowl.
- Lightly cover and melt the chocolate in the microwave for 30 seconds at a time.
- Quickly spread the chocolate on top of the Italian rainbow cake (this time, we used the green layer on top).
- Refrigerate for 30 minutes to set.

Sometimes, people make "Italian seven-layer cookies," with an additional layer of chocolate on the bottom. But we prefer these with a cake layer on the bottom and just one layer of chocolate on top.
Recipe tips
- To make it easy to flip the cake layers out of the pans, grease the baking pans, line them with parchment paper then grease and flour the paper surface. You can use baking spray, which contains flour.
- If you don't have three 9x13 pans (affiliate link), you can take turns using one to bake each of the layers.
- This recipe yields 72 rainbow cookie bars. You can halve the recipe using 8x8 pans to get 36 cookies.
Frequently asked questions
It's better to refrigerate rainbow cookies than to leave them at room temperature. They'll stay fresher in the refrigerator for up to a week. Store them in a sealed container.
At room temperature, the cookies will stay fresh for just a few days, then will start to get dry.
Yes, you can freeze Italian rainbow cookies for up to three months! I highly recommend doing so within a day of making them. They will taste so fresh!
Stack them in a sealed container with wax paper between each layer of cookies. You can eat them cold out of the freezer or allow them to sit out for about 30 minutes to soften.
Most people believe rainbow cookies originated in Italian-American bakeries from Italian immigrants who wanted a way to commemorate their heritage.
But the Italian Sons and Daughters of America site points out there are little rainbow pastries sold at Christmastime in Italy, so a version of these actually originated in Italy.
Although they're sometimes known as Venetian cookies or even Neapolitan cookies, they don't seem to be tied to a specific Italian region.
More delicious cookies to try
- Chocolate-Orange Cookie Bars
- Hazelnut Biscotti
- Italian Pizzelle
- Lemon Pizzelle
- Italian Jam Cookies (Pizzicati)
- Pecan Cloud Cookies
Enjoy!
If you try these Italian Rainbow Cookies, please leave a comment and a rating!
Italian Rainbow Cookies
Equipment
- parchment paper to line 3 (9x13) pans
Ingredients
14 Ounces Almond Paste (if not using store-bought)
- 2 cups almond flour (Measure by spooning into cups or weighing 186 grams.)
- 1 ½ cups powdered sugar (Measure by spooning into cups or weighing 162 grams.)
- 1 large egg white
- 1 ½ teaspoons almond extract
- ¼ teaspoon salt
Rainbow Cookies
- 14 ounces almond paste (See directions above or use store bought.)
- 1 ½ cups sugar
- 1 teaspoon almond extract
- 1 ½ cups salted butter (24 tablespoons) (at room temperature)
- 6 large eggs
- 2 cups all-purpose flour
- ½ teaspoon salt
- ⅓ teaspoon green food coloring
- ⅓ teaspoon red food coloring
Filling
- ¾ cup Amaretto (Divided use. Can omit if needed.)
- 1 cup apricot preserves (divided use)
Chocolate Topping
- 6 ounces semisweet chocolate chips
- 2 teaspoons canola oil (can use vegetable oil or coconut oil)
Instructions
Almond Paste
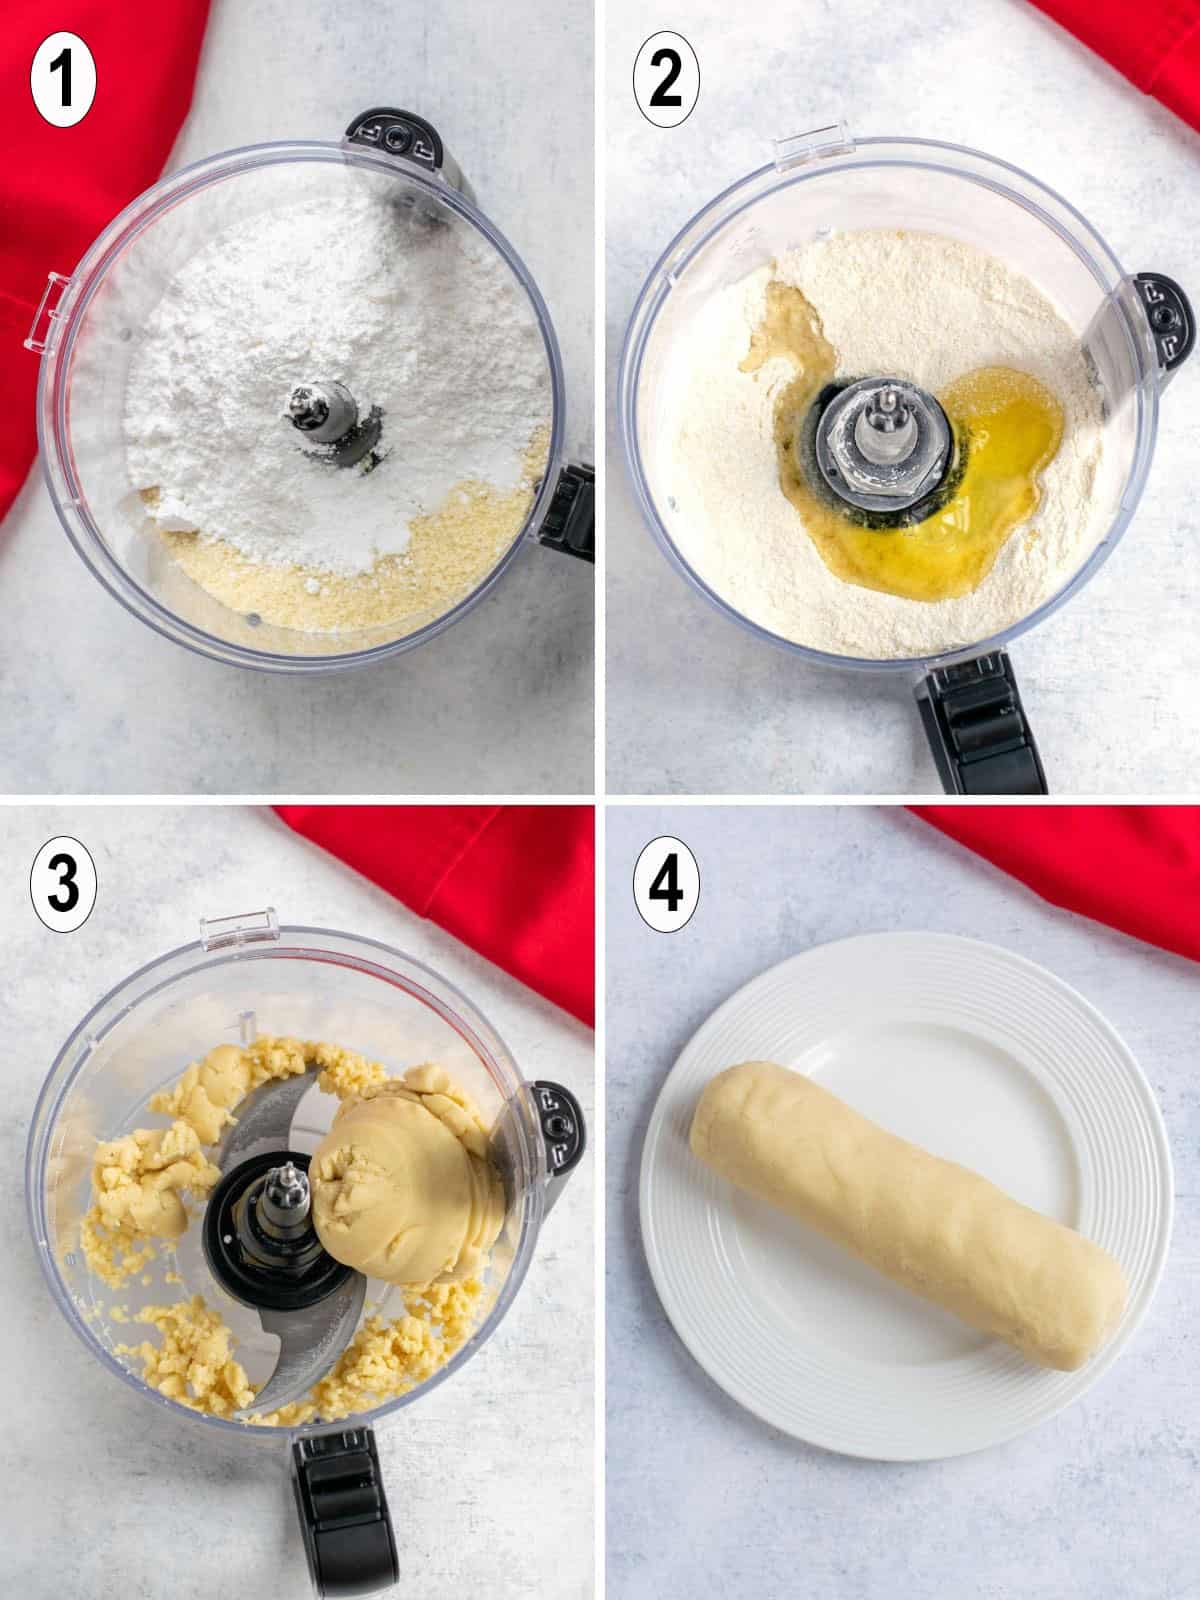
- Add the almond flour, powdered sugar and salt to the bowl of a food processor fitted with its blade. Use a spoon to stir the ingredients a bit.
- Pulse the almond flour mixture briefly to combine further. Stop the machine to scrape down the sides with a plastic spatula as needed.
- Separate the egg white from a large egg. (Store the yolk in the refrigerator for another use.) Add the egg white and almond extract to the food processor bowl. Pulse the machine again until the almond paste comes together in a ball.
- Scrape out all of the almond paste from the food processor and shape it into a log. If you're not going to use the paste within an hour, place the log onto a sheet of plastic wrap. Wrap the paste tightly and then place it in a zip-top plastic bag (or double-wrap it). Refrigerate it, then let it come to room temperature before using it in the cookies.
Cake Layers (9x13)
- Preheat the oven to 350 degrees F. Grease three (9x13) baking pans. After greasing them, line them with parchment paper, smoothing the paper down into the pans. Grease the tops of the parchment paper, then flour them (or use baking spray with flour).
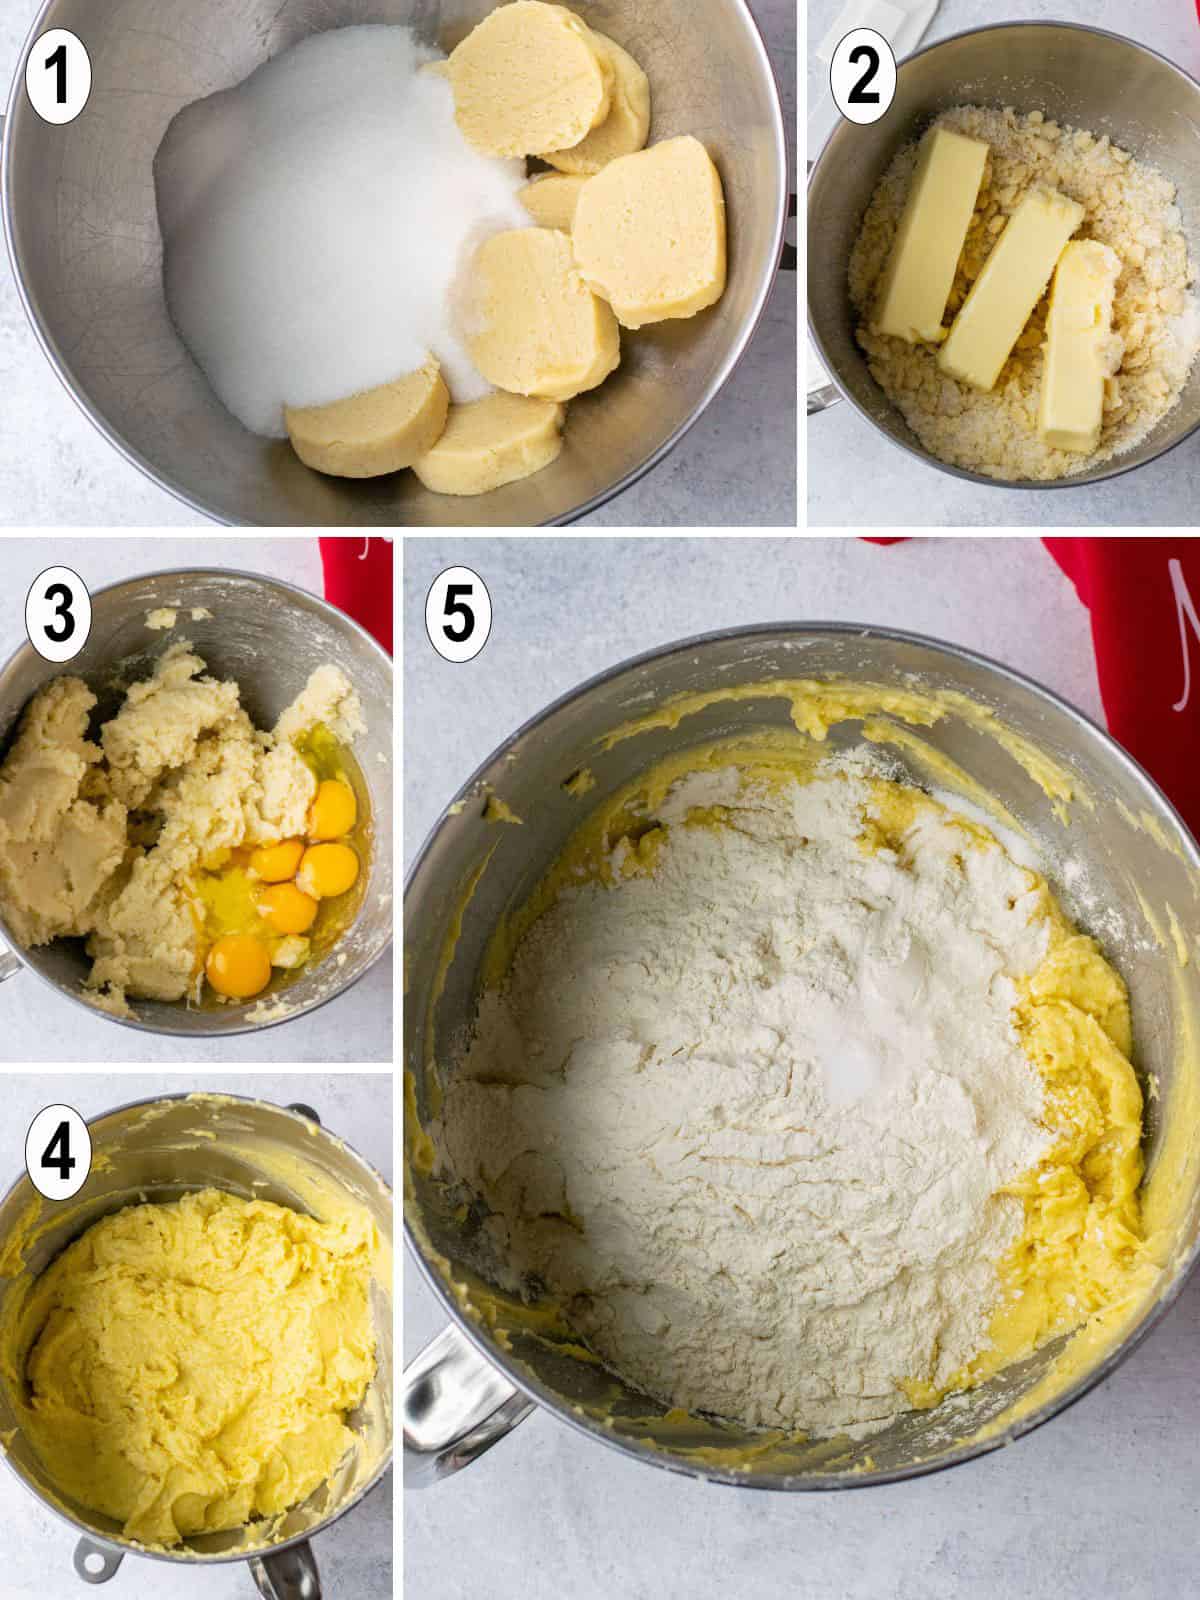
- In the bowl of a stand mixer or a large mixing bowl, add 14 ounces of room-temperature almond paste cut into slices, 1 ½ cups sugar and 1 teaspoon almond extract. Beat to combine into a crumbly mixture. Then add 1 ½ cups butter (3 sticks). Beat on low, then medium, until blended into a dough.
- Add 6 large eggs and blend on low for a bit so they don't splash. Then beat on medium speed, then medium-high. Beat until the batter is smooth and creamy.
- Stir ½ teaspoon of salt into 2 cups of flour. Add the mixture to the batter. Beat until it's creamy with no lumps.
- Divide the batter evenly into three bowls (you can use the mixing bowl as one of them.) If you have a food scale, use it to weigh three equal amounts of batter.
- Add ⅓ teaspoon of green food coloring to one of the bowls of batter. Stir to combine. Add ⅓ teaspoon of red food coloring to another bowl of batter. Use a clean spoon to stir it to combine.
- Spoon the batter from one bowl into one of the prepared pans. Spread the batter evenly with the back of a tablespoon. Bake it for 10-15 minutes, until it's set and a toothpick inserted in the center comes out clean. Cool the pan on a wire rack for about 30 minutes.
- While the first cake layer is baking, use a clean spatula to transfer the batter from another bowl into one of the prepared pans. Spread the batter evenly with the back of a clean tablespoon. Repeat with the last bowl of batter and your third 9x13 pan, making sure to use a clean spatula and spoon. Bake each cake layer for 10-15 minutes, as you did before. Cool each cake layer on a wire rack for 30 minutes.
- When the cake layers are cool to the touch, run the tip of a knife around the sides of the pans to loosen the cake layers. Flip the green layer onto a large, flat surface that can be refrigerated, such as a large cutting board or the back of an empty baking sheet. Gently pull off the parchment paper from the cake.
- Measure ¼ cup of amaretto. Brush all of it onto the cake layer, evenly. Then, use the back of a tablespoon to spread ½ cup of apricot preserves onto the cake layer.
- Flip the white cake layer on top of the green layer and press down gently to make it even. Gently pull off the parchment paper from the white cake.
- Measure ¼ cup of amaretto. Brush all of it onto the white cake layer, evenly. Then spread ½ cup of apricot preserves onto the cake with the back of a tablespoon.
- Flip the pink cake layer on top of the white layer and press down gently to make it even. Gently pull off the parchment paper from the red cake.
- Measure ¼ cup of amaretto. Brush all of it onto the pink cake layer, evenly. There is no apricot used on this layer.
Chocolate Topping
- Place the chocolate chips and canola oil in a medium microwave-safe bowl. Loosely cover with wax paper and heat the chocolate and oil for 30 seconds at a time, then stir. Continue doing this until the chocolate is melted and smooth.
- Immediately spread the melted chocolate on the top surface of the rainbow cake, working quickly. (Don't use chocolate on the sides.) If the chocolate in the bowl starts to harden, heat it again in the microwave for a few seconds to melt it.
- Refrigerate the assembled layers until the chocolate is firm, about 30 minutes. Then, let it sit out to come to room temperature before trying to cut it, so the chocolate doesn't crack and break. Use a long, serrated knife to trim ¼ inch from all the sides and set aside for snacking, if you wish. Cut the stacked layers into rectangular cookies that are about 1 ½ inches long and 1 inch wide.
- To store, place the cookies in a single layer in a container lined with wax paper. Refrigerate for up to one week or freeze for up to 3 months.
Notes
Nutrition
(Recipe Source: Cooking with Mamma C - My son and I tweaked his recipe to make it even better! Originally published on July 16, 2015 and updated now with step-by-step photos, additional information and an improved recipe.)


Theresa says
Terrific, easy recipe. Made them for my Italian mother-in-law, she loved them! Thank you for sharing!
Mamma C says
Hi Theresa - I'm so happy to hear that! You're welcome, and thanks for leaving a review.
Anna says
They are out of this world!!!
Mamma C says
Hi Anna - I'm so glad you loved them!
Lynette says
Hi Andrea,
This recipe looks amazing. I wanted to ask before I got started ( I have already gathered ingredients) There isn't any Baking powder or Whipped egg whites in this. Is this something that was left out on purpose? Im so excited to try this and want to do it correctly.
Thank you for sharing this wonderful recipe!
Mamma C says
Hi Lynette - Correct, there is no baking power nor whipped egg whites. This recipe was adapted from another recipe that didn't call for those either. I imagine they would make the layers too thick. - Andrea
Lynette says
Thank you Mama C! I appreciate it and I apologize for calling you Tammy. I was reading the comments before I commented and it was the last name I saw. So sorry. Holiday brain... Cant wait to try these. THank you so much for your quick response!!
Mamma C says
No problem! Enjoy.
Cheryl "Cheffie Cooks" Wiser says
Hi ANDREA, LOVELY COOKIES SO COLORFUL....HE DID A GREAT JOB-BRAVO...
Mamma C says
Thanks, Cheryl! Have a great weekend.
Tammy Renea @SanPasqualsKitchen says
How awesome that your son has this kind of ambition in the kitchen! Mine would barely attempt a grill cheese sandwich. haha This looks wonderful and sounds delicious, especially "soaking each layer of cake with Amaretto". Be still, my heart. Also, I'm glad I'm not the only one who turns in at 9pm. I constantly hear, "God, Tammy, my grandmother stays up later than that." haha It's beauty sleep, people!!!
Mamma C says
Tammy, I taught my son to cook pasta when he was eight years old, and he began attempting more and more recipes as he got older. I love that every once in a while, he makes something for us. 🙂 As for sleep, I find I need enough of it for peak performance and to feel my best. Whenever I stay up too late, I regret it the next day.