
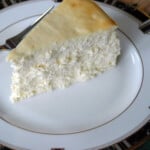
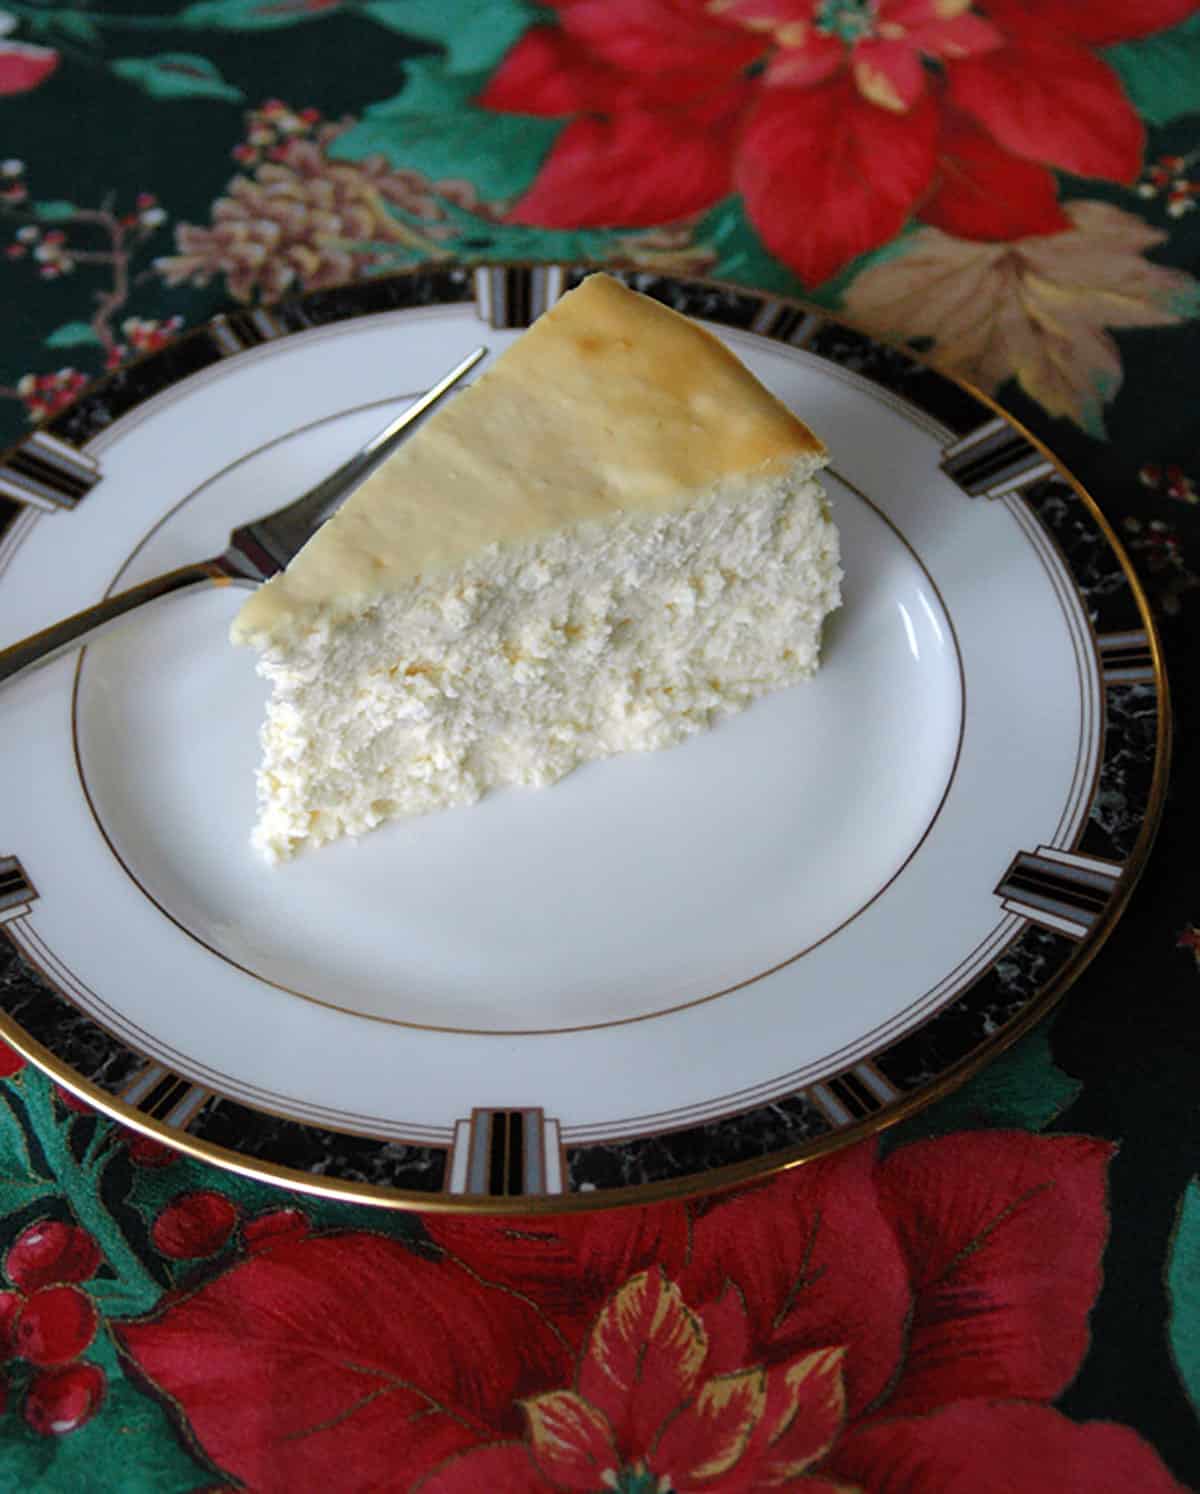
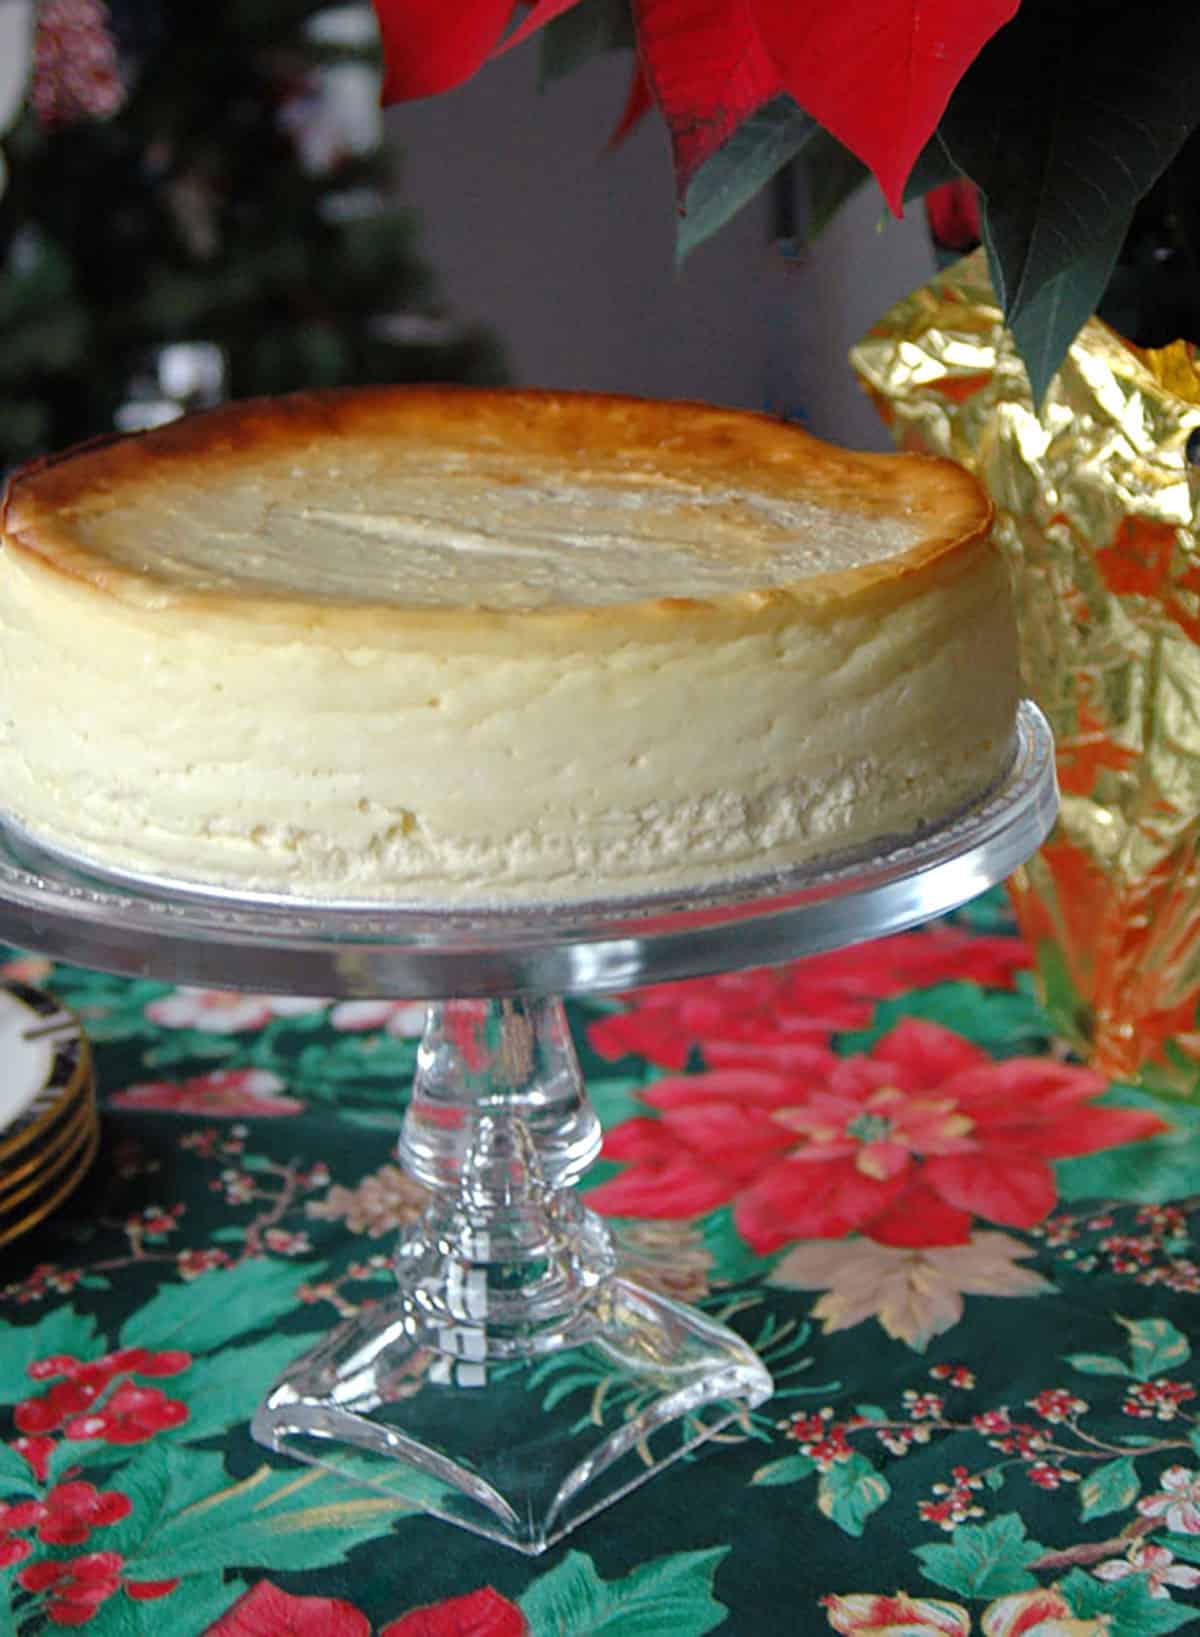
This Fluffy Crustless Cheesecake is simply the best, and it happens to be gluten-free! This New York-style cheesecake has fans all over the world! It's one of the most popular recipes on Cooking with Mamma C.
This Fluffy Crustless Cheesecake is the best cheesecake I've ever tasted! And it's become a holiday tradition for many Cooking with Mamma C visitors, ever since I posted the recipe in 2014.
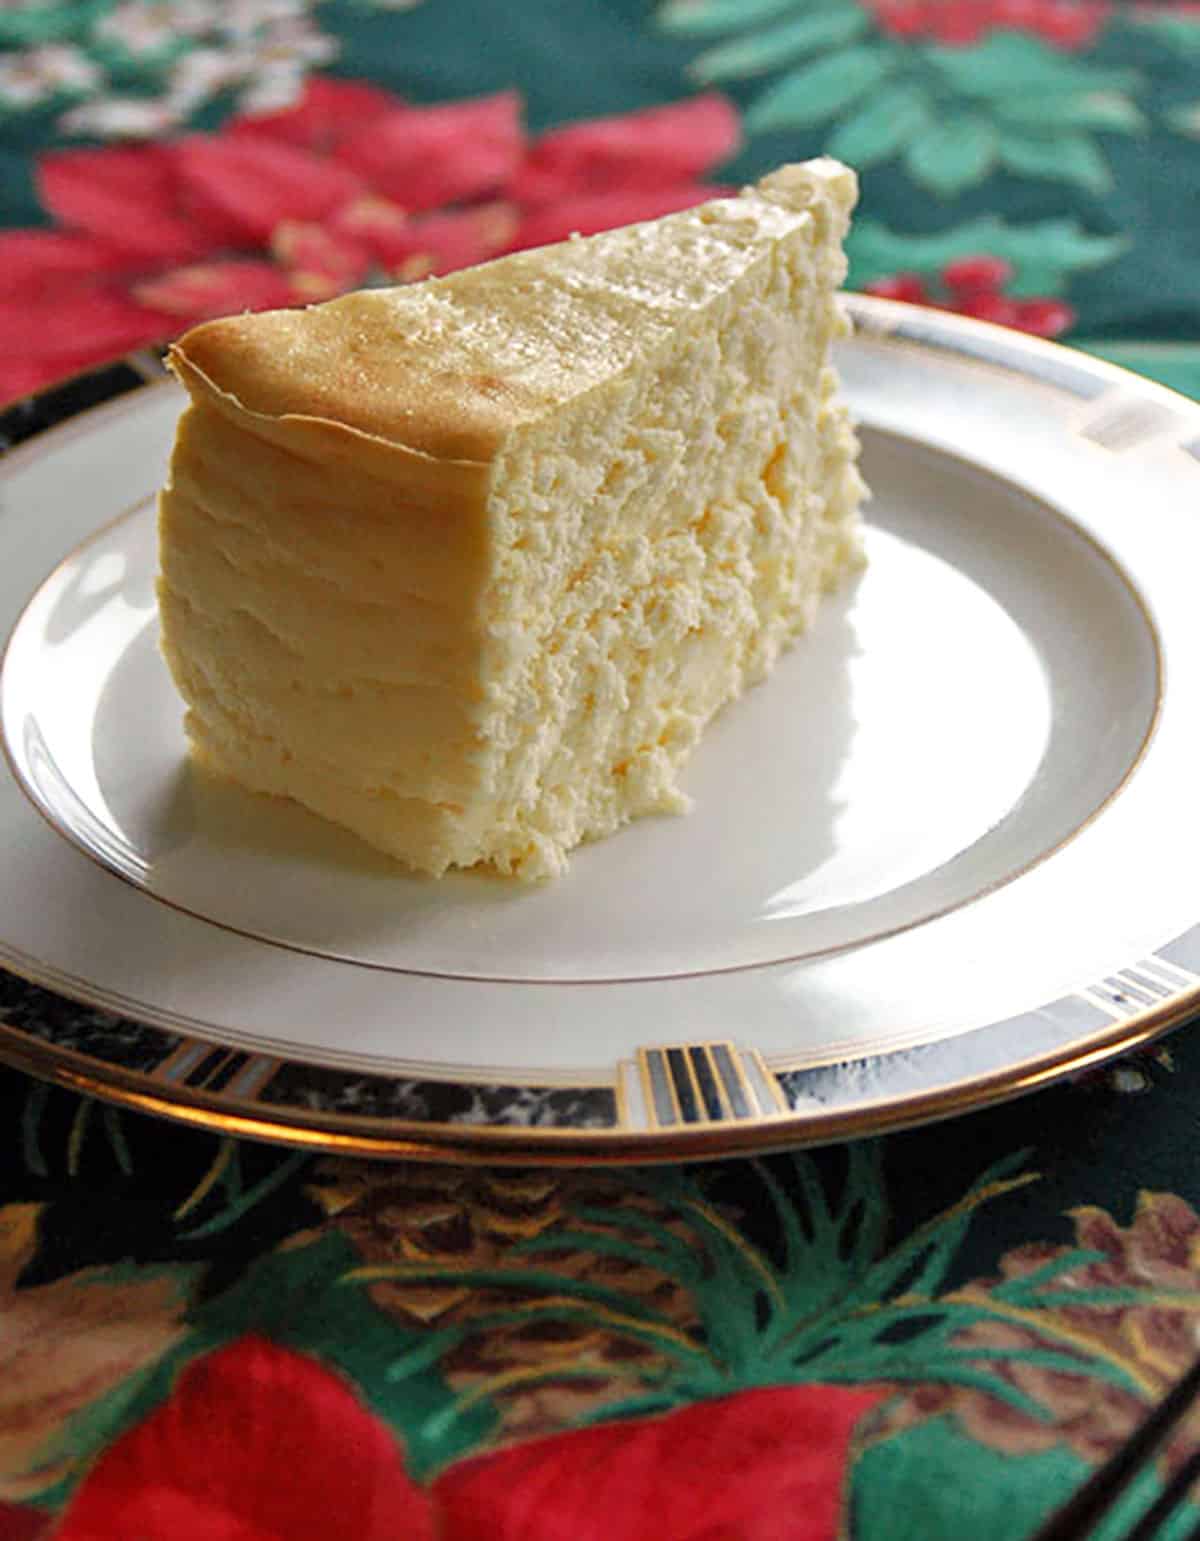
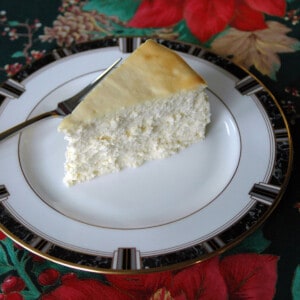
I'm almost at a loss for words in trying to describe this New York cheesecake without crust. It's fluffy, airy, luscious, creamy and so delicately soft.
It's pure decadence! And, since it's flourless, this is a gluten-free cheesecake.
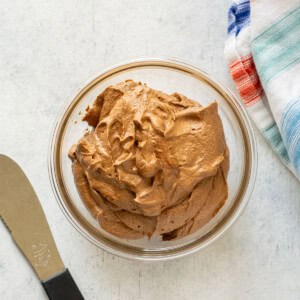
Delicious on its own, it's flavored with vanilla and is just begging to be accented with your favorite cheesecake topping. I've tried it with homemade versions of chocolate liqueur, strawberry liqueur and limoncello.
I know. To die for!
But it's excellent with non-alcoholic toppings like Italian Strawberries with Sugar and Lemon, caramel sauce and raspberry coulis.
We enjoy this crustless cheesecake on our trips to Connecticut to visit my in-laws for the holidays. A dear family friend makes it, and my mother-in-law stores it in the freezer to thaw when we arrive.
I asked for the recipe several years ago, and the rest is history!
Recipe ingredients
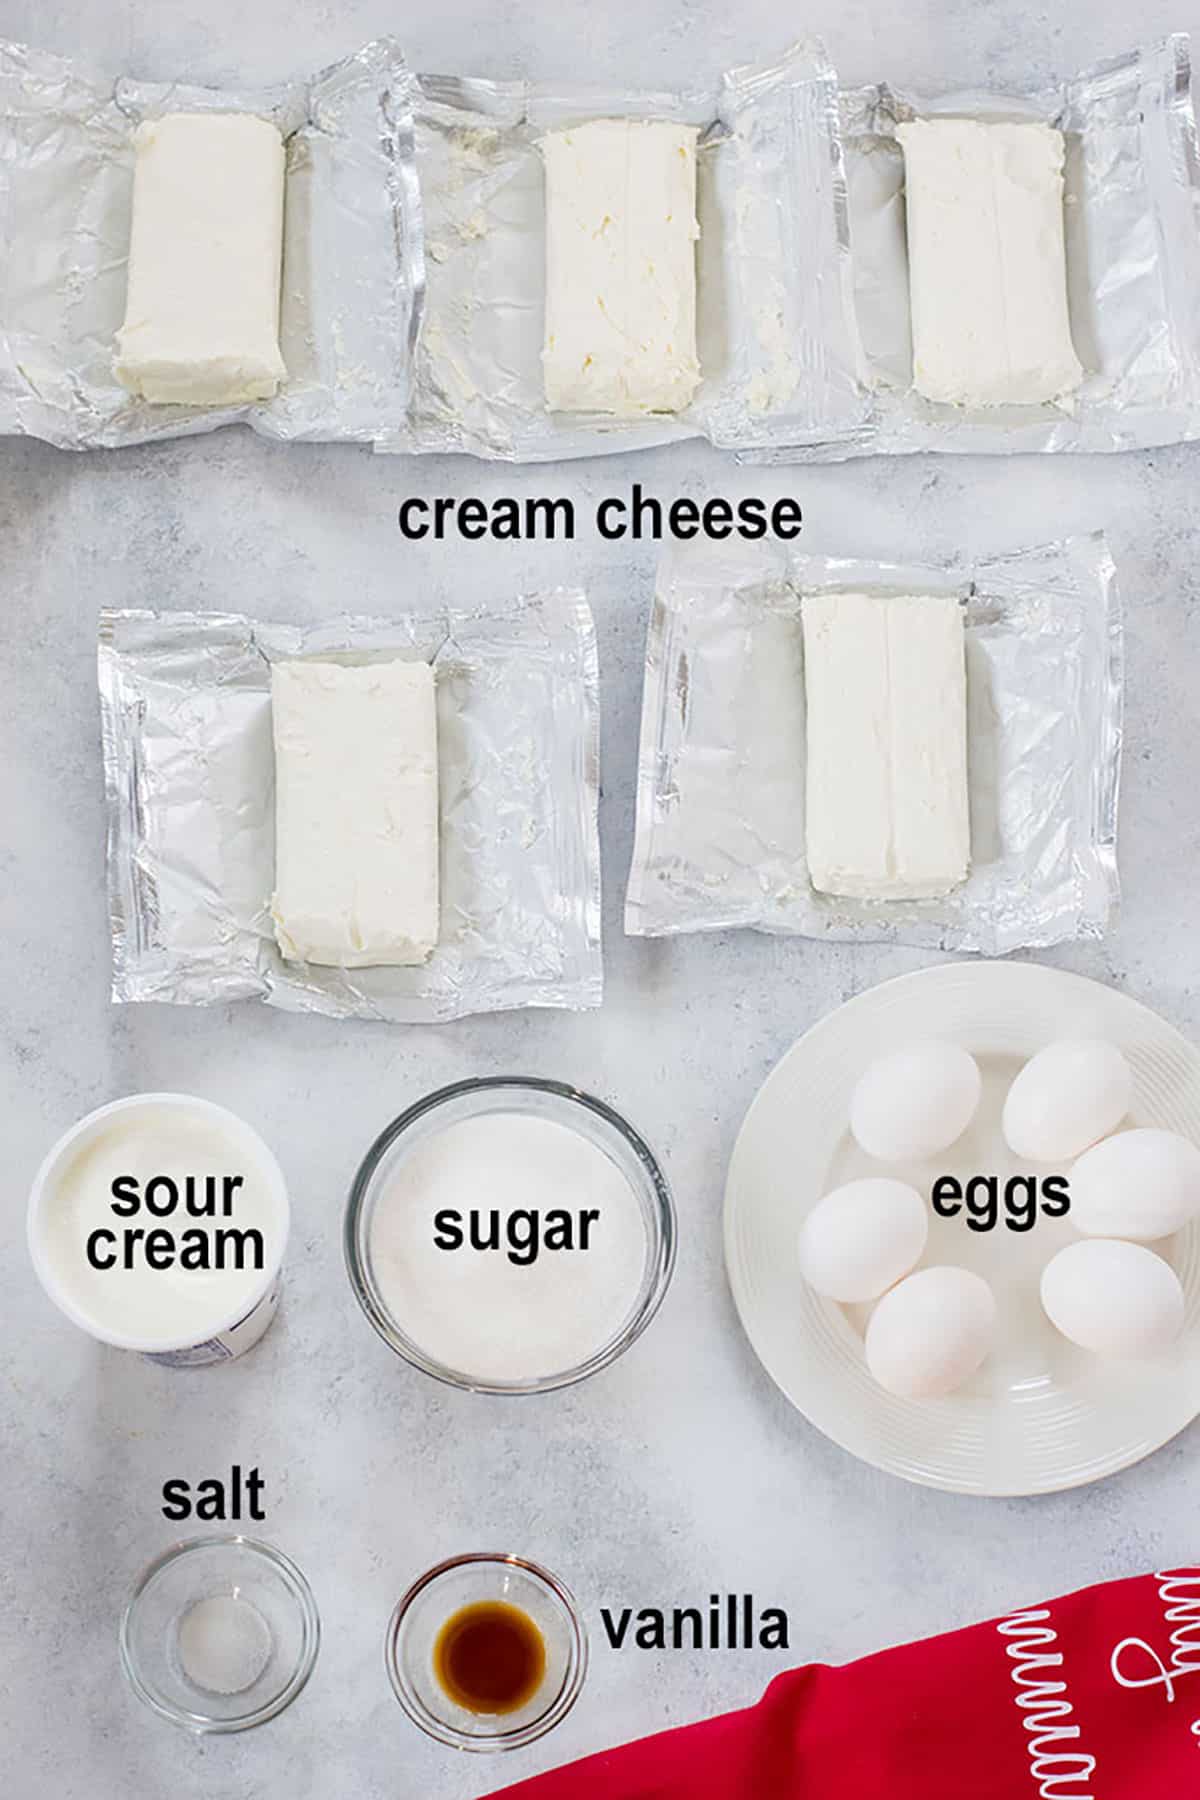
Cream Cheese - You'll need five, 8-ounce blocks for this tall cheesecake. We're not messing around!
You can use full-fat or low-fat cream cheese. Just make sure it's softened.
Sour Cream - The addition of sour cream to the batter makes this a New York-style cheesecake recipe. Use regular or low-fat sour cream.
Eggs: We're using large eggs here. I haven't tested this with other sizes.
For a keto cheesecake
You can easily make this no-crust cheesecake low carb. To make a keto crustless cheesecake, replace the sugar with a keto-friendly sweetener. Monk fruit sweetener (affiliate link) has the best taste, in my opinion.
How to make fluffy cheesecake
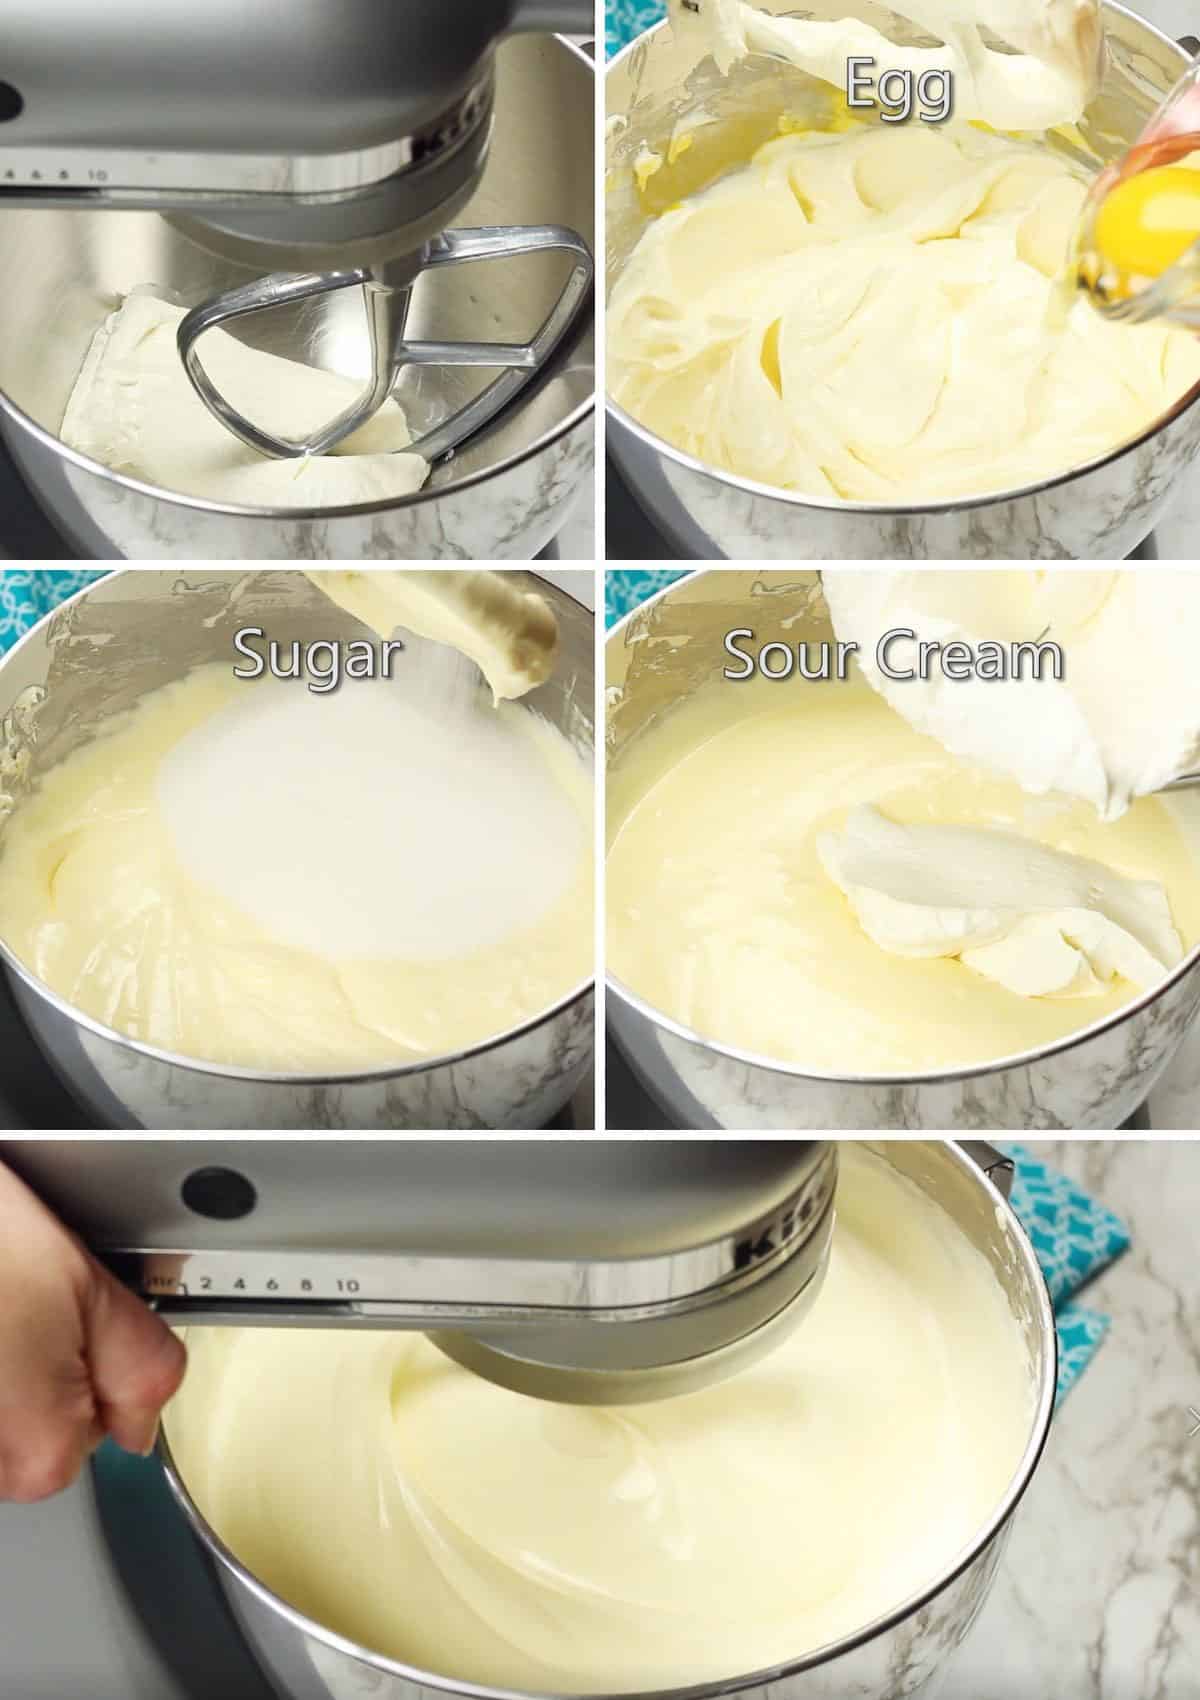
The key to this fluffy cheesecake recipe is beating in lots of air for volume! Besides beating after adding each ingredient, you'll beat the cheesecake filling for seven minutes.
See the recipe card at the end of this post for full instructions, but here's an overview.
Tips for the best crustless cheesecake:
- To prevent lumps, let the cream cheese, eggs and sour cream come to room temperature before starting. Beat each block of cream cheese one at a time, until it's smooth and creamy. Add each ingredient one at a time, beating after each addition, just until combined, then mix everything for seven minutes.
- To prevent over browning, move your top oven rack down to the second lowest position and bake your cheesecake there, with nothing above it so there's room. Also, if you have a dark springform pan, you'll need to reduce the oven temperature by 25 degrees. Note that your cheesecake will still taste good if it does get brown on top.
- To prevent cracks, bake your cheesecake in a water bath (bain marie) by filling a roasting pan ¼ full with hot water and placing your springform pan (affiliate link) with the batter in it. When done baking, leave the cheesecake in the oven with the door ajar for one hour.
- To prevent water from seeping into your springform pan, place your springform in a large pie dish first. Then set the pie plate with the springform in the water bath and proceed. If you don't have a pie dish large enough, you'll need to wrap the outside of the springform pan with heavy-duty foil (or a double layer of regular foil), covering the bottom, up the sides and inside the top of the rim.
How to tell when cheesecake is done
The cheesecake is done when the top is set, except for a small circle in the middle. Don't insert anything into the cheesecake to test it, or it will crack.
Turn off the heat and let the cheesecake stay in the oven with the door ajar for one hour. This allows the cheesecake to finish cooking in the center while the cake cools down gradually.
Frequently asked questions
You can freeze this cheesecake for up to three weeks with good results. The texture starts to change after that, but it can be used within two months.
Cover the cheesecake (whole, partial or sliced) with plastic wrap, then foil. You can leave the cheesecake in the springform pan and just wrap the whole thing.
Thaw the cheesecake in the refrigerator overnight or let it sit out at room temperature for 2-4 hours. You can thaw an individual slice in the microwave on the defrost setting for less than a minute.
You just need to release the buckle, then lift the sides of the pan to remove the circular frame. Keep the cheesecake on the bottom portion of the pan, however. You can even place the cheesecake with the base of the pan on a cake stand.
More dessert recipes to love
- Chocolate Cheesecake - A chocolate version of this gluten-free crustless cheesecake!
- Creamy Cheesecake with Sour Cream Topping - A family favorite for decades!
- Lemon Lush Dessert - A recipe made from scratch!
- Torta Caprese - A flourless chocolate-almond cake that's gluten free!
If you try this Fluffy Crustless Cheesecake, be sure to leave a comment and a rating!
Fluffy Crustless Cheesecake (NY Style)
Video
Ingredients
- 5 (8-ounce) blocks cream cheese (at room temperature)
- 6 eggs (large)
- 1 ⅓ cups granulated sugar
- ¼ teaspoon salt
- 1 teaspoon vanilla extract
- 1 pint sour cream (low-fat is fine)
Instructions
- Two hours ahead of time, unwrap the cream cheese blocks and set them out at room temperature to soften. Set out the eggs and sour cream also. When the cream cheese is softened, start the recipe.
- Move the top oven rack down to the second lowest position in your oven, with nothing above it (to prevent over browning the cheesecake). Preheat the oven to 400 degrees F. (If using a dark springform pan, you'll need to reduce the oven temperature by 25 degrees F for this recipe, or the cheesecake will brown too much. You'll start at 375 degrees, then lower to 350 degrees.)
- Grease a 10-inch springform pan. (See notes if you have a 9-inch springform.)
- Fill a roasting pan ¼ full with hot water. Prepare your springform pan to prevent water from seeping into it during baking. If you have a large pie dish, place the springform in it. If you don't have a pie dish large enough, you'll need to wrap the outside of the springform pan with heavy-duty foil (or a double layer of regular foil), covering the bottom, up the sides and inside the top of the rim.
- In a large mixing bowl, add one block of cream cheese and beat it until creamy. Continue adding one block of cream cheese at a time and beating well, scraping the bowl as needed. There must not be any lumps in your batter. Add the eggs one at a time, mixing after each addition on low. Add the remaining ingredients one at a time, mixing to combine after each addition. When all ingredients have been added, beat on high (or as high as you can without splashing) for seven minutes.
- Transfer the batter to the springform pan (filling it no more than ¾ of the way to the top; see notes for what to do with extra batter). Place the springform and bottom pie dish in the water bath and bake for 10 minutes at 400 degrees F. (Use 375 degrees for a dark pan.) Then lower the temperature to 375 degrees (use 350 degrees for a dark pan) and bake for 40-55 minutes, or until the top is set except for a small circle in the middle. Do not insert anything into the cheesecake to test it, or it will crack. Turn off the heat and let the cheesecake stay in the oven with the door ajar for one hour.
- Leave the cheesecake in the springform pan and let it finish cooling on a wire rack. Refrigerate it overnight before slicing it. Leave it uncovered the first night if you can, unless you have strong odors in your fridge from onions or something. (See notes.)
- To slice, remove the outer circle of the pan and dip a knife in warm water to make the cuts, wiping the knife clean after each slice. (Keep the bottom of the pan under the cheesecake. You can even place the cheesecake with the bottom portion of the pan on a cake stand.)
- Store the cheesecake covered in the refrigerator (you can keep it in the springform) for up to three days or freeze it for up to 3 weeks. Wrap it in plastic, then foil before freezing it. Thaw the cheesecake in the refrigerator overnight or let it sit out at room temperature for 2-4 hours. You can thaw an individual slice in the microwave on the defrost setting for less than a minute.
Notes
- Even if you have a 10-inch springform, just fill it ¾ full so it doesn't overflow.
- If you only have a 9-inch springform pan, fill it ¾ full with the batter. Bake the remaining batter in two ramekins or another suitable baking dish, in a water bath, ideally in a separate oven, so you can pull out them out earlier without affecting the springform cheesecake. I bake my extra batter in a separate oven for 10 minutes at 400 degrees, then 25 minutes at 375 degrees, then leave it in the oven with the door ajar for 20 minutes. If you don't have a separate oven, bake the ramekins/baking dish in the same oven with the springform cheesecake for the full amount of time (it's important not to open the oven during baking) and just know that the ramekins/baking dish will come out a bit overcooked, but tasty.
- Some readers have halved the recipe with good results.
- Whenever I cover the cheesecake with foil or wrap the first night, a few drops of moisture pool on top of the cheesecake, leaving a water stain on its surface. If you don't have strong odors in your fridge, try leaving the cheesecake uncovered for the first night.
- I have never tried making this with a crust.
- This cheesecake is barely adapted from a Williams Sonoma recipe.
Nutrition
(Recipe Source: Barely adapted from family friends Lee and Carol, who said it originally came from Williams Sonoma. Originally published on December 22, 2014 and updated now with additional photos and information.)

Patti says
Hi Mamma C,
I made a cheese cake almost identical to,this but I only used 32 oz of cream cheese. I am wondering about the beating part. You say not to over beat it but then you say to beat it for seven minutes. I did the same thing to mine. I beat it with my kitchen aid with the whip attachment but did not beat for 7 min. I want to try it this way. Mine came out great but it did brown to much on the edges. I saw where someone said if you use the water bath this will not happen.
I love your recipe and can't wait to make it. I also use swerve for sugar and you can't tell the difference.
Please advise on the beating part.
Thanks so much
Mamma C says
Hi Patti - This recipe calls for beating after each ingredient is added, then beating the batter for seven minutes. The seven minutes (with a paddle attachment) is required to create fluffiness and volume. Make sure your cream cheese is softened and comes to room temperature before you begin, so you won't end up overbeating the cream cheese when you add each block. Enjoy!
Karen C Lewis says
Going to make this again, but this time in a smaller pan so I can get some individual mini cakes. My thoughts on doing this (too keep it from cooking too fast due to the smaller volume): place ramekins or smaller pans in separate bath with COLD water. That way the cold water can absorb the heat and keep the batter in the smaller containers from heating up faster than the big cake.
Mamma C says
That's an interesting idea. Please let us know how it works!
Karen says
If I use my 9.5" springform, how many ramekins can I get out of it? I've used the 10" spring form and I can easily slice 16 pieces. But I want to have some extra to put in some smaller springform pans (5" diameter). How many ramekins did you fill up with a smaller springform pan?
Thanks.
Karen
Mamma C says
Hi Karen - I think I usually fill up four ramekins with extra batter, but it's been a while.
Karen C Lewis says
Awesome recipe! I made it last night and had it this morning for breakfast! It is delicious and delightful!
Mamma C says
I'm happy to hear that, Karen! Thanks for letting me know.
Marti says
Would a round Pyrex baking dish be suitable for baking a 1/2 recipe ( (i'm baking for only 2 people)?
I don't have a springform pan, but do have an 8" round glass baking dish, which is about 2.5" deep.
Mamma C says
Hi Marti - That might not be large enough. Here is a baking pan conversion chart.
Crystal says
I'm making this recipe tonight for probably the 4th time. It is *delicious*! Your instructions are easy to follow and the recipe is pretty easy to make. This is the first recipe I used a bain Marie for, the first time I made the recipe I made one with the water bath and one without to see the difference and they definitely turn out better using the water bath! My husband can't wait until tomorrow to dig into the cheesecake! Thank you for sharing the recipe!
Mamma C says
That's great to hear, Crystal! I'm glad the instructions are easy to follow. Enjoy!
Emily says
This looks amazing! I'm just beginning to venture into baking and can't wait to make it this week. My husband requested I make the cheesecake with a chocolate graham cracker crust (his favorite), however. Would I need to make any modifications to this recipe to be able to factor that in?
Mamma C says
Emily, I've never made this with a crust, so I don't know if any changes need to be made. If you try it, be sure not to fill your pan higher than 3/4 full with batter. You'll probably have extra batter to put in another baking pan or ramekins. Let me know if you try it!
maria in nj says
Momma C I cheesecake was delicious...everyone loved it! But I have a question about cutting it...is there a method that you use to get a nice cut...I did the wet knife trick and that did not work, when I cut into it there was still a good portion that adhered to the knife with each pass.....any suggestions?
maria in nj says
Hello Momma C, the cheesecake was an overwhelming success!! Everyone loved it! Sorry for another question but...is there a trick to cutting it? I tried to cut it using the wet knife method and that did not work, it was soft and fluffy and I could not get a good nice clean cut...any suggestions?
Mamma C says
That's great news, Maria! I will sometimes freeze the cheesecake and slice it when it's partially thawed. Some people swear by using unflavored, waxed dental floss to slice cheesecake. I haven't tried it, but I think I will next time.
Keti says
Hello,
I’m not sure how it can be transferred to a cooling rack after 1 hour of the cake remaining ajar in the oven. When I went to take it out after 1 hour it almost collapsed. Now it looks funny on the top which I will cover with caramel sauce.
Another thing, after being in the fridge over night do you take it out to soften before guests start eating? If so how much earlier do you suggest?
Thank you
Mamma C says
Keti, the cheesecake should stay in the spring form pan while it's cooling on a wire rack. I'm sorry if my instructions weren't clear on that point. (I just updated the recipe to clarify.) After being refrigerated overnight, the cheesecake will be firm on the edges but soft in the middle, but you can leave it out for 30 minutes or so before serving, if you prefer it even softer.