

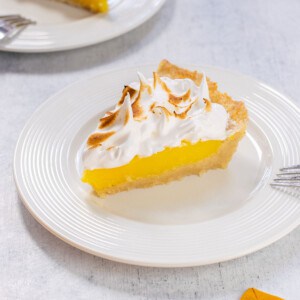
This Foolproof Lemon Meringue Pie recipe works! It features a tasty olive oil crust that you just press into place, a perfectly sweet-tart lemon filling and a toasty cloud of meringue on top. Don't miss all of my tips and tricks for success!

Behold, my favorite pie ever. I worked hard to get this Foolproof Lemon Meringue Pie just right.
It features:
- A sweet-tart filling with wonderful lemon flavor.
- A sturdy filling that won't turn soupy.
- A gorgeous, bronzed meringue that tastes like toasted marshmallows and doesn't become weepy.
- A delicious crust that's easy to make, with a slight sweetness that perfectly complements the lemon flavor.
It's fantastic, if I do say so myself! But, it's really important to follow all of my instructions carefully.
And if you love lemon desserts, don't miss this Pecan Lemon Pie Without Meringue or these Italian Lemon Knot Cookies!
Recipe ingredients

Pie Crust: The best pie crust for lemon meringue pie includes olive oil and has a hint of sweetness. And the best part is, you don't need to roll it!
But you can use any single pie crust you prefer. Some people make this with my Sugar Cookie Crust!
Lemon Juice & Zest: You'll need up to 2 ½ lemons for this pie, so buy three of them. (You might get away with using just two juicy lemons, but it's better to have extra just in case. )
Cream of Tartar: This helps stabilize the egg whites, making them easier to whip into a glossy meringue, as the Food Network explains.
How to make lemon meringue pie
See the card at the end of this post for the full recipe, but here's an overview.
Make lemon pie filling
This is the no-fail, lemon pie filling recipe I've been using for nearly a decade. It's also delicious when doubled for homemade lemon lush from scratch.

- Whisk sugar, flour, corn starch and salt in a heavy-bottomed saucepan.
- Gradually whisk in water and make sure the corn starch mixture is fully incorporated before placing the pan over heat.
- Use a silicone spatula to gently stir the mixture until thickened and bubbly, then lower the heat and cook for two minutes more.
- Temper the egg yolks by mixing in a cup of the hot filling, then add the yolk mixture to the pot with the corn starch mixture. Gently stir, boil briefly and cook a couple of minutes more.
- Add butter and lemon zest, stirring gently to combine.
- Gradually stir in the lemon juice until fully incorporated.
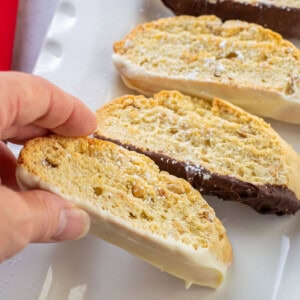
Make the crust
To make the olive oil pie crust, whisk the flour, sugar and baking powder. Then stir in the olive oil and milk with a fork.

Gather the dough into a ball and press it into place, poking holes along the bottom to prevent puffing. Blind-bake the crust (without anything inside) for 10 minutes.

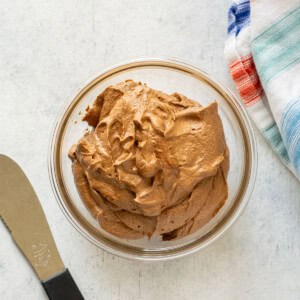
Make the meringue topping
Meringue for pie involves beating egg whites, sugar and cream of tartar into stiff peaks. Since baking the meringue can cause it to weep, I recommend torching the surface instead.

I've always topped this pie with French meringue (which is not heated), then torched it. However, using this method means some of the egg whites are still raw underneath the torched surface.
I've recently experimented with Swiss meringue, which involves using a double boiler to whisk the egg whites, sugar and cream of tartar in a bowl over simmering water. This method ensures the whites are heated to a safe temperature, but doesn't achieve the same volume as a French meringue when beaten and will start to leak after a day.
I'm including instructions for both methods in the recipe card. The Egg Safety Center says yolks are a more likely breeding ground for bacteria than whites, but if you have any safety concerns, make the Swiss meringue.
Assemble it

- Add the hot lemon filling to the pie crust. Freeze briefly until firm.
- Spread on the meringue by starting at the edges of the pie, making sure to completely seal the filling so the meringue doesn't slide off later. Use a kitchen torch to brown the top.

Recipe tips
- Separate the eggs when they're cold (it's easier), but beat the egg whites when they're at room temperature for a fluffier meringue in less time.
- Once you place the corn starch mixture over heat, it's important to only stir slowly and gently with a silicone spatula, so you don't break down the starch molecules, which would make the filling runny.
- Briefly freezing the lemon pie filling in the crust allows it to set and become firm before you add any meringue topping. Don't skip this step!

Make-ahead options
While you'll need to make the meringue the same day you want to serve the pie, you can make the crust and lemon filling a day ahead of time. Store them covered in the refrigerator with the filling inside the crust.
Storing the pie
Store this Foolproof Lemon Meringue Pie in the refrigerator for up to three days. You can leave the pie uncovered so as not to mess up the torched meringue, but if you have a round cake container, you can refrigerate it in that. Don't freeze it.
More recipes like this
- Lemon Ricotta Pancakes with Olive Oil
- Lemon Waffle Cookies
- Strawberry Amaretto Pie
- Blueberry Pie with Cookie Crust
- Brownie Pudding Pie
Enjoy!
If you try this Foolproof Lemon Meringue Pie recipe, please leave a comment and a rating!
Foolproof Lemon Meringue Pie
Equipment
Ingredients
Crust for 9-inch pie
- 2 cups all-purpose flour
- 1 tablespoon sugar
- ½ teaspoon salt
- ⅜ teaspoon baking powder
- ½ cup olive oil (not extra virgin)
- ¼ cup milk (low-fat is fine; can use an extra teaspoon if needed to blend)
Lemon Filling
- 3 egg yolks (I use extra large)
- 2 teaspoons lemon zest
- ⅓ cup lemon juice (from about 2 ½ lemons)
- 1 ⅛ cups sugar
- 3 tablespoons all-purpose flour
- 3 tablespoons corn starch
- 1 dash salt
- 1 ½ cups water
- 2 tablespoons salted butter
French Meringue (will contain partially raw egg whites after being torched; see notes for cooked version.)
- 3 egg whites (extra-large)
- ¼ teaspoon cream of tartar
- 6 tablespoons sugar
Instructions
- Preheat the oven to 450 degrees F. For the crust, whisk the flour, sugar, salt and baking powder in a 9-inch pie dish. Whisk the milk and olive oil in a measuring cup and add the liquid to the pie dish. Stir with a fork to blend. If it seems too dry, add an extra teaspoon of milk. When the dough is mixed, press it evenly along the bottom and up the sides of the dish to form a crust. (It will feel soggy.) Crimp the edges with two fingers.
- Use a fork to poke holes in the bottom of the crust and where it meets the sides, so it won't puff up while baking. Bake for 10 minutes or until just golden. Don't overbake it, or the crust will be tough. (If you see the crust puffing in the oven, just open the door and poke more holes.) Let the crust cool on a wire rack.
- While the crust is baking, separate the eggs, placing the yolks in a large mixing bowl and the whites in a medium mixing bowl. Beat the yolks slightly with a fork. Set the yolks and whites aside, letting them come to room temperature.
Lemon Pie Filling
- For the filling, rinse and dry two lemons. Zest the lemons until you have 2 teaspoons. Cut the lemons in half (you will probably need half of a third lemon) and squeeze them until you have ⅓ cup of lemon juice. Set it next to your stove.
- In a medium, heavy-bottomed saucepan (I use my stainless steel one) whisk together the sugar, flour, corn starch and salt. Gradually whisk in the water. Make sure the corn starch mixture is fully incorporated before placing the pan over heat. Use a silicone spatula for gently stirring from this point forward. Place the pan over medium-high heat and slowly, gently stir until thickened and bubbly. Reduce the heat. Cook and stir slowly and gently for two more minutes, and remove the pan from the heat.
- To temper the egg yolks so they don't scramble, gradually mix in one cup of the hot filling into your bowl of yolks. Then, add the yolk mixture to your pot with the rest of the filling. Stir slowly and gently over medium-high heat and bring to a gentle boil. (Lower the heat if needed.) Cook and stir slowly and gently for two minutes more. Remove from the heat. The filling should be very thick.
- Carefully stir in the butter and lemon zest. Gradually stir in the lemon juice (gently!), making sure the liquid is fully incorporated before adding more. Stir until there is no liquid pooling at the sides of your pan.
- Pour the hot filling into the pie crust. Freeze the filling and crust for 10-20 minutes, until the filling is firm to the touch and set.
French Meringue (or see notes to make Swiss Meringue with heated egg whites)
- While the filling is chilling in the freezer, make the meringue. Add the cream of tartar to the egg whites in the medium mixing bowl. Using clean beaters, beat the egg whites with an electric mixer on medium speed until soft peaks form. (The tips will curl.) Gradually add the sugar, one tablespoon at a time, beating at high speed until the sugar is dissolved and stiff, glossy peaks form. (When you turn off your mixer and lift up the beaters, the peaks should stand up firmly without falling over.)
Top with Meringue & Torch It
- Spoon the meringue over the chilled filling, starting at the edges of the filling, where it meets the crust. Completely cover the filling and seal it by pressing down slightly at the edges. When all of the meringue is spooned on top, you can make decorative swirls using the back of your spoon to smooth and lift the peaks. Use a kitchen torch (or a blow torch from your garage) to brown the meringue.
- Let the pie sit at room temperature for at least half an hour before slicing it, making sure the bottom of the pie is cool first. Serve it the day you add the meringue, for the best quality and texture. Store leftover pie in the refrigerator for up to three days. You can leave it uncovered so as not to mess up the meringue or store it in a round cake container. Don't freeze it.
Notes
- Bring a saucepan with two inches of water to a simmer over medium-high heat. Whisk 4 extra-large egg whites with ½ cup sugar and ½ teaspoon cream of tartar in a stainless steel mixing bowl that will fit over the pan of simmering water.
- Place the bowl with the whites mixture over the pan of simmering water, making sure the water isn't touching the bottom of the bowl. Whisk constantly for four minutes.
- Test to see if the sugar has dissolved by dipping your finger in the whites and rubbing between your fingers to see if it feels gritty. If it's gritty, it needs to be heated longer.
- Otherwise, wear oven mitts to remove the bowl and then use an electric hand mixer with clean beaters to beat the whites into stiff peaks that barely droop when you lift up the beaters. It can take 6-10 minutes.
Nutrition
(Recipe Source: Crust adapted from King Arthur Flour. Pie ingredients and method adapted from Better Homes and Gardens New Cook Book, 1989. Originally published on March 18, 2016 and updated now with new photos, additional information and a tweaked recipe.)


Sitare says
This dessert was something that I failed miserably many years ago, thus I avoided making another attempt until I found yor recipe which turned out to be great success, many thanks… I applied all the steps carefully… I had little bit more lemon juice as my lemons were quite big, therefore the taste of the lemon curd turned out to be little on the acidic side but regardless the taste was overall excellent, THANK YOU SO MUCH….
Mamma C says
Hi Sitare - I'm so glad this was a great success for you! Be sure to use just 1/3 cup of lemon juice, as called for in the recipe, regardless of the size of the lemons.
Susan says
The pie was a big hit when I made it for Easter! I definitely will make it again. Thank you
Mamma C says
Hi Susan - I'm so glad to hear that! You're welcome, and thanks for leaving a review!
Jen says
in the directions it states add butter... but no where in your ingredients do you have butter listed
Mamma C says
Hi Jen - It's two tablespoons of salted butter. Thank you for catching that! It must have gotten deleted during the last update. I just fixed the recipe card.
Sandi says
Not sure what I did wrong but I had a very runny filling. Will try it again as the tartness of the filling was perfect for us. I have another lemon meringue pie recipe that always comes out great. I re-read the recipe and don’t see anything I missed. Oh well. Just served it with spoons instead of a fork.
Mamma C says
Hi Sandi - Something to pay attention to is the "gentle" stirring while making the lemon filling. It should be slow stirring in order not to break down the corn starch molecules. That should work for you next time, but please let me know. I'm glad you enjoyed the taste.
Faith Walker says
The crust is the best. The lemon filling was a little too sweet The top was really good.When I do it again I will add maybe 7/8 of a cup of sugar because 1 1/8 cup was too much.
Mamma C says
Hi Faith - I love the crust too! Feel free to adjust the sugar in the filling, if you want it more tart.
Sandra says
Today we were experiencing a blizzard outside and that means cooking in the kitchen inside. Came across this recipe a while ago and was waiting for the perfect opportunity to make it. Today was the day.
I love the olive oil crust as it was cookie-like. My family detests soggy pie crust and this crust was great! I only had large eggs so I used 4 eggs instead of the 3 extra large recommended in the recipe. We like tart foods and this lemon meringue pie came through for us. I could have reduced the sugar in the meringue but decided not to although I may next time. Once I had all the ingredients measured and out on the counter, this recipe was easy to make. No runny lemon filling!! Thank you for all the helpful tips as they made all the difference in creating the perfect lemon meringue pie.
According to my husband aka the pie expert, "If I were judging this pie, I would give it first prize!".
This lemon meringue pie recipe is a keeper!
Mamma C says
Thank you for your detailed feedback, Sandra! I'm so glad you and your husband enjoyed this pie. I love that he would give it first prize!
Sarah says
Excellent recipe! Making this for a Mothers Day this year and I'm hoping it will be a hit! (It's five stars but my iPad won't let me hit the fifth star)
Mamma C says
Thank you, Sarah. I'm so glad! Enjoy! 🙂
Jess @ What Jessica Baked Next says
Love lemon meringue pie! This looks great, I'm really pleased you perfected the recipe. Looking forward to giving it a try soon. I'm intrigued by the olive oil pastry crust! 🙂
Mamma C says
The olive oil pastry crust has made pies more achievable for me. I use milk in the recipe, instead of water, because it makes it more tender. My mother was skeptical when she heard I wasn't going with a butter crust, but then she absolutely loved it! I hope you try it, Jess!
Cheryl "Cheffie Cooks" Wiser says
Oh Yum Andrea-trial and error but what a masterpiece in the end. Bravo!
Mamma C says
Thank you, Cheryl! It was definitely worth it, and hopefully, everyone reading can benefit from what I learned.
annie@ciaochowbambina says
Love, love, love this! Who wouldn't want to be greeted by a tart, lemony hello? This was one of my favorite desserts of my mom's growing up...still is! I tell you what - she was one of those people who could whip off a lemon meringue pie like it was nothin'! You've reminded me that I need to get on that bandwagon! Your pie is gorgeous! And thank you for all the trouble you went through so that we may have a perfect experience! Pinned!
Mamma C says
Thank you so much, Annie! Props to your mom for being able to do this with ease. It took me a while, but I feel like I learned some important lessons. Have a great weekend!