

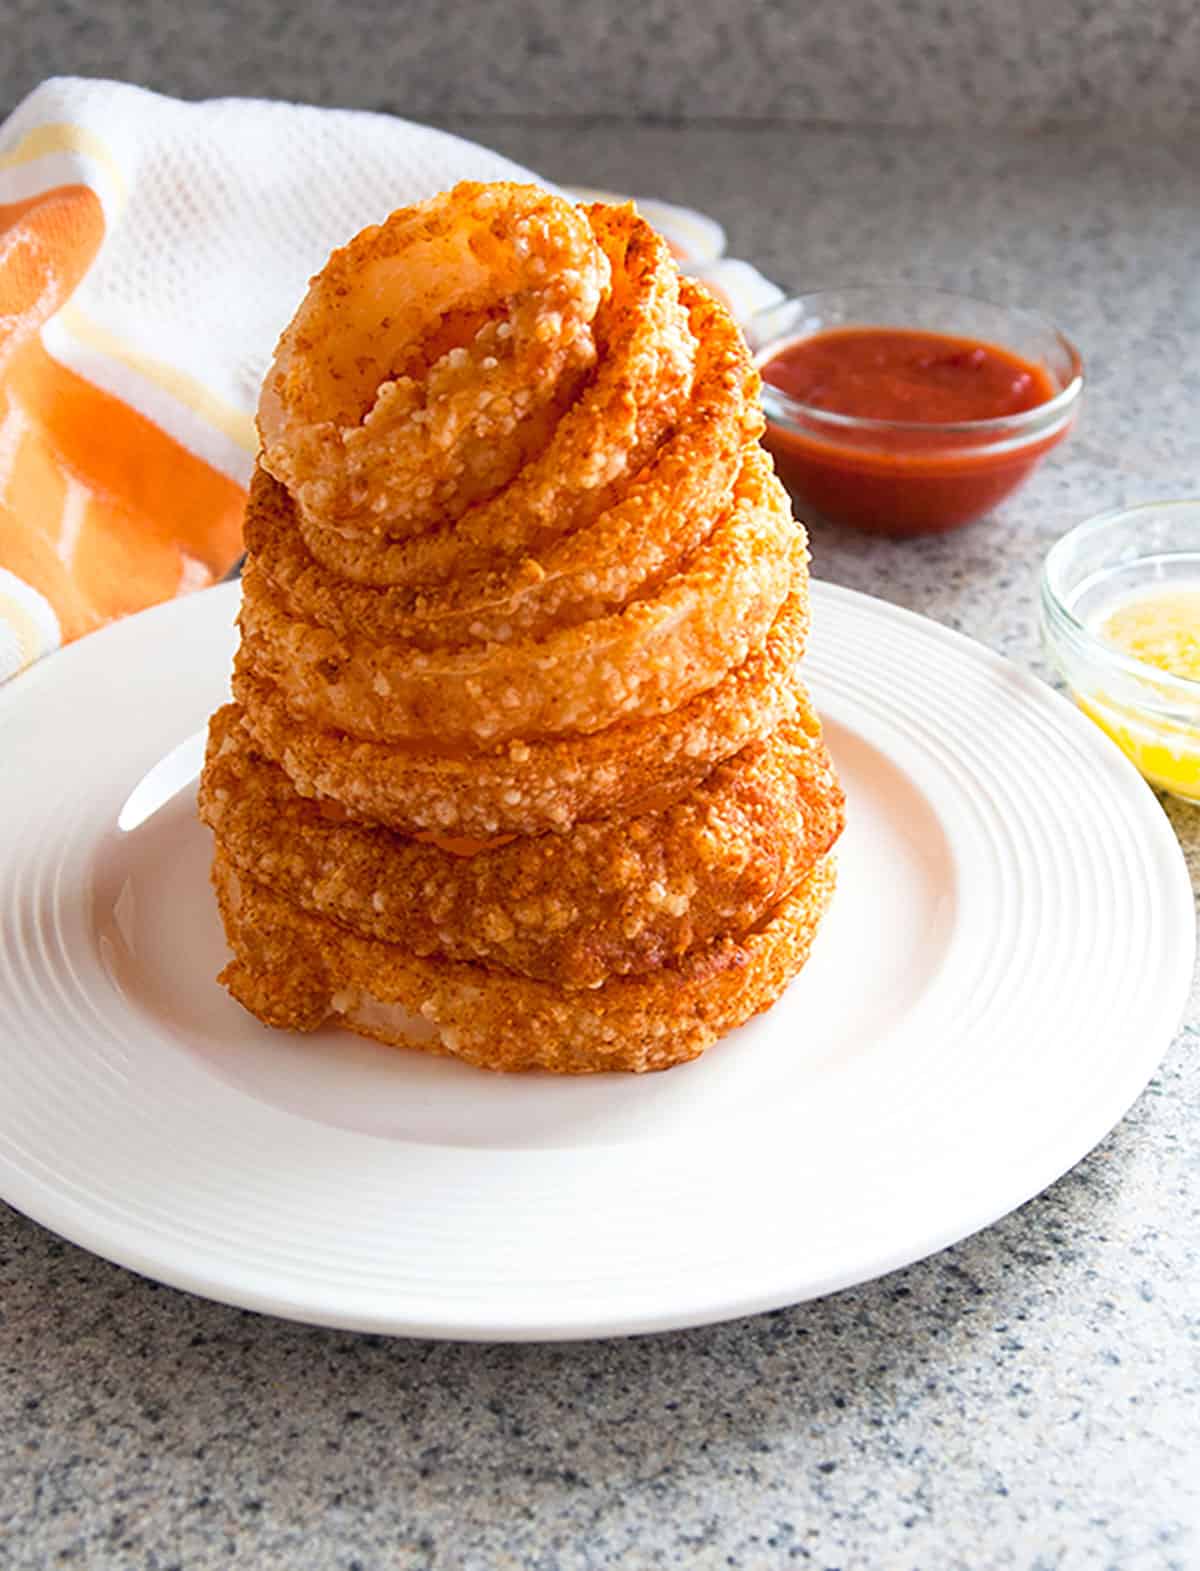
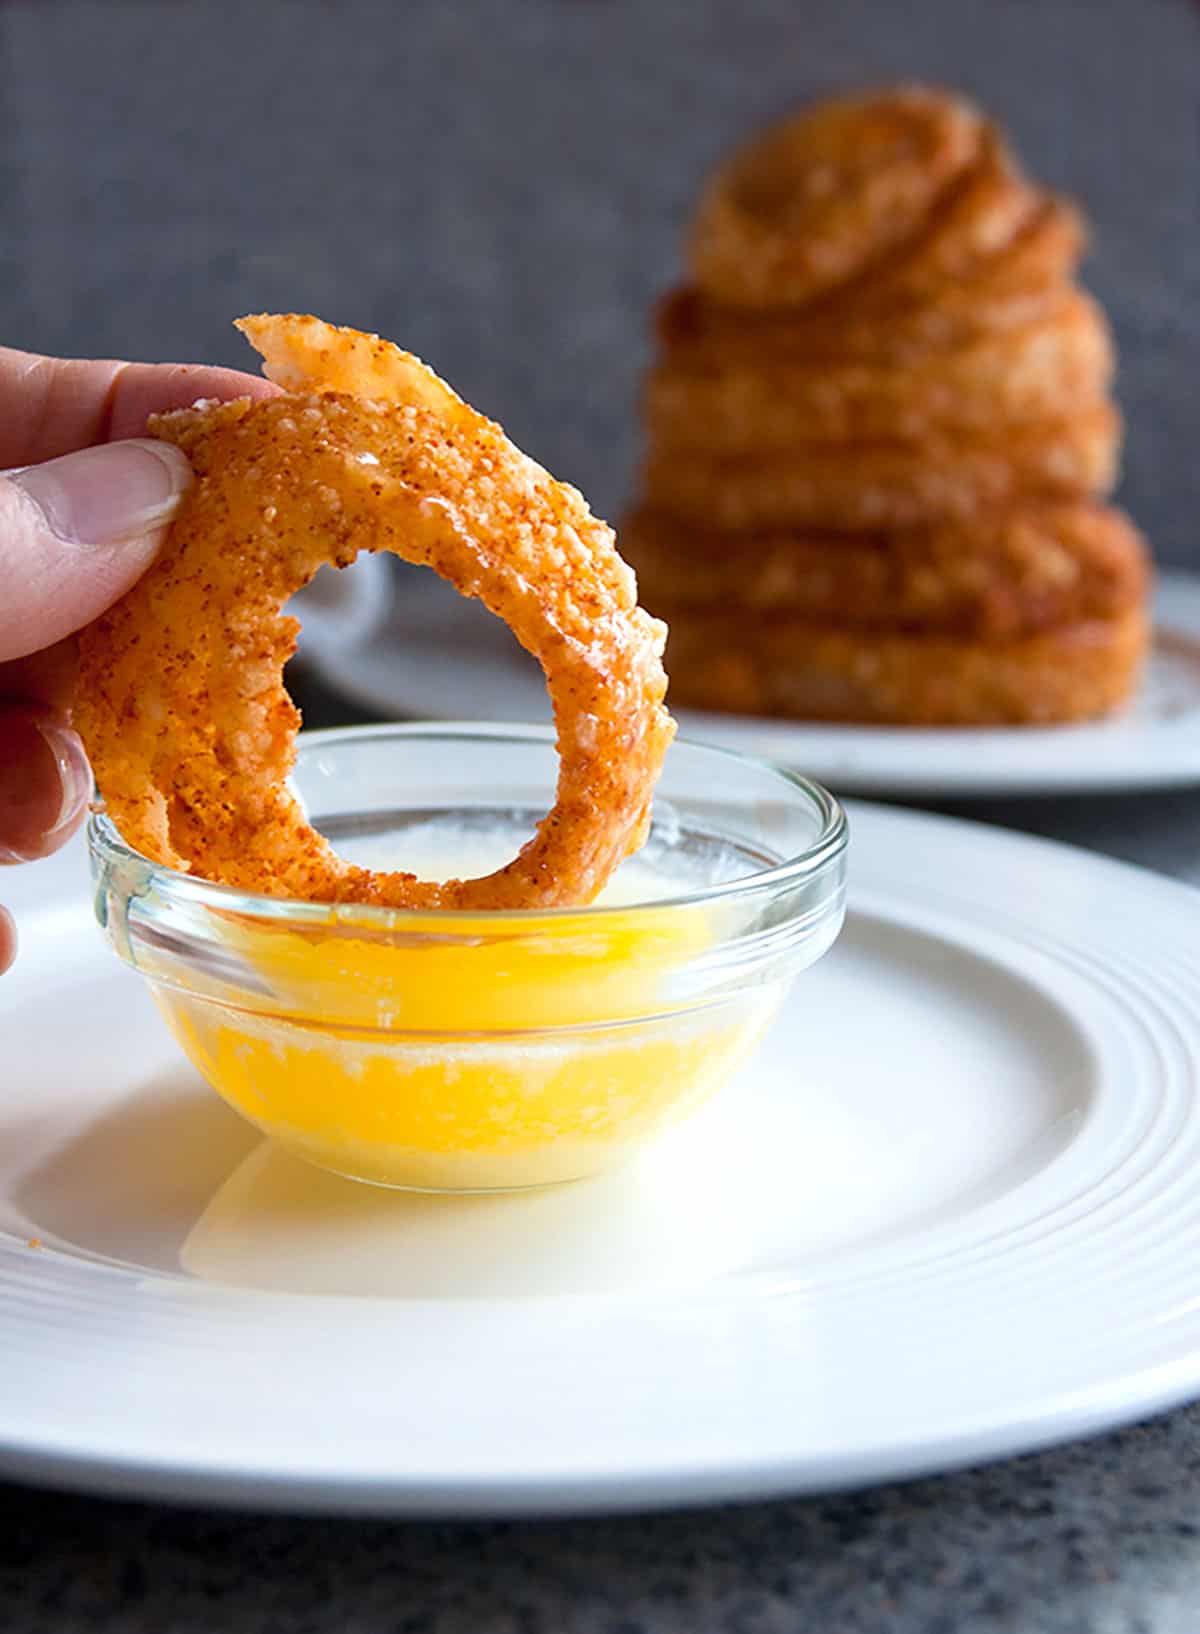
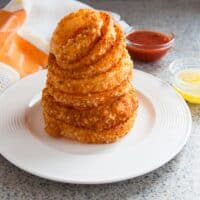
You'll love these baked Gluten-Free Onion Rings! Instead of bread crumbs, they feature a crispy coating of garlicky Parmesan cheese. Enjoy these oven-fried onion rings plain, dipped in melted butter or dunked in marinara!
Without question, these gluten-free onion rings are the most tested recipe on Cooking with Mamma C. I stopped counting after nine versions.
You see, I had a vision for crispy, oven-baked onion rings without bread crumbs. I wanted to use seasoned Parmesan as the "breading." And I wasn't giving up until I got it right!
So, I kept going, sometimes baking just one or two rings at a time to test my latest theory of how to get the coating to adhere, how to make the onion rings crispy and how to prevent the Parmesan from burning on the bottom.
I wanted to model these after our beloved Baked Chicken Drumsticks, Parmesan-Crusted Cod and Baked Garlic Parmesan Shrimp.
I savored every taste test - even the "fails" were delicious! After all my testing, I finally found the best way to make these baked homemade onion rings work.
Why this recipe works
- Corn starch (my secret ingredient) makes them crispy.
- Frothy egg whites help the coating to adhere.
- A mesh cooling rack (affiliate link) placed on the baking sheet and topped with the rings allows the air to circulate and prevents burning.

Even if you don't follow a gluten-free diet, you've got to try these crispy onion rings! They're simply the best.
Recipe ingredients
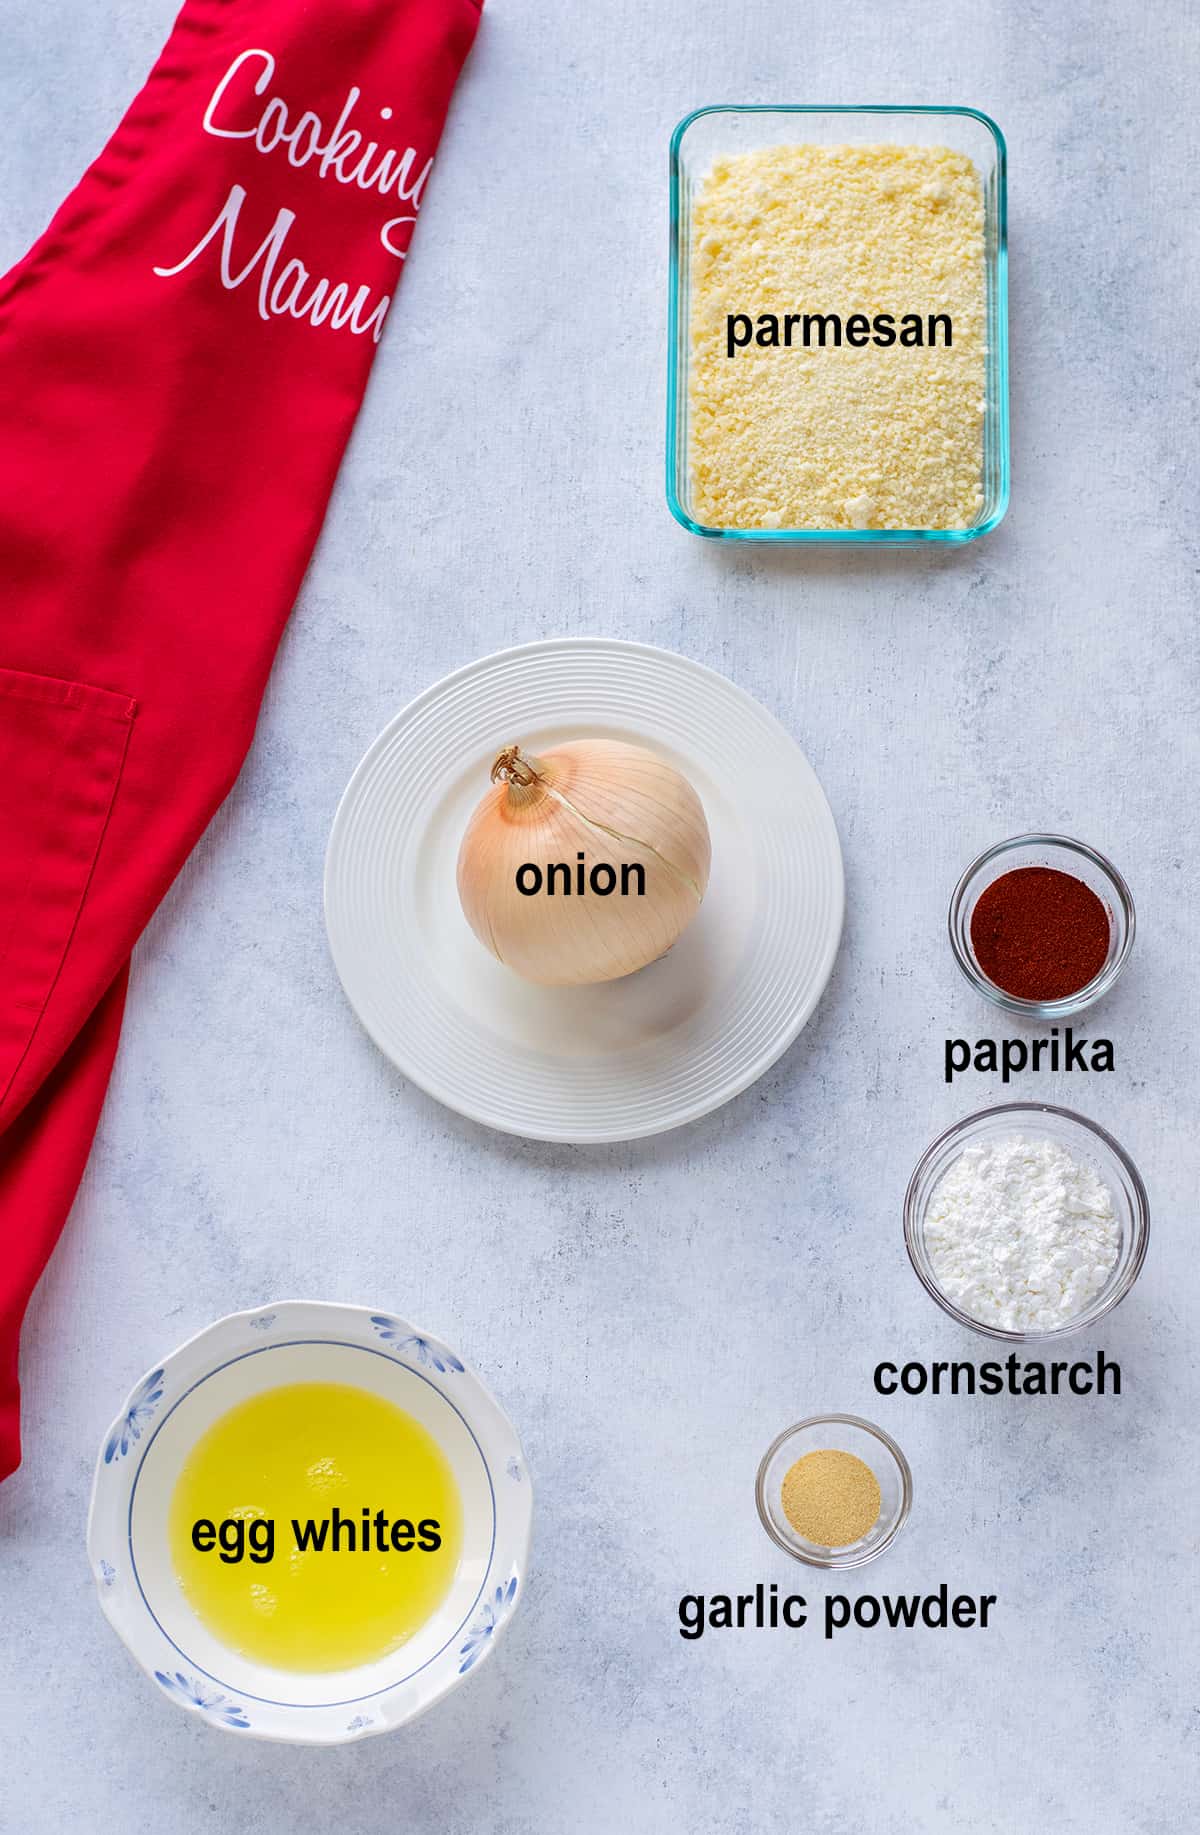
Onions: I prefer using sweet onions for onion rings. White or yellow onions also work, but they have a stronger taste.
Parmesan: Use freshly grated Parmesan cheese to give your onion rings the perfect texture and flavor. I cut a triangle of Parmesan into chunks and grate them in my Vitamix blender (affiliate link).
Corn Starch: This is the secret ingredient for crispy, baked rings! Note, cornstarch is not keto-friendly. So, this gluten-free onion ring recipe isn't for someone following the keto diet.
Egg Whites: Use fresh egg whites, not the liquid ones you find in a carton. Frothing your egg whites will help adhere the corn starch and Parmesan coating.
How to make gluten-free onion rings
See the card at the end of this post for the full recipe, but here's an overview.
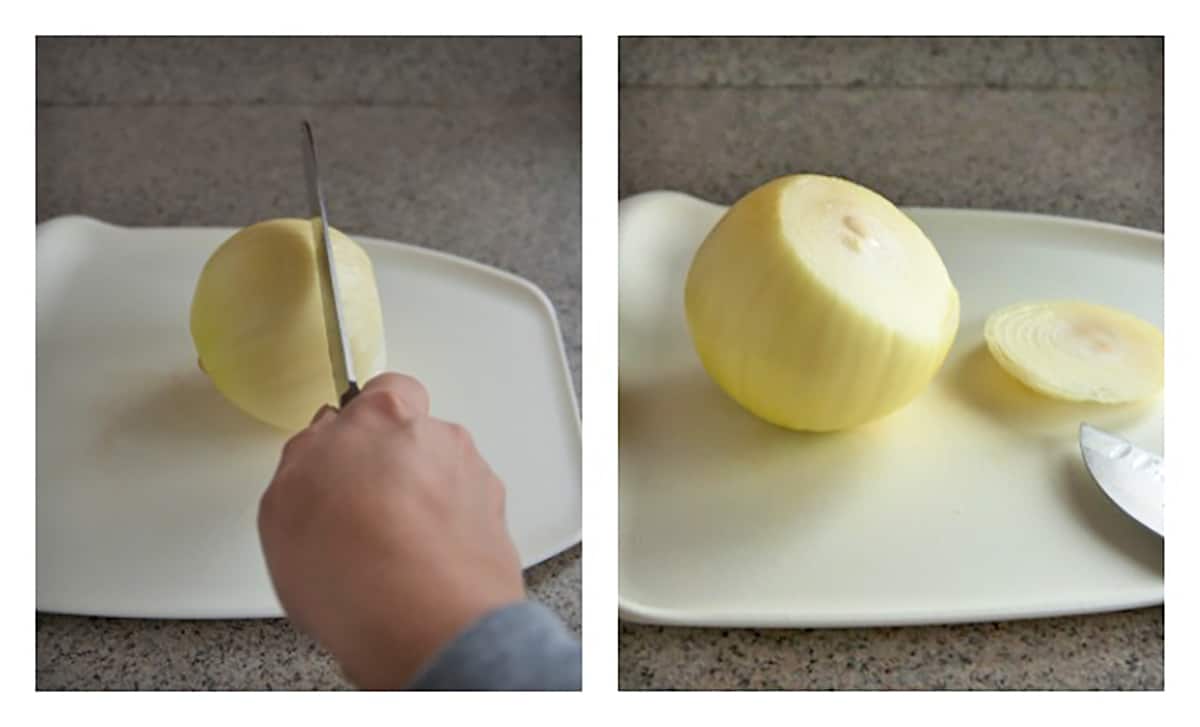
Slice the onion into rings
Position the peeled onion so the root and stem ends are on each side. Slice downward to make ½-inch thick circles. Push through each circle to separate the rings.
Dip the onion rings
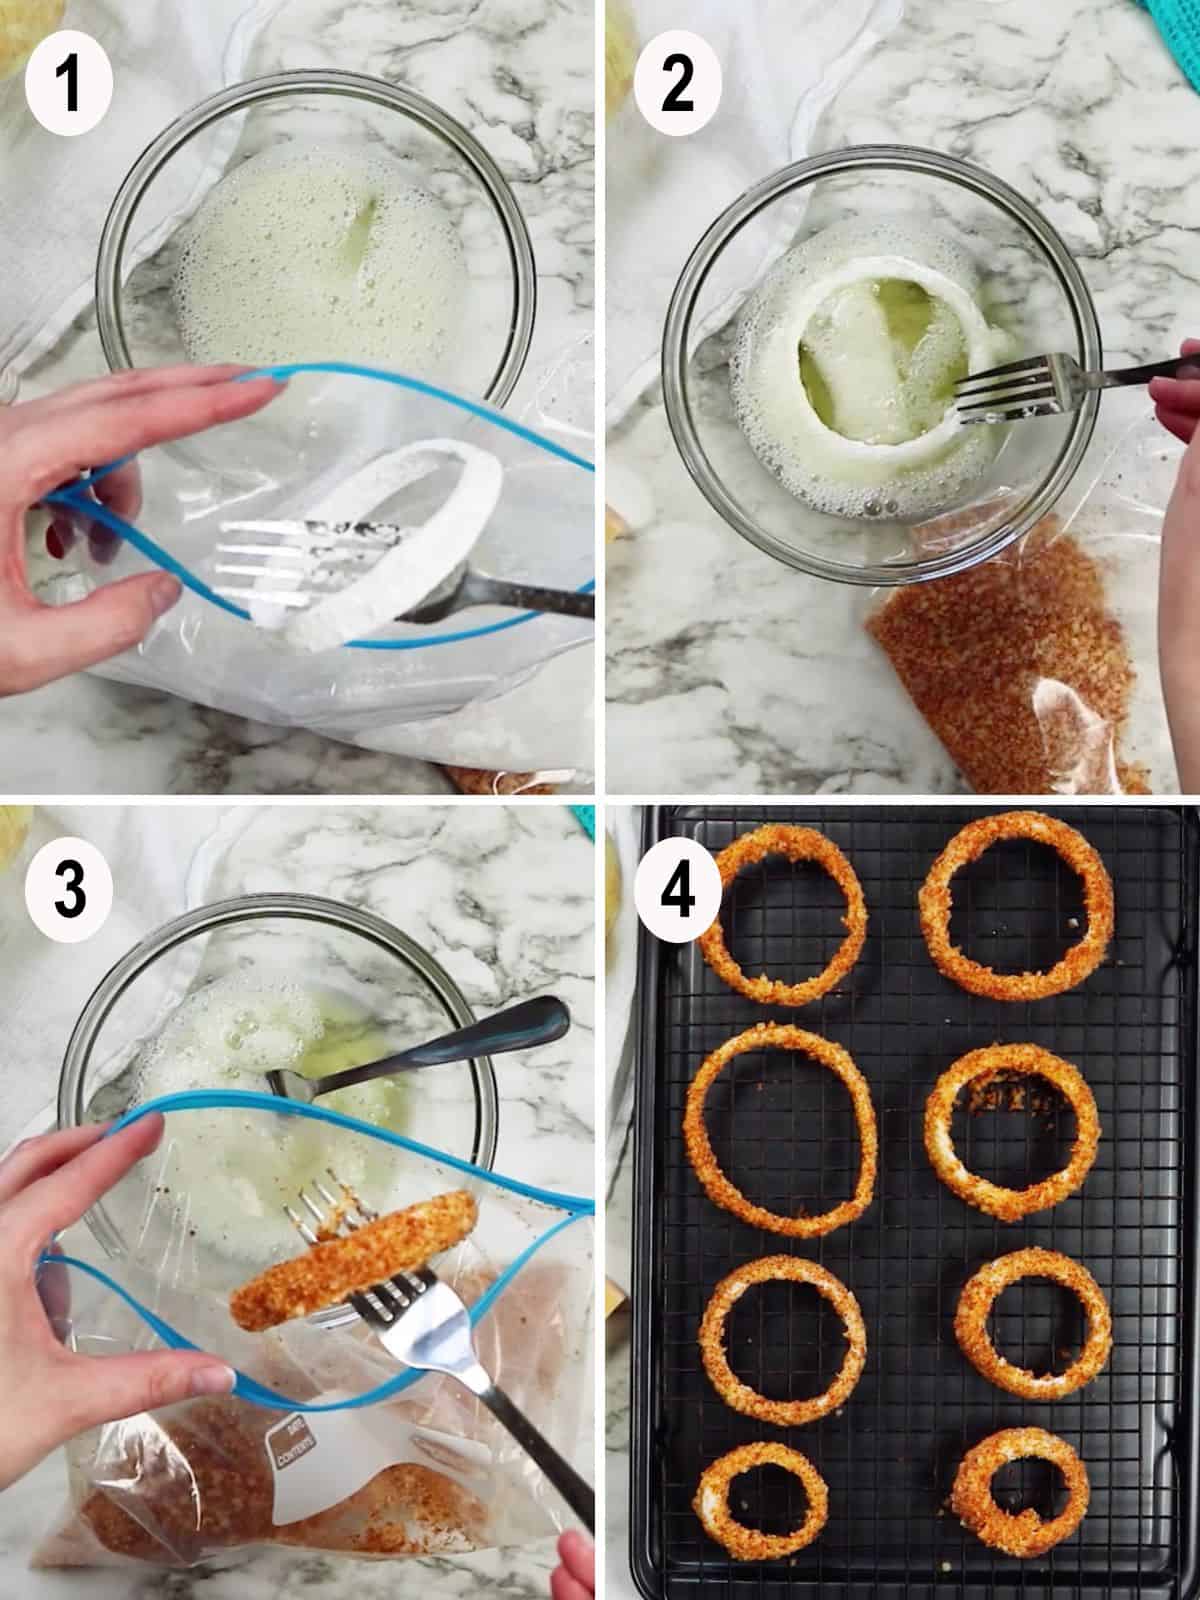
- Dip each onion ring into the corn starch and shake the bag.
- Dip the ring into the beaten egg whites.
- Place the onion ring in the Parmesan mixture and shake the bag to coat the onion evenly.
- Place the battered onion rings onto a mesh baking rack set in a sheet pan.
- Bake!

Recipe tips
- Placing 2-3 onion rings at a time in zip-top plastic bags (affiliate link) with the dry ingredients makes it easier to fully coat the rings.
- Be sure to change the plastic bags when the contents become soggy.
How to serve them
These baked onion rings make an excellent appetizer! Melted butter makes the best dipping sauce, complementing the garlic flavor in the cheese coating.
You also could dunk these in a simple marinara sauce.
They're also a great side dish! Serve the cheesy onion rings alongside steak pinwheels, spinach-stuffed meatloaf, glazed pork tenderloin or burgers on quick hamburger buns.

Frequently asked questions
If you own an air fryer, use that to reheat the onion rings, so they'll be crispy. Spray them with oil first.
You also could use the broiler for crispy results. Spray the rings, then broil two minutes per side. Spray the second side as well.
Yes! Allow your leftover onion rings to cool before placing them in a single layer on a parchment-lined baking tray.
Then put them in the freezer for at least an hour until frozen. Once the onion rings are frozen, transfer them to a large zip-top bag for up to three months.
More appetizers to love
Enjoy!
Watch the video to learn how to make Parmesan Gluten-Free Onion Rings and please leave a comment and a rating if you make them!
Parmesan Gluten-Free Onion Rings
Video
Equipment
- 5 zip-top bags (quart or gallon size)
Ingredients
Onions
- 1 pound sweet onion (1 large)
- ½ cup cornstarch
- 4 egg whites (don't use the liquid ones in a carton)
Parmesan Coating
- 2 cups grated Parmesan cheese (finely grated fresh Parmesan)
- 4 teaspoons paprika
- 1 ½ teaspoons garlic powder
Dipping Sauces
- Melted butter optional
- Marinara sauce optional
Instructions
- Heat your oven to 400 degrees F. Peel the onion, rinse it and pat it dry. Slice off the root and stem ends. Slice the onion into circles ½-inch thick (see photos). Separate the onion into rings by gently pushing through the center of each slice.
- Place the corn starch in a quart- or gallon-sized plastic Ziploc bag. Stir the Parmesan coating ingredients together in a small mixing bowl. Place about a fourth of the Parmesan mixture into another Ziploc bag. (Later, when the cheese coating gets soggy and is almost gone, you will get a clean bag and add more of the Parmesan blend from your mixing bowl.)
- Place two egg whites into a liquid measuring cup or a soup bowl. Use a fork to beat the egg whites until they are a little frothy.
- Set up an assembly line from left to right with the onion rings, the corn starch, the cup or bowl of egg whites, the bag of Parmesan coating, and your baking sheet that has a wire mesh cooling rack placed on it. (See photos.) Have three forks ready: one for the corn starch, one for the egg whites and one for the cheese coating.
- To dip, place an onion ring into the bag of corn starch, hold the bag closed, and shake it a bit until the onion ring is coated inside and out. Use a fork to loop inside the ring and lift it out, shaking off excess corn starch into the bag.
- Drop the onion ring into the egg whites. With your egg white fork, scoop the egg whites over and inside the onion ring to coat it. Lift the ring out of the egg whites, letting any excess drip off.
- Next, transfer the onion ring to the bag of Parmesan coating. Close the bag and shake it until the ring is coated inside and out. Use your Parmesan fork to lift out the onion ring and shake off excess cheese into the bag.
- Place the coated onion ring onto the rack in your baking pan. Continue the process, adding two onion rings at a time (or a little more if they fit) to your corn starch bag. Remove one ring at a time from the corn starch and continue dipping that ring until it's ready to be placed on the rack. It helps to place rings of similar size next to each other on the rack, and you should be able to fit about 12 rings at a time on the rack.
- Bake the onion rings for 11-14 minutes, or until they are crispy and reddish golden. Mine take 13 minutes, but it will depend on your oven. Don't let them burn.
- While the first pan is baking, you can proceed to dip and coat the rest of the onion rings. You will need to use your other two fresh egg whites to replenish the cup or bowl of whites. You also will use a clean bag for more of the Parmesan mixture. (Change the bag as needed.)
- Discard the bags with leftover corn starch and leftover Parmesan mixture. If you have any leftover Parmesan blend from your mixing bowl, and it has not touched the raw egg whites, you can save it for another use.
- Serve the onion rings plain or with melted butter for dipping, if desired. You also could use marinara.
- Store leftovers in a tightly closed container in the refrigerator for up to five days.
Notes
- I'm counting four onion rings as an appetizer serving.
- The onions themselves (inside the crisp coating) are crisp-tender after being baked. If you want soft onions on the inside, you have to soak them for 30 minutes in ice water, then pat them dry before dipping them. I found them too soft that way.
Nutrition
(Recipe Source: Cooking with Mamma C. Originally published on February 3, 2017 and updated now with additional photos and information.)


Sandra says
Do you use Fresh parmasan or the "powdered" kind aka kraft? How do get the parm, if it's fresh, small enough?
Mamma C says
Sandra, I only buy fresh Parmesan, so I've never tried it with the powdered kind. I use my Vitamix to blend up chunks of Parmesan until it's the consistency I want. A regular blender should work as well.
Karen Jansen Gillig says
Nevermind....Just needed to read the directions better. Thanks.
Mamma C says
No problem, Karen!
Karen Jansen Gillig says
I don't understand the use of 2 bags. Wouldn't you lose the cornstarch since it was in the first bag?
Cheryl "Cheffie Cooks" Wiser says
Baked Onion Rings on tap (with a multitude of other things good to eat) for Super Bowl Sunday. These sound so yummy - I love onion rings baked! Woo-Hoo Andrea. xo
Mamma C says
Baking them is definitely easier. Thanks, Cheryl! xo
Lexy says
OH MY.....I can't wait to try these and to thank the Lord I just found and subscribed to your posts last week. What a winner/pinner this is. My question is....if I only want to do one big onion for the one big me do you think it would be better to do just one small/med. onion instead? Should I cut the ingredients in half? OR, maybe they freeze ok...have you ever tried?
Mamma C says
I'm so glad you subscribed, Lexy! I haven't tried freezing these. I'd say just make a smaller onion. If you get one that weighs half a pound, you can cut the ingredients in half. At any rate, you can always start by reducing the recipe but have extra ingredients on hand if you need them. I hope you enjoy these!
Christine says
Yum - those onion rings looks delicious! Perfect for Game Day!
Mamma C says
They're so addictive! Thanks, Christine.
Tina Dawson | Love is in my Tummy says
OMG! OMG! OMG! I LOVE onion rings and I did not know you can bake them!!!!!!! I am doing this as soon as possible!!!!
Mamma C says
Hahaha! I love your reaction, Tina! I feel the same level of excitement about these. I hope you enjoy them!
Erren says
Never seen a recipe for onion rings yet! These look amazing!
Mamma C says
Thanks, Erren!
Lisa | Garlic & Zest says
All of your testing and hard work have paid off -- these look absolutely stellar! Frankly, this is just what I want to go with my burger for the super bowl!
Mamma C says
I'm so glad to hear that, Lisa! I hope you give them a try! Thank you.
Katrin says
Love this recipe! Knowing it has been tested 9 times means it's got to be more than perfect. Sounds delicious
Mamma C says
All the testing was worth it. Thanks, Katrin! 🙂